Showing posts with label Stitching. Show all posts

Thursday, January 19, 2023

Spellbinders January 19th Clubs Blog Hop + Giveaway!


Hello, crafty friends!
I'm happy and honoured to be joining Spellbinders for the January 2022 Clubs Inspiration Blog Hop today. Spellbinders is celebrating all their Club Kits in shop for January 2023.

If you arrived here from the wonderful, Michelle Short's Blog, then you are on the right track. If this is your first stop, then you will want to start at the beginning, the Spellbinders Blog. We've got tons of inspiration and giveaways for you on the hop today, so keep reading till the end of this post for more information.

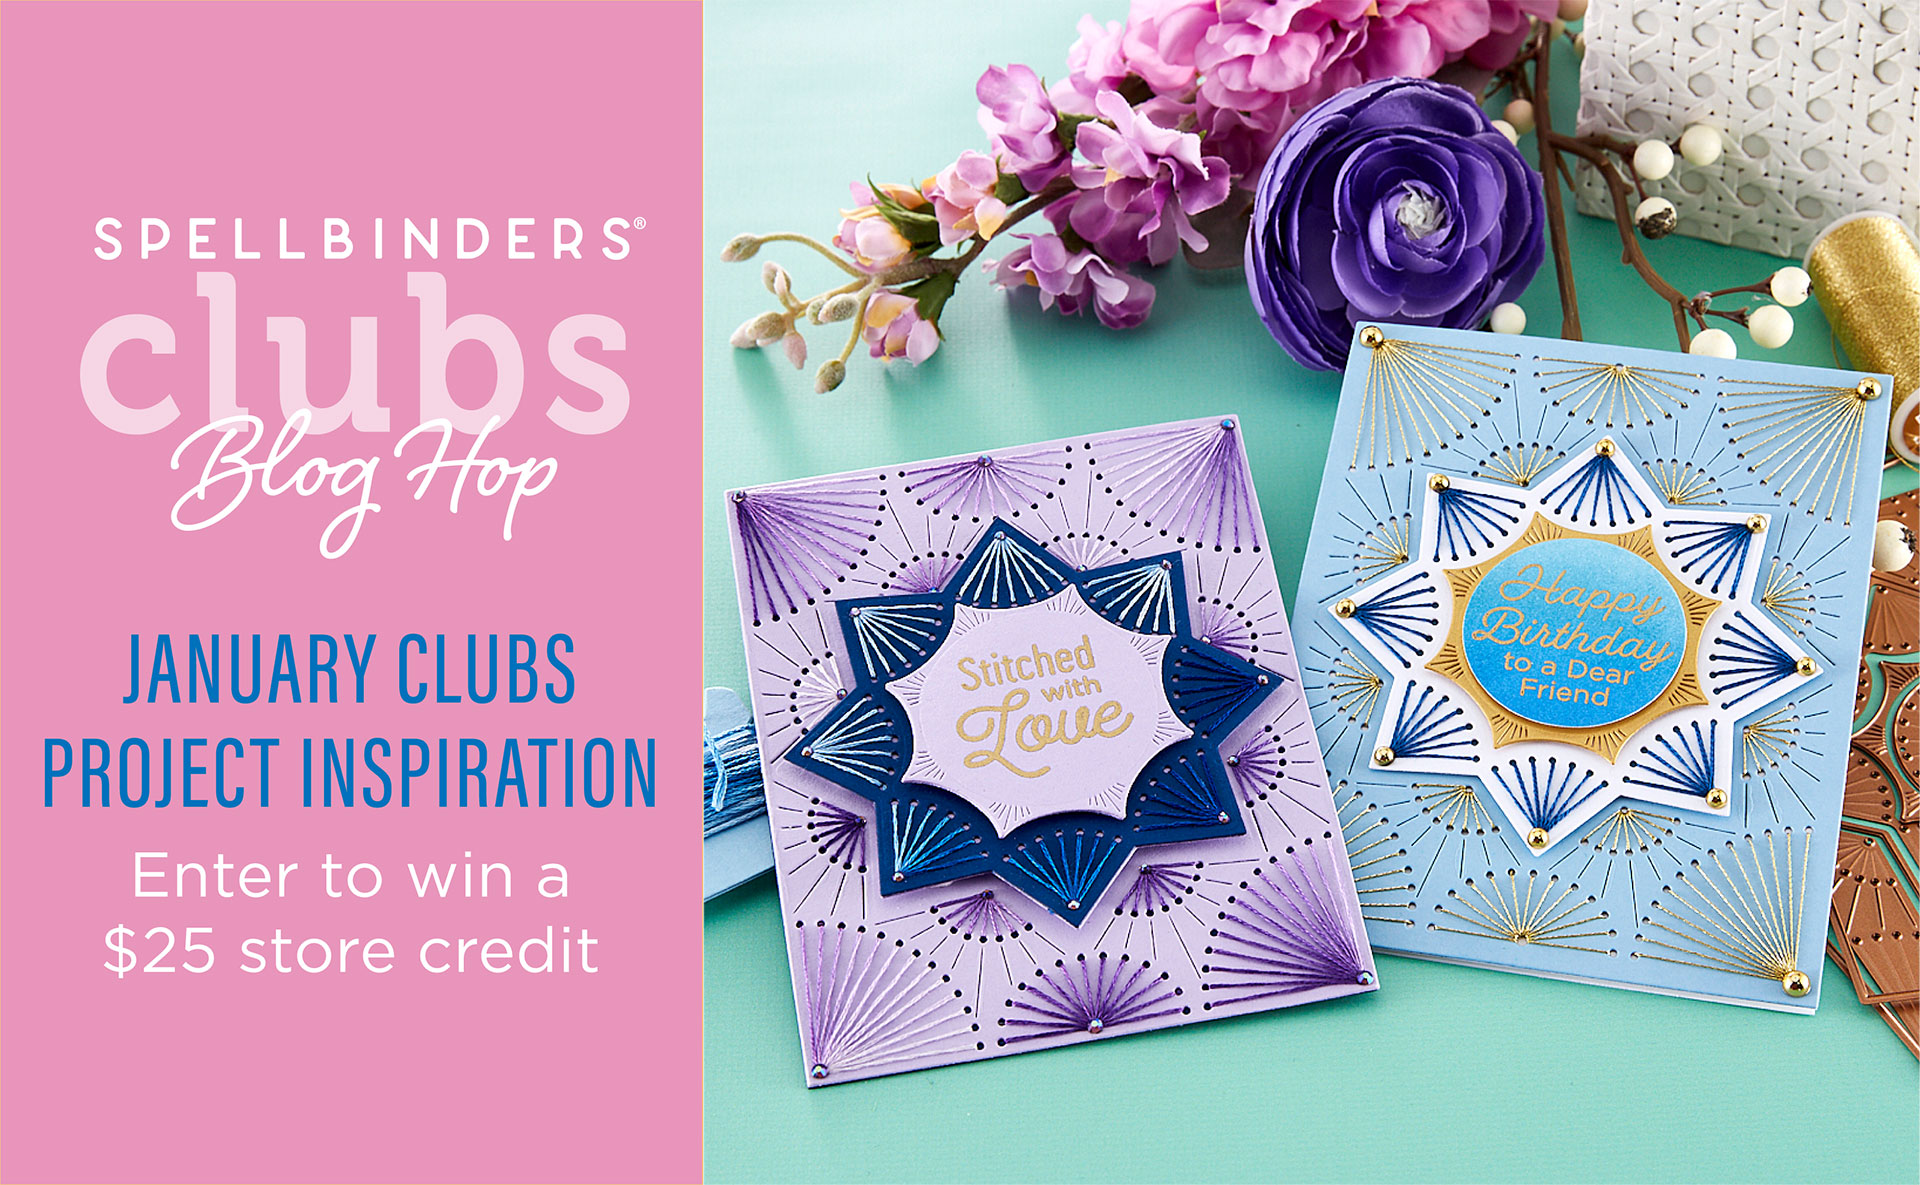
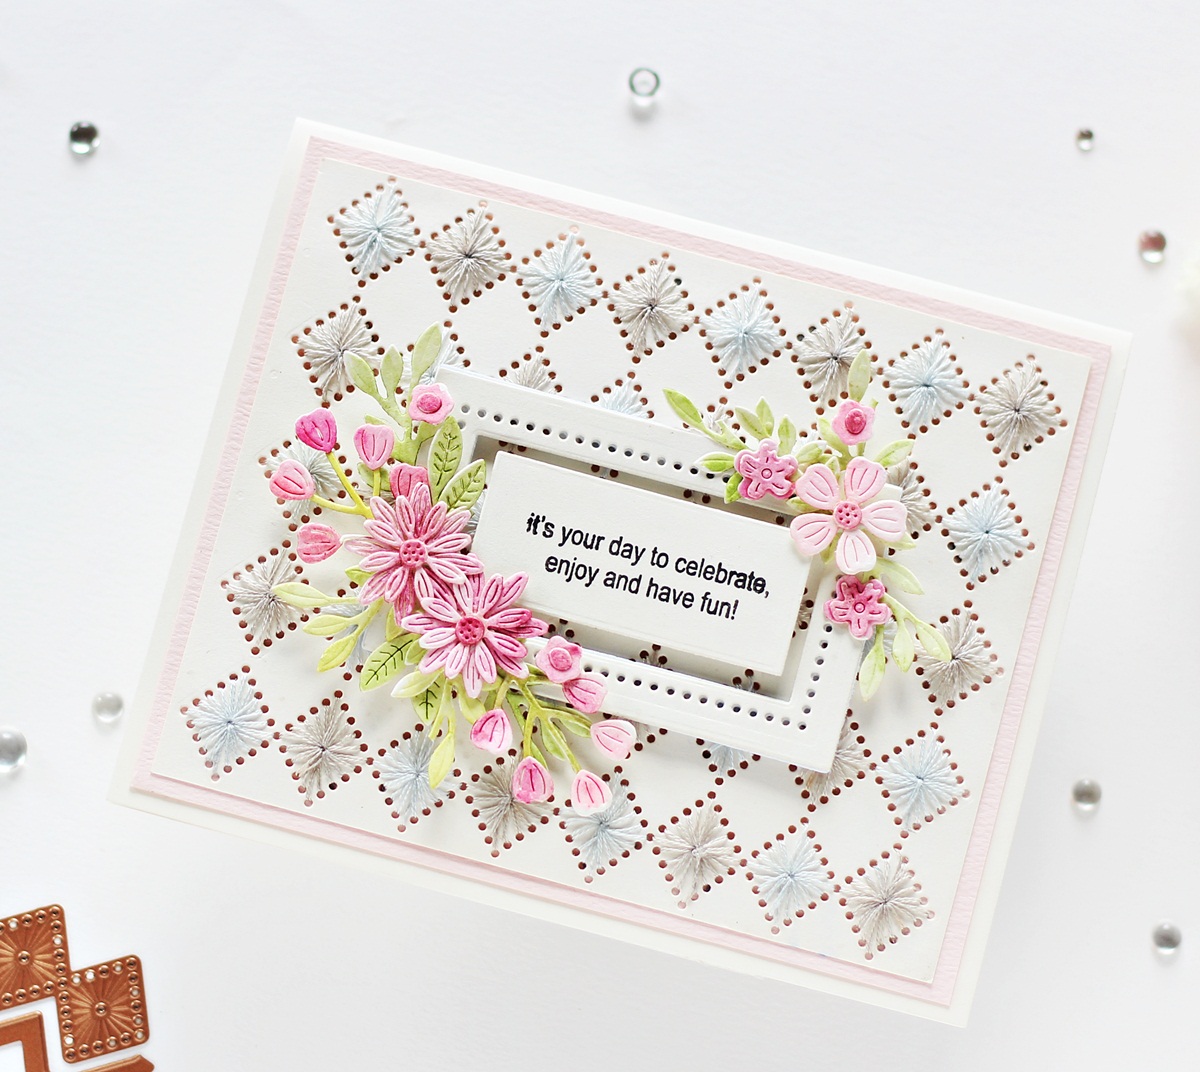
I am excited to share with you a thank-you card I created using the Stitching Die Club of the Month - Nested Stitched Burst from Spellbinders. Spellbinders has just introduced this NEW Club from this month, and it is such a beautiful one. 

 Join the NEW Stitching Die Club of the Month and receive an expertly designed die set each month, complete with inspiration. 

To create the card, I used three different shades of orange floss from the DMC Color Essentials Floss Bundle Warm 10-Pack. I began by die-cutting the main panel using a piece of Cream Cardstock. This gave me a base with a perforated grid to do my stitching.

Next, I cut out the center panel, which is also a part of this die and added some stitching using a light coloured thread. To add some extra detail, I added some Gold Pearls to accentuate the design. I then die-cut two other circles from this die set and layered them using some foam tape.

This month also features an optional à la carte clear stamp set that coordinates with the Stitching Die Club of the Month called the Sentimental Greetings Clear Stamp. I used a sentiment from this set and stamped it in the center of the circle die-cut piece.

Finally, once I had stamped and heat embossed my sentiment using Clear Embossing Powder, I cut out some flowers and leaves using the Be Bold Blooms Etched Dies from the Be Bold Collection and I Dance Etched Dies.  Then, I colored my florals using some OLO Coral Tones Alcohol Markers Set and the leaves using the OLO Forest Alcohol Markers. I assembled the pieces on to my card panel using foam tape. Then, to complete, I mounted my card panel to an A2 top-folding card base using tape runner.

Giveaway:
To celebrate this release, Spellbinders are giving away a $25 gift certificate to 3 lucky blog readers – selected from the comments on our blog. Giveaway closes on Sunday, January 22nd, 11:59 pm MST. The winner will be announced in this blog hop post the following Wednesday. The winner is responsible for shipping costs, duties, and taxes.

Please note, store credit (gift certificate) cannot be applied to Club Subscriptions. Store credit can be applied to shop past Club products, Club extras and regular releases.

Blog Hop Order:
Next Stop on this Blog Hop is, Jumi Baek's blog. Just in case you lose your place along the way, here is the complete list of participants so that you can find your way back:


                         Hussena Calcuttawala (You are HERE)

Well, that’s all for my project today! Thanks so much for stopping by and reading. I hope you have a wonderful day!

If you like what you've seen from me, please give me a follow over on my Instagram (@hussena_cal) and/or subscribe to my blog if you haven't already.

Wednesday, September 29, 2021

Spellbinders Merry Stitchmas Collection


Hello everyone!
I hope you are doing well. I am very excited to share a set of cards today showcasing the Spellbinders Merry Stitchmas Collection. If you’re brand new to stitching dies, don’t worry at all, because these dies are super easy to work with and you’ll get the hang of them very quickly! 


My first card features the Circular Stitch Background Etched Dies, the Pop Up 3D Vignette Poinsettia Sleigh, the Shapeabilities Swirl Tags Dies, and the Petite Floral Potpourri Etched Dies.

This Circular Stitch Background Etched Dies set will add detail and texture to your holiday projects and is versatile enough to use all year long. The Circular Stitch Background die set contains two dies – Outline as well as a stitch-able insert. It's perfect for creating a stitched background on an A2 card base and has an intricate pierced pattern. Stitching brings out the beauty of this design, but is an option - You can also just die cut and emboss to highlight the lines and layer onto the A2 card front. The other thing I love about this die set is that the possibilities are endless. Just by changing the colors of card stock and floss you use you can get so many different looks. 

To create my card, I used the Circular Stitch Outline die to cut the background panel out of Alabaster Cardstock. Next, I stitched the entire design with light peach embroidery thread. I split the thread in half so that the 6 strands become 3, then thread a needle, and began stitching. I worked from the area in the middle out to the edges, but you could really stitch in whatever order you like! If you’ve never stitched like this before, do not worry, for there are templates included to help you figure out where to put your needle! 

Next, I die cut Alabaster Cardstock using the various poinsettia dies included in the Pop Up 3D Vignette Poinsettia Sleigh Set. I coloured each of the pieces using Mermaid Markers from Jane Davenport and embossed the centres using the 2mm and 5mm ball stylus tips from Susan's Garden Ultimate Tool Kit. I added some glitzy jewel stickers in the centres of the flowers to give them more definition. The leaves and sprigs were die cut out of Snowdrift Cardstock again using dies included in the Pop Up 3D Vignette Poinsettia Sleigh Set and the Petite Floral Potpourri Etched Dies. These were coloured using Mermaid Markers from Jane Davenport too. Then, I shaped the die cut pieces using the 2mm ball stylus tip from Susan's Garden Ultimate Tool Kit. I adhered the flowers and leaves to my panel using hot glue.

Once that was done, I die cut Vellum and Snowdrift Cardstock using the scalloped tag dies in the Swirl Tags Etched Die Set. Next, I stamped my sentiment to the die cut piece using Versafine Onyx Black ink and then attached it to my project using foam squares. I then matted my card panel to a piece of Snowdrift Cardstock before adhering it to an A2-sized top-folding white card base using liquid glue. I added some light blue rhinestones in the centre of each of the stitched circles as the finishing touch. 


This is a set of three thin metal dies and the diamond insert cuts dots to act as a guide for stitching a diamond pattern. You can also use the design as is because the embossed lines have faux stitched details. One can also add the split rims together with the insert for a wonderful border or a single die to create a decorative edge! It's a versatile set and can be used in a number of ways. I decided to create an entire card panel using the design!

To create my card, I used the diamond insert die to cut the design in the centre of my panel on Snowdrift Cardstock. Then, I went ahead and die cut it four more times to create my background panel. Next, I stitched the entire design with sky blue and grey embroidery threads. I split the thread in half so that the 6 strands become 3, then thread a needle, and began stitching. This was very therapeutic to do and quite fun too! 

Once I finished stitching on the entire panel, I die cut Snowdrift Cardstock using the medium frame die in the Hemstitch Rectangles Etched Die Set. I then cut the centre of the die cut piece using a coordinating rectangle die from the A2 Matting Basics A Card Creator Etched Die Set. Next, I die cut another rectangle, albeit a little smaller, from Snowdrift Cardstock. I stamped my sentiment on to it using Versafine Onyx Black ink and then adhered both the frames down to my panel using foam squares. 

Next, I die cut Snowdrift Cardstock using the floral and leaf dies included in the Simply Perfect Layered Blooms Etched Dies and the Mini Blooms and Sprigs Etched Dies. I coloured the pieces using the Mermaid Markers from Jane Davenport and then adhered them around the frame using foam squares. 

I matted my stitched panel to a panel of Pink Sand Cardstock before adhering it to a top-folding white card base with liquid adhesive. I love how this card came together. What do you think?


I hope you liked my cards featuring the Spellbinders Merry Stitchmas Collection and thanks so much for stopping by today. Are you going to try some stitching on your cards? I'd love to know!

Don't miss out on the MASSIVE Jane Davenport Sale going on now with up to 60% off select Jane Davenport art supplies, stamps, and more through Sunday, October 3rd!

If you like what you've seen from me, please give me a follow over on my Instagram (@hussena_cal) and/or subscribe to my blog if you haven't already.