Hello everyone!
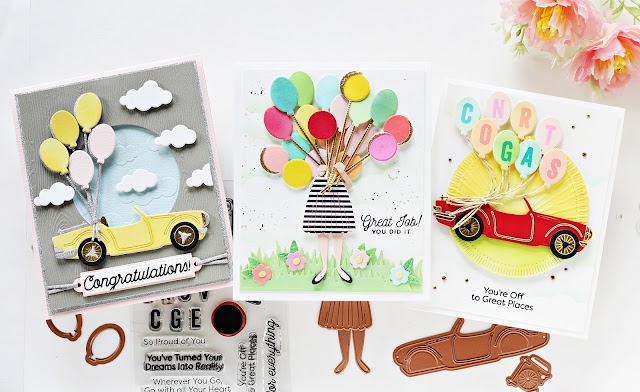
I am so excited to be guest designing on the Spellbinders blog. I have three projects to share with you today highlighting the NEW Open Road Collection. The wonderful and fun products in this collection inspired me to create a set of three cards perfect for sending to your friends and family!
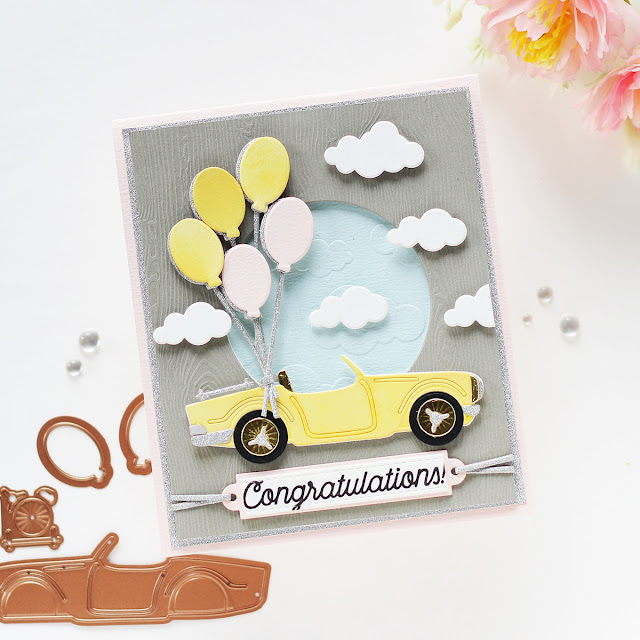
My first project features the Open Road Etched Dies, On Cloud Nine Etched Dies, Head in the Clouds Embossing Folder, and the Open Road Sentiments Clear Stamp Set. I LOVE the convertible die in the set and used it to create soft pastel card for a friend. It was so fun to create this one!
To begin, I embossed the Head in the Clouds Embossing Folder on a piece of 4” x 5 1/4” Waterfall Cardstock. Next, I trimmed a piece of Grey Woodgrain Paper to size and die-cut a circle in the middle of the pane using the Circle Shape Medium Die from the Essential Circles Die Set. Once that was done, I die-cut White Foam using the same die and adhered the two panels together with Craft Glue.
Next, I die-cut Snowdrift, Pink Sand, Silver Glitter Paper, Onyx, White Foam, and Mirror Gold Cardstock using the Open Road Etched Dies and assembled the car with liquid glue. Then, I blended Squeezed Lemonade and Scattered Straw Distress inks over the convertible and the balloon die-cut pieces using a sponge dauber for depth. I adhered all the pieces down on my panel with Craft Glue.
Next, I die-cut Silver Glitter Paper using the Ribbon/Twine die included in the Assorted Tags Etched Die Set and grouped the die-cut pieces together to create the balloon strings. Next, I die-cut Snowdrift Cardstock using the On Cloud Nine Etched Dies and adhered them down on the card panel suing foam adhesive for a raised effect. Once that was done, I die-cut Pink Sand Cardstock using the large label from the Sentiment Labels Die Set. Next, I stamped a sentiment from the Open Road Sentiments Clear Stamp Set to Snowdrift Cardstock using Versafine Onyx Black ink and cut it out using one of the inserts dies from the Sentiment Labels Die Set. Once that was done, I adhered the sentiment strip on top with liquid glue. Next, I die-cut Silver Glitter Paper using the twine die in the Sentiment Labels Etched Dies. I attached the sentiment label on the card using the twine and adhered it on top using foam adhesive.
To finish, I adhered the embossed panel to a piece of Silver Glitter Paper before adhering it to a top-folding A2-sized Pink Sand card base using tape runner.
My next card features the Open Road Etched Dies, I Dance Etched Dies. and the Sentiments for You Clear Stamp Set. I thought the balloons included in the Open Road Die Set were super fun on their own and just perfect for creating this easy and fun graduation card!
To start, I die-cut Barely Peach and Onyx Cardstock using the hand and leg dies from the I Dance Etched Dies. I assembled the pieces with liquid glue and die-cut BnW Stripes Patterned Paper using the skirt die included in the same set.
Then, I die-cut Snowdrift and Gold Glitter Cardstock using the balloon dies in the Open Road Etched Dies. I die-cut a bunch of them at once, so that I could use them later for other projects as well. Once that was done, I used an array of Distress Oxide inks to colour the balloons using sponge daubers. This took me some time to do, but I thoroughly enjoyed the process as it was very therapeutic. If you don't want to colour the pieces individually, you can die-cut the pieces from coloured cardstock scraps too.
Once that was finished, I die-cut Mirror Gold Cardstock using the Ribbon/Twine die included in the Assorted Tags Etched Die Set and grouped the die-cut pieces together to create the balloon strings. Next, I stenciled on the panel with a DIY stencil created using the On Cloud Nine Etched Dies and lightly inked it with Shabby Shutters Distress ink as a way to ground the pieces. Once that was done, I die-cut Snowdrift Cardstock using the grass blade die in the Besties Forever Die Set and the itty bitty flowers and leaves from the Be Bold Blooms Etched Dies. I blended Mowed Lawn Distress Oxide ink over the glass blades using a blending brush to colour them, while the flowers were coloured using Ripe Persimmon, Milled Lavender, Shaded Lilac, and Broken China Distress Oxide inks. I attached the pieces to the bottom of the panel using with liquid glue and adhered the flowers on the grass blades using foam adhesive for a raised effect. I then assembled the balloons and the skirt down on the panel using foam adhesive for dimension and interest.
Next, I stamped a sentiment from the Sentiments for You Clear Stamp Set onto the panel using Versafine Black Onyx ink and then used the Antique Gold Metallic Spray and Jet Black Ink Spray to make it extra artsy! To finish things off, I mounted the panel to an A2-sized top-folding white card base using tape runner.
My last card for today features the Open Road Etched Dies, On Cloud Nine Etched Dies, Fluted Classics Circle Etched Dies, and the Open Road Sentiments Clear Stamp Set. The convertible in the Open Road Die Set is super sleek and fun and can be customized with all of the little details included in the set. I added gold accents and colorful balloons to create this textured graduation card.
To begin, I trimmed a panel of Snowdrift Cardstock to 4 1/4” x 5 1/2” and stenciled on the panel with a DIY stencil created using the On Cloud Nine Etched Dies. I used Cracked Pistachio and Mowed Lawn Distress inks to apply ink over the top edge of the panel with a blending brush to give the illusion of blue skies.
Next, I die-cut Snowdrift Cardstock using the Medium Outer Rim and Insert dies from the Fluted Classics Circle Etched Dies. Then, I embossed the piece using the Radiant Burst Embossing Folder and inked the sides and the centre of the die-cut piece with Scattered Straw Distress Oxide ink on the top and Twisted Citron ink on the bottom using an ink blending tool to highlight and bring out the raised areas more.
Once that was done, I die-cut Poppy Field, Mirror Gold, Onyx Cardstock, and White Foam using the Open Road Etched Dies and assembled the car with liquid glue. Next, I die-cut Snowdrift Cardstock using the balloon dies from the same set. Then, I coloured the pieces using Spun Sugar, Dried Marigold, Broken China, Mowed Lawn, and Worn Lipstick Distress Oxide inks. Next, I stamped 'Congrats' from the Open Road Sentiments Clear Stamp Set on the pieces using closely coordinating ink colors and arranged the balloons in a cluster with a piece of masking tape. Then, I flipped them over and added foam adhesive, before flipping them back over and adhering them to the card front. Next, I cut several pieces of white and gold Baker's Twine and adhered them under the balloons for a realistic touch. I mounted the embossed circle on my panel using foam adhesive and then adhered the car over it using liquid glue.
To finish, I stamped another sentiment from the Open Road Sentiments Clear Stamp Set onto the panel using Versafine Onyx Black ink. I then adhered this panel to an A2-sized top-folding white card base using tape runner and added a few Gold Mix Color Essential Gems to embellish.
SPELLBINDERS SUPPLIES:
CS-002, CS-005, CS-010, CS-017, CS-027, CS-030, SCS-118, SCS-160, S2-328, S3-413, S3-427, S3-432, S4-1039, S4-1150, S4-1179, SES-028, ST-0147, MBR-EOM, TD055846, TD056294, TD056362, TD056119, TD056232, TD056218, TD056072, TD056188, AD-0084, MISTI, PCGO4E, PE-100, T-021, STP-066, SCS-129
OTHER SUPPLIES:
Neenah Solar White Cardstock, American Crafts Grey Woodgrain Paper, Citrine Glitter Cardstock, Cracked Pistachio Distress Oxide ink, Versafine Onyx Black Ink, MISTI Stamping Tool, Gold and White Baker's Twine, Antique Gold Metallic Spray and Jet Black Ink Spray, Tape Runner.
That’s it for today’s post! I hope you enjoyed it and have been inspired to create with these stunning dies and stamp from the Open Road Collection. Thank you so much for stopping by!
You can find more inspiration over at my Instagram page.


No comments:
Post a Comment