Hello, crafty friends!
I hope you're well and staying safe!
It's the start of a new month and I am so happy to be sharing two cards with you today featuring the NEW Stained Glass Bouquet Collection by Amazing Paper Grace.
A beautiful assembly of stained glass inspired patterns can be found in the Stained Glass Bouquet Collection from Amazing Paper Grace by Becca Feeken. Look at the wonderful details only seen in these amazing works of colored glass art.
I have made a set of cards using the Radiant Oval Etched Dies and the Deco Bloom Etched Dies. I simply love the intricate background dies and the pretty flower dies in this collection.


I created a textured glass design for my first card featuring the Radiant Oval Etched Dies and the Deco Bloom Etched Dies.

To create my card, I first die cut Gold Mirror Cardstock and White Cardstock using the floral swag outline and insert dies from the Radiant Oval Etched Dies. I then die cut Pink Sand Cardstock and Gold Mirror Cardstock using the oval rim and insert dies from the Radiant Oval Etched Dies.

I coloured the white floral die-cut pieces using alcohol markers and let dry. Then, I adhered the oval frame and floral swag outline die-cuts to their backer dies with liquid glue and foam tape. I also adhered the coloured insert pieces back into the gold foil outlines and reassembled the shapes. Then, I slightly offset the gold oval frame to the back of the pink die-cut before adhering for visual interest and dimension. Next, I die cut Pink Sand Cardstock using the outer frame die from the Deco Bloom Etched Dies. I also die cut White Cardstock using the inner rim die. I adhered the layers to my card base using liquid glue.

I then applied Gold Hot Foil Roll to White Cardstock using one of the sentiments from the Borders and Sentiments Hot Foil Plates using my Spellbinders Glimmer Hot Foil Machine. I then snipped the foiled strips into two pieces and attached them to my card panel using foam adhesive.

I die cut Pink Sand Cardstock using the fleur swirl die from the Shapeabilities Swirl Tags Dies Set. I die cut four pieces and then added them to my card panel using liquid glue. To finish, I adhered the largest layered background panel to a top-folding white card base measuring using tape runner. I adhered some pink Jewels to complete my design.

For this card, I created a dramatic and striking background to showcase the gorgeous bunch of roses from the Deco Bloom Etched Dies.

To start, I die cut Gold Mirror Cardstock using the outer frame die from the Deco Bloom Etched Dies. Next, I die cut Gold Mirror Cardstock and White Cardstock using the leaf frame rim and insert dies from the Deco Bloom Etched Dies. I ink blended the plain white die-cut piece for the background using Black Soot Distress ink and a sponge dauber. Then, I adhered the gold metallic frame outline die-cut to the coloured die-cut with liquid glue and foam adhesive.

Next, I die cut White Cardstock and Gold Mirror Cardstock using the large, medium, and small rose bunch rim and insert dies from the Deco Bloom Etched Dies. I adhered the gold metallic outline die-cuts to their backer die-cuts with liquid glue. Once that was done, I pieced all the white die cut insert pieces into the gold outlines to reassemble the frame.
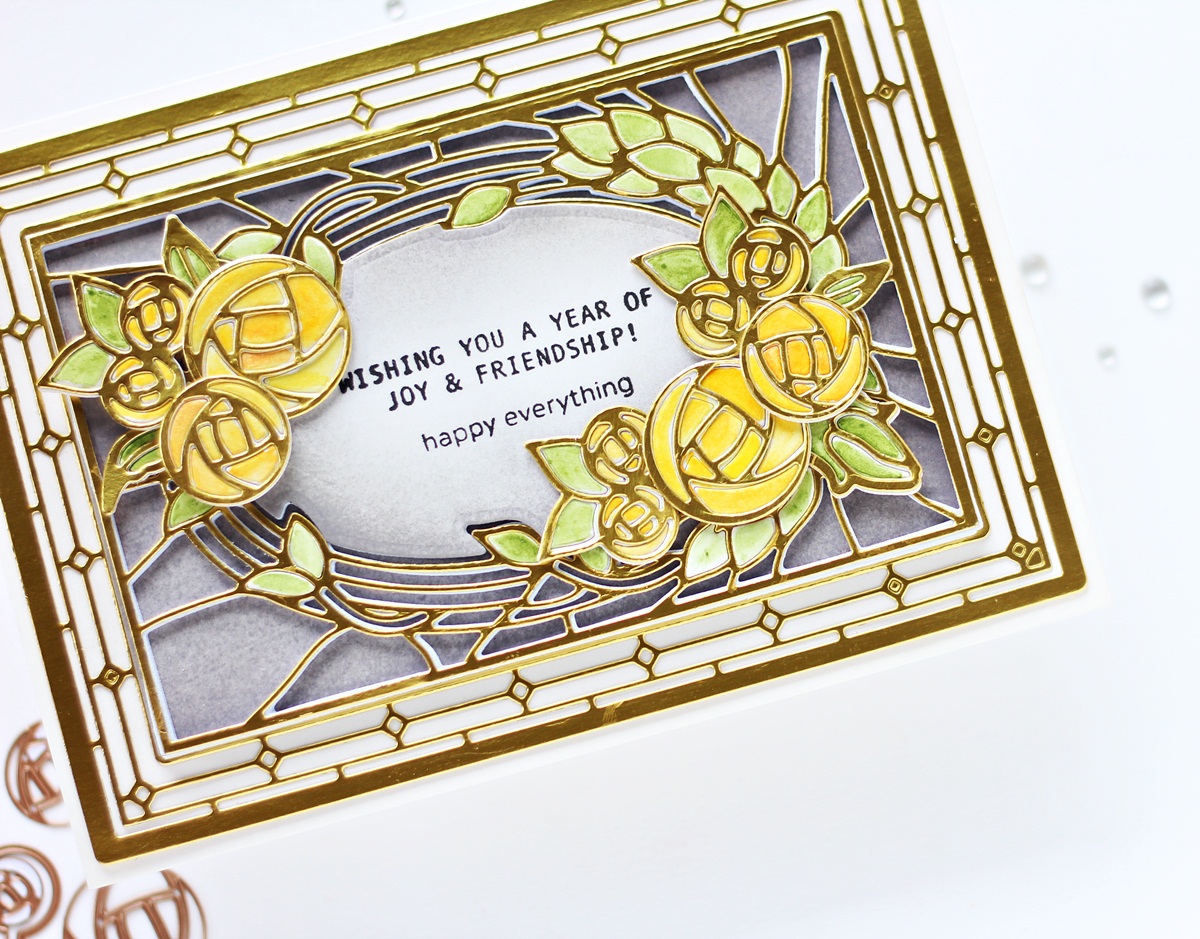
I colored the individual reassembled pieces using the Jane Davenport's Watercolors Set Brights for a soft, artsy look. Next, I ink blended the negative die-cut of the leaf frame insert die using Black Soot Distress ink and a sponge dauber and adhered it to my card panel using foam adhesive for dimension. I also stamped my sentiment on the piece using Versafine Onyx Black ink.

Once everything was done, I adhered the largest layered background panel to a top-folding white card base using tape runner. I popped the layered medium frame up on top using two layers of foam adhesive.

I hope you enjoyed looking at my projects today and I hope they inspire you as you create with these gorgeous new products. I would love to hear what you think of them.
If you like what you've seen from me, please give me a follow over on my Instagram (@hussena_cal) and/or subscribe to my blog if you haven't already.
Thank you so much for your visit to my blog today!


No comments:
Post a Comment