Hello, crafty friends!
I'm ecstatic and honoured to be joining Altenew for the March 2022 Folktales & Stories Collection Release Blog Hop today showcasing new stamps, dies and more!
If you arrived here from Norine Borys's Blog, then you are on the right track. If this is your first stop, then you will want to start at the beginning, the Altenew Card Blog. We've got tons of inspiration and giveaways for you on the hop today, so keep reading till the end of this post for more information.

I loved the details in the beautiful floral stamp from the Endless Florescence Stamp & Die Set. and thought it would look wonderful embossed in white with just a touch of color added. To keep the focus on the s embossed images, I added just a simple ink blended background to complete the card.
I started off by stamping the floral image from the Endless Florescence Stamp Set in Versamark Ink onto Neenah Classic Crest Solar White Cardstock, sprinkled White Embossing Powder over the image, and melted it with a Heat Tool. Next, I coloured the image using Zig Clean Color Real Brush Markers and cut it out with the coordinating die.
Once that was done, I die-cut Neenah Classic Crest Solar White Cardstock using the Layer 3 Die from the Precision Layering Mini Slimline B Etched Dies. Next, I adhered thin strips of Masking Tape all around the panel and blended Firefely ink (Green Valley Ink Set) around the edges and in the centre of the cardstock to give the panel a little depth. I let the panel dry and then added some black and green paint splatters for interest. Next, I stamped a sentiment from the Endless Florescence Stamp Set onto the bottom left of the panel using Obsidian Ink and adhered the embossed images on the panel using foam squares for dimension.
Once that was done, I die-cut Pink Sand Cardstock using the Layer 2 Die from the Precision Layering Mini Slimline A Etched Dies to create a mat for my card front and then attached it to an top-folding white card base using tape runner. Then, to finish, I adhered some Antique Gold - Sequins to embellish my panel.
My second card features the new Botanical Bookmark Stamp Set and coordinating Dies (also available as a bundle) against a heat-embossed background made using the new Rosy Blooms Stamp Set.
To make this card, I started off by stamping the leaves from the Rosy Blooms Stamp Set in Versamark Ink onto Neenah Classic Crest Solar White Cardstock, then sprinkled some White Embossing Powder over the images, and melted the powder with a Heat Tool. Next, I applied Sweet Leaf and Minty Mint inks on the top two-thirds of the panel using an ink blending tool to highlight and bring out the embossed areas more.
Next, I stamped the sentiment layers from the Botanical Bookmark Stamp Set in Parrot, Razzleberry, and Mangrove Root inks onto Neenah Classic Crest Solar White Cardstock. Then, I die-cut the image using the coordinating die and adhered the pieces on the panel using foam squares for dimension. Next, I stamped the accompanying sentiment from the Botanical Bookmark Stamp Set onto Rubellite Cardstock in Versamark Ink, then covered some White Embossing Powder over the image, and melted the powder with a Heat Tool and added to the card with two layers of foam tape for more dimension. Once that was done, I added some pink and blue paint splatters using the Altenew Watercolor 36 Pan Set for interest.
Then, to complete, I mat my card panel with layers of Dazzling Diamond and Rubellite Cardstock before adhering it down to a side-folding A2-size white card base using tape runner. I finished the design with some sparkling silver sequins around the sentiment to embellish.
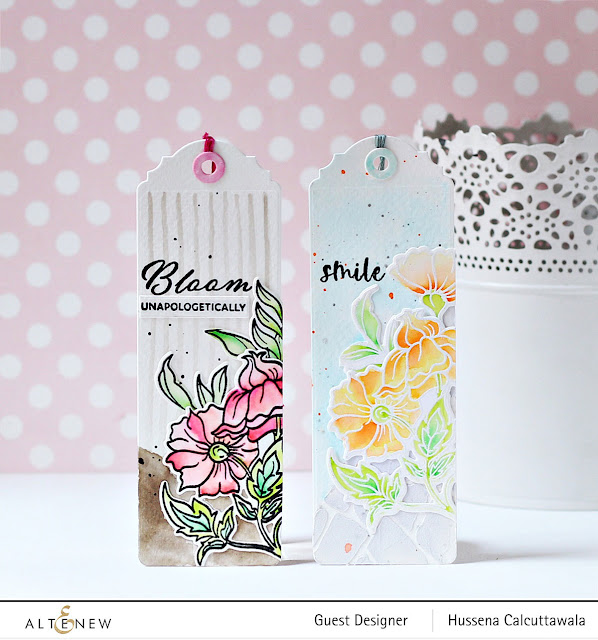
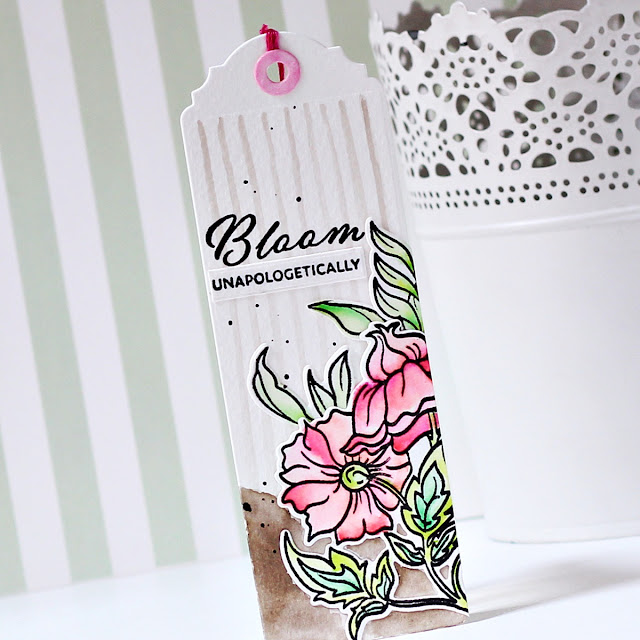
Next up, I have two bookmark designs to share which I made using the new Rosy Blooms Stamp Set, coordinating dies, Botanical Bookmark Die Set, and the Altenew Watercolor 36 Pan Set. The blooms in this set are so gorgeous and they’re the perfect size to scatter across a card panel.
I started by trimming a piece of Neenah Classic Crest Solar White Cardstock (110 LBS) to about 7″ x 2″. (I like this cardstock for projects like these because it’s bright white and works with so many different techniques.) Then, I die-cut the strip with the Botanical Bookmark Die Set to form my basic bookmark shape.
Next, I used a very fine paint brush to paint some loose pale grey stripes on the bookmark using Industrial Diamond paint. After this dried, I sprinkled some black paint splatters around by tapping my brush onto my paper. I also added some sketchy sand to the bottom with the Watercolor 36 Pan Set and blended it out a bit with water. Next, I stamped the floral images from the Rosy Blooms Stamp Set using Obsidian Ink onto Neenah Classic Crest Solar White Cardstock. I then coloured the images using the Watercolor 36 Pan Set and cut them out with the coordinating dies.
I adhered the images to the bookmark using liquid adhesive and then stamped the word 'Bloom' from the Rosy Blooms Stamp Set using Obsidian Ink. Next, I stamped the accompanying sentiment from the Rosy Blooms Stamp Set onto a strip of Neenah Classic Crest Solar White Cardstock using Obsidian Ink and adhered it to the bookmark. I added a reinforcer and a handmade tassel with some beads to finish off the bookmark.
For my next bookmark, I started by trimming a piece of Neenah Classic Crest Solar White Cardstock (110 LBS) to about 7″ x 2″ and then die-cut the strip with the Botanical Bookmark Die Set to form my basic bookmark shape. I thought it would be fun to add a stenciled design on the bookmark, so I secured my Stone Wall Stencil on top of the bookmark using Washi Tape and added Embossing Paste mixed with Lava Rock Re-inker to the bottom right-hand side of the bookmark with a spatula. Next, to create the blue background, To create the blue background, I simply did a wash of “Caribbean Sky” by mixing in some water with the paint and spreading it over my paper using a wide brush.
I stamped the floral images from the Rosy Blooms Stamp Set in Versamark Ink onto Neenah Classic Crest Solar White Cardstock, then covered it with some White Embossing Powder, and melted the powder with a Heat Tool. Next, I coloured the images using Zig Clean Color Real Brush Markers and cut them out with the coordinating dies. I adhered the images to the bookmark using liquid adhesive and then stamped the word 'Smile' from the Rosy Blooms Stamp Set using Obsidian Ink. Then, to finish, I added some orange and grey paint splatters around by tapping my brush onto my paper. Just like the previous bookmark, I added a reinforcer and a handmade tassel with some beads to complete the bookmark.
Giveaway Prizes:
$200 in total prizes! To celebrate this release, Altenew is giving away a $50 gift certificate to 2 lucky winners and a $25 gift certificate to 8 winners! Please leave a comment on the Altenew Card Blog and/or each designer’s blog post on the blog hop list below by 02/23/2022 for a chance to win. Altenew will draw 7 random winners from the comments left on each stop of this blog hop and announce the winners on the Altenew Winners Page on 03/12/2022.
Free Gift:
- Get a FREE brand new Folktales & Stories Mini Inspiration Guide with every order from 03/04/2022 through 03/06/2022. Shop HERE!
- Get a FREE brand new Folktales & Stories Stamp & Die Release Inspiration Guide Ebook (worth $5.99) with every order of high-value Sweet Moments Bundles. Shop HERE! *Exclusions apply.
- Get a FREE brand new Online Cardmaking Class with every order from the new Folktales & Stories Stamp & Die Release Collection from 03/04/2022 through 03/10/2022. Shop HERE!
Blog Hop Order:
Next Stop on this Blog Hop is the incredibly talented, Emily Midgett's blog. Just in case you lose your place along the way, here is the complete list of participants so that you can find your way back:
Hussena Calcuttawala (You are HERE)
I really appreciate you stopping by and participating in this blog hop! If you like what you've seen from me, please give me a follow over on my Instagram (@hussena_cal) and/or subscribe to my blog if you haven't already.


Hussena you are right at home among the best here at Altenew, my friend! I'm so very proud of you - and your creations are just what I come to expect from you: GORGEOUS, and perfect!
ReplyDelete=]
Your bookmarks would inspire anyone to open a book.
ReplyDeleteAnother great release and your projects showcase so many of the products beautifully.
ReplyDeleteYour bookmarks would inspire anyone to open a book!
ReplyDeleteBeatiful makes! Love this new release!
ReplyDeleteLove the soft colors!!
ReplyDeleteSuch pretty springtime projects!
ReplyDeleteI LOVE the soft colors and splatters! The bookmark is awesome!
ReplyDeleteBeautiful springtime creations!!
ReplyDeleteYour cards and bookmarks are beautiful. Thank you for the inspiration.
ReplyDeleteWow.... such a great job . So bright and cherry and I loooooove your bookmarkers. I will have to try those. Beautiful !!! tyfs :)
ReplyDeleteSuch stunning projects! I love the white embossing with the watercolour markers, so beautiful and soft!
ReplyDeleteLovely cards!
ReplyDeleteLove the cards and tags/bookmarks. So pretty. Thanks for sharing
ReplyDeleteI love those bookmarks! So much fun!
ReplyDeleteI'm in LOVE with your first card. It's STUNNING.
ReplyDeleteWonderful Altenew inspiration.
Really love the subtle pink splatter on the "Read" card.
ReplyDeleteThese are all so pretty!
ReplyDeleteEach of your projects is very lovely, I like your color combinations in every instance. Thank you for sharing your creative ideas.
ReplyDeleteWow, your cards are fabulous, specially that first one! The soft colors are so pretty! And the bookmarks are gorgeous!
ReplyDeleteGreat project shares. I like the ideas for the bookmarks.
ReplyDeleteI love the soft coloring on all these beautiful designs.
ReplyDeleteSuch lovely pastels. Now that is Springtime.
ReplyDeleteBeautiful projects, I love our bookmark designs! Thanks for the inspiration!
ReplyDeleteBeautiful cards and bookmarks! Love the colors…
ReplyDeleteThanks for sharing.
Love your creations, they’re beautiful!
ReplyDelete