Monday, December 21, 2020

Pinkfresh Studio | Floral Delight


Happy Friday, crafty friends!
I have two Cards to share today that I made using a multitude of dies and stamps from Pinkfresh Studio. I have combined and used dies from the November Release along with stamps and dies from previous releases for my cards today and I am so excited to share them with you. 


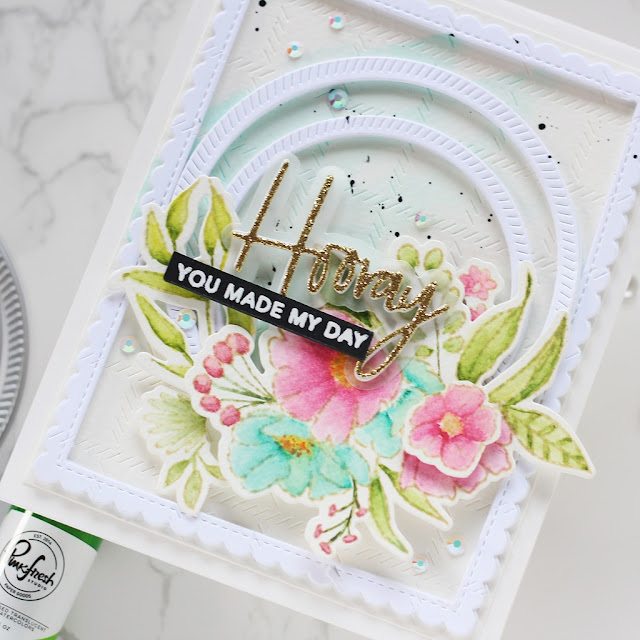
To create my card, I began by stamping the floral images from the Fancy Blooms Stamp Set onto a piece of Canson Montval Watercolor Paper using a light hybrid ink that is watercolor-friendly. I then started coloring the images using Liquid Watercolors from Pinkfresh. The flowers were colored using Bubble Gum and Aquamarine, while the leaves were colored using Key Lime and Emerald City. I diluted the colors with water while watercoloring to achieve a nice, soft look. After the coloring was complete, I die cut the images using the coordinating Fancy Blooms Die Set and set it aside to work on other components of my card. 

To create the background, I die cut a card panel using the Diagonal Stitched Plaid Die from Canson Montval Watercolor Paper and did a light color wash on it using Aquamarine Liquid Watercolor. I also flicked some black paint splatters on the panel for detail and interest. Then, I foam mounted this panel to my card base.

Next, I die cut the two stitched circles from the Diagonal Stitched Circles Die Set from Neenah Claasic Crest Solar White Cardstock (110 LBS) and adhered them to the card panel using foam dots. Once that was done, I die cut the outer rectangle from the Essentials: Stitched Scallop Rectangles Die Set from Neenah Cardstock and foam mounted it to my card panel for dimension. 

I then arranged the floral images to my card front using foam squares. I also fussy cut some of the smaller flowers from the floral cluster and added them to the card to create a more cohesive design.

The sentiment is die cut from the Classic Words Die Set. I cut the outer shadow for the sentiment from Vellum Paper and 'Hooray' from from Gold Glitter Cardstock. The sentiment from the Floral Notes Stamp Set was heat embossed in white on a strip of Black Cardstock and then attached to the panel using foam squares. I finished off the card with a few clear Jewels


To begin, I stamped the floral outline cluster using the You Are My Favorite Stamp Set on a piece of a Neenah Classic Crest Solar White Cardstock (110 LBS) using Detail Black ink. The You Are My Favorite stamp, die, and stencil set is one of my all-time favorites from Pinkfresh and I love using it time and again for my cards. One of the things I like about this set is that the coordinating Stencils make it so easy to add color without stamping or coloring, so you can blend colors and add shading as you like.

 The coordinating You Are My Favorite stencils consist of 3 layering stencils to color the stamped image without having to mask. I used Berrylicious and Sparkling Rose to ink the flowers and Fresh Pear for the leaves and foliage. Once I was done, I die cut the image using the coordinating You Are My Favorite Die Set and set it aside to work on other elements for my card.

For my card background, I die cut a couple of paper strips from White Cardstock using the Slim Stripes Die Set. I colored the die cut strips using Mint and Coral Reef and then adhered the various strips to the centre of my card panel. Next, I die cut the Fancy Oval Frame Die from Neenah Cardstock and foam mounted it over on my card panel. I also went ahead and die cut a stitched rectangle frame from the Essentials: Stitched Scallop Rectangles Die Set. I lightly coloured the frame using Coral Reef ink and then foam mounted it to my card front. 

I adhered my floral clusters on my panel using foam tape for dimension. For my sentiment, I used a combination of Lea's Onrnate Lowercase Die Set, and Heather's Lowercase Die Set. l love that these are all interchangeable and can be mixed and matched together. They are truly very versatile! I die cut the letters to spell Hi twice - once in Gold Glitter Cardstock and again in White (which was then colored using Coral Reef for a soft, transparent look) to swap out the pieces for the outline before adhering them to my card. The sentiment from the Floral Notes Stamp Set was heat embossed in white on a piece of Black Cardstock and then adhered to the card front using foam tape. To finish, I embellished my card with clear Jewels. This card required me to do quite a bit of die cutting, but I really enjoyed creating it.


I hope you like today's cards! I would love to hear what you think of them.
 Thanks so much for stopping by!

Tuesday, December 15, 2020

Spellbinders December 2020 Card Kit | Heart Hands


Hello, crafty friends!
It's the start of a new month which means it's time for a NEW Card Kit from Spellbinders. I have a bunch of cards to share today featuring the December 2020 Card Kit by Spellbinders - Heart Hands. If you haven't heard about the Monthly Card Kits by Spellbinders or don't know how to subscribe to one, you can go over to the Spellbinders website and/or blog and read more about them HERE


This "Heart Hands" Kit, like all their other Card Kits, gives you everything you need to create 10 unique cards and even more. You now also get better goodies, including a 40 sheet paper pad, clear stamps, an adorable die set, tons of embellishments, and more!

I have FIVE Card ideas to share with you today using this kit, so let's get started!

Card #1
My card uses the Heart Hands Paper Pad, the Heart Hands Die Cut Shapes Set, and the exclusive dies in this month's Card Kit.

This month's Spellbinders Card Kit is filled with lots of different goodies to get creating right away. The Heart Hands Kit is quite unique because there is a little bit of everything in it! I specially loved the dies in the Kit. They are simply lovely! 
For my card, I first selected a patterned paper design from the Heart Hands Paper Pad and trimmed it to fit my card base. Next, I die cut a circle from the centre of the panel using the Nestabilities Standard Circles LG Etched Dies. I adhered this panel to my card base and then started working on the focal for my card.

I die cut the hands and the flowers using different colored cardstock sheets from the Card Kit. The flowers were die cut from White Cardstock and colored using the Watercolors Set Glitz-Sea by Jane Davenport. I then assembled the die cut hands and adhered them to my card front using foam squares. 

I picked out few printed flower die cut shapes from the Heart Hands Die Cut Shapes Set and adhered them to my card front. I then adhered the other die cut flowers over it. I love the contrast of the printed and die cut flowers. Then, to complete my card, I added two sentiment banners from the Heart Hands Die Cut Shapes Set. I adhered them using foam squares to my panel and my first card was done!


Card #2
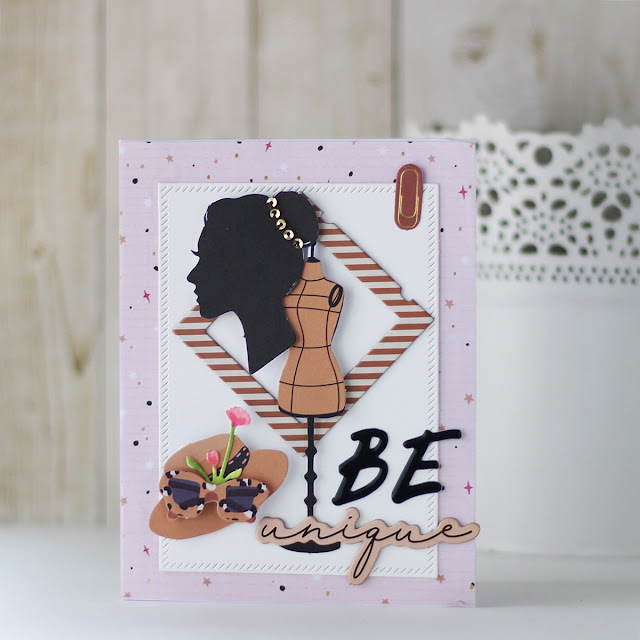
My card uses the Heart Hands Paper Pad, the Heart Hands Die Cut Shapes Set, and Chipboard Embellishments.

To create my card, I first picked out a patterned paper design from the Heart Hands Paper Pad and trimmed it to size to fit my card base. I adhered the paper to my card base and then die cut a rectangular panel from White Cardstock.  

Next, I adhered a chipboard frame and few pre-printed die cut shapes from the Heart Hands Die Cut Shapes Set to create my card focal. The embellishment on the left-hand side of the card  was created by layering two different die cut shapes and adhering one atop the other. I also tucked in a leftover flower die cut from the previous card for visual interest. 

The sentiment is a combination of Puffy Stickers and a Chipboard Embellishment. To finish, I added rhinestones to the woman's silhouette and a paper clip die cut shape from the Heart Hands Die Cut Shapes Set. This card would be perfect to give to any of your friends, don't you think?! 


Card #3
My card uses the Heart Hands Paper Pad, the Heart Hands Die Cut Shapes Set, and the Heart Hands Clear Stamp Set.

To create this card, I chose a patterned paper design from the Heart Hands Paper Pad and trimmed it to size to adhere to my A2-sized white card base. Next, I die cut a decorative frame from Gold Mirror Cardstock and adhered it down to my panel.

Then, I die cut an oval from White Cardstock using the Nestabilities Classic Ovals LG Etched Dies. Once that was done, I used the Hands Heart Clear Stamp Set to stamp the silhouette of the woman's face using Licorice Black Ink Pad on the die cut shape. I then gold heat embossed the oval wreath frame from the stamp set for visual interest. I adhered the oval die cut to my panel using foam tape and added two flower die cut shapes from the Heart Hands Die Cut Shapes Set to accentuate the design.

Next, I stamped the sentiment using Licorice Black Ink Pad and cut it out using the coordinating die which is included in the Card Kit. I foam mounted it to my panel for added dimension. I then added some flat-back Jewels and Gold Sequins from the Card Kit to complete my card. 


Card #4
My card uses the Heart Hands Paper Pad, the Heart Hands Die Cut Shapes Set, and the Craft Tags Set.

This card was quite easy to put together because it doesn't involve any kind of stamping or die cutting. I simply used the different Die Cut Shapes included in the Card Kit to create it! To begin, I first trimmed a patterned paper design from the Heart Hands Paper Pad to size and adhered it over my A2-sized white card base.

Next, I pulled out the different tags from the Craft Tags Set and adhered them to my card base. I popped one of the tags using foam squares for dimension and interest. Then, I used a menagerie of pre-printed die cut shapes from the Heart Hands Die Cut Shapes Set to create my card design. The sentiment banners were also from the same set and added to the card front using foam squares. I like the whimsical elements and pretty colours of the card. I would love to hear what you think!?


Card #5
My card uses the Heart Hands Paper Pad, the Heart Hands Die Cut Shapes Set, the Chipboard Embellishments, and the exclusive dies in this month's Card Kit.

To start, I picked a patterned paper design from the Heart Hands Paper Pad and trimmed it to size to adhere over my A2-sized white card base. Then, I die cut a rectangular frame from Gold Mirror Cardstock and added it to my card base. Next, I die cut a Stitched Diagonal Rectangle frame from White Cardstock and adhered it over on my card panel.

Once all the layering was done, it was time to start working on my card focal. I die cut the hands from White and Light Peach Cardstock, which are included in the Card Kit itself. I then assembled the die cut hands and adhered them to my card front using foam squares. 

Next, to embellish my card front, I used some Chipboard Embellishments. The foiled Chipboard Stickers in this month's Card Kit are simply wonderful and I thoroughly enjoyed using them on my cards. Lastly, to finish, I added some Gold Sequins. 


Spellbinders Merry Member Appreciation Month
December is our Merry Member Appreciation Month! All Club members enjoy a free gift as our Thanks for being part of the Club! Includes a free adhesive gift. Gift may vary. This gift may not be returned or exchanged.


If you want to find out more about the Club – prices, how you sign up and what’s included, please look ——–> HERE
 The Card Kits for Spellbinders Monthly Clubs are exclusive to Spellbinders and you won't find them anywhere else, so be sure to gets yours before it gets sold out! If there are any leftovers, they are added to the Spellbinders store for sale at full price after a few months. You can see all of the past Card Kits HERE.
Card Kit of the Month Membership
If you'd like to see some more project inspiration using the Card Kit, check out THIS super helpful YouTube video that has some awesome card ideas using the Card Kit. 

That's it from me for today! I hope you liked my cards. Let me know if you have any favourite(s)! I would love to hear from you.

 If you like what you've seen from me, please give me a follow over on my Instagram (@hussena_cal) and/or subscribing to my blog if you haven't already.

Thank you so much for your visit to my blog today!

Thursday, December 10, 2020

Spellbinders December 2020 Clubs Inspiration Blog Hop + Giveaway!


Hello, crafty friends!
I'm thrilled to be joining Spellbinders for the December 2020 Clubs Inspiration Blog Hop today. Spellbinders is celebrating all their Club Kits in shop for December 2020.

If you arrived here from Joy Baldwin's Blog, then you are on the right track. If this is your first stop, then you will want to start at the beginning, the Spellbinders Blog. We've got tons of inspiration and giveaways for you on the hop today, so keep reading till the end of this post for more information.

I have made a Card for the hop today using the Amazing Paper Grace – December Die of the Month. In case you missed, it I shared a Card on my blog few days ago using this month's "Rose Garden Promise" Set, which you can check out HERE.

The Rose Garden Promise Set consists of four dies. I simply LOVE the design and its versatility. It's so elegant! 

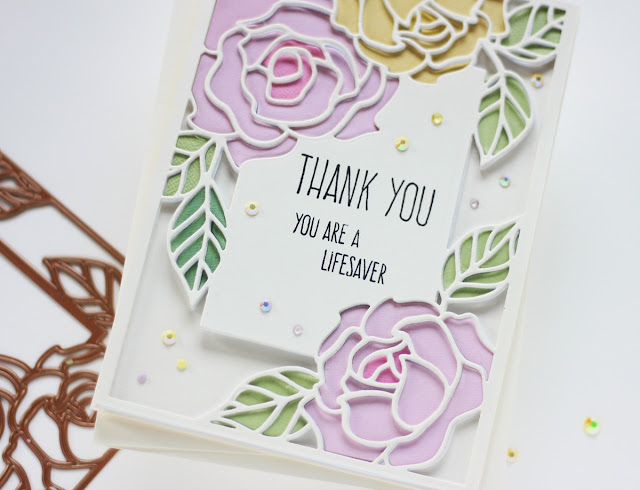
To create my card, I first die cut the outer rim die from the Rose Garden Promise Set from Cream Cardstock using my Platinum 6" Die Cutting and Embossing Machine. I wanted to recreate the look of a stained glass piece on my card front, so I die cut the layer with the roses from two different sheets of Colored Cardstock. I did the same for the leaves too and die cut them from two different shades of Green Cardstock. The centres of the roses were die cut from a darker shade of Cardstock for visual interest.

Next, I die cut the rose die layer from White Fun Foam so that I could adhere it to the card base for dimension. Once that was done, it was time to move on to the fun part - popping all the die cut pieces back on to the panel. I love how the solid cardstock bits look against the cream cardstock! Then, I stamped my sentiment in the centre of the panel using Black Licorice ink. I added some yellow and purple flat back Jewels to finish my card. 

This card was REALLY simple to put together and I am quite happy with how it turned out too. If you're looking for some quick and easy card designs for Valentine's Day, Anniversary cards, or for any custom orders, this is just the perfect die for it! The die does all the work for you. ❤️

Spellbinders recently introduced a new collection of card making basics on their website called 'The Card Shoppe'. I used the cards and envelopes for my last couple of projects and really liked them. All the products are high quality and you can find more details about this range HERE.
Affiliate Disclosure
All products in today's post are linked throughout the post. These are my personal affiliate links which you can shop from at no cost to you! Thank you for your support!

Spellbinders Merry Member Appreciation Month
December is our Merry Member Appreciation Month! All Club members enjoy a free gift as our Thanks for being part of the Club! Includes a free adhesive gift. Gift may vary. This gift may not be returned or exchanged.

Giveaway:
To celebrate this release, Spellbinder is giving away a $50 gift certificate to 3 lucky blog readers – selected from the comments on our blog. Hop along for additional chances to win. Giveaway closes on Sunday, December 13th, 11:59 pm MST. The winner will be announced in the blog hop post the following Tuesday. The winner is responsible for shipping cost, duties and taxes.

Blog Hop Order:
Next Stop on this Blog Hop is the talented, Kathy Clement's blog.
Just in case you lose your place along the way, here is the complete list of participants so that you can find your way back:

Spellbinders Blog
Tina Smith
Bibi Cameron
Sandi MacIver
Jill Hilliard
Jennifer Snyder
Jean Manis
Sheri Holt
Joy Baldwin

                         Hussena Calcuttawala (You are HERE)
Kathy Clement
Ilina Crouse
Jenny Colacicco
Michelle Short
Virginia Lu


Thank you so much for your stopping by and reading this blog post. I hope you liked my project! If you like what you've seen from me, please give me a follow over on my Instagram (@hussena_cal) and/or subscribing to my blog if you haven't already.
Wishing you a great day ahead!

Friday, December 4, 2020

Pinkfresh Studio | Florals Galore


Hello, crafty friends!
I hope you're having a great week so far!
I have two bright and summer-y cards to share today using a variety of new and old Pinkfresh products. I love combining and using different supplies for all my projects and these cards were simply a delight to create!


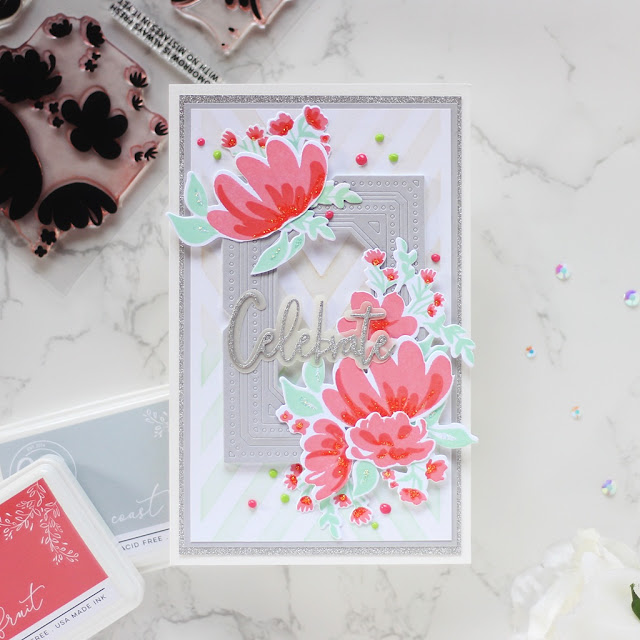
To create my card, I began by stamping the floral cluster from the  Sending Love and Hugs Stamp in my MISTI on a piece of Neenah Classic Crest Solar White Cardstock (110 LBS). I used Passion Fruit and Berrylicious to ink the flowers and Mint for the leaves and foliage. I have a thing for coral pink flowers - I find them very pretty!

Then, I die cut the images using the coordinating Sending Love and Hugs Die and kept them aside to work on my card panel. I took a piece of White Cardstock and used the Inverted Diamond Stencil to create my card background. I used two different ink colours - Warm Buff and Mint to stencil the design as I wanted to create some visual interest. Then, I trimmed it to size and adhered it to a panel of grey cardstock. 

 To accentuate my design, I die cut the Essentials: Pretty Frames 2 Die from grey cardstock and foam mounted it to the stenciled panel for a raised look. The best thing about this cover plate is that you can either stack all the different frame layers as I have done on my card, or you can just use the frames individually if you like. Either way, it looks very elegant!

I adhered the stamped images over the frame using foam squares for dimension. I also fussy cut some of the smaller flowers from the floral cluster and added them to the card to create a more cohesive design. Then, in order to glam things up, I added Diamond Stickles Glitter Glue in the centre of the flowers and leaves. It looks quite nice and sparkly in real life!

The sentiment is die cut from the Classic Words Die Set. I die cut the outer shadow for the sentiment from Vellum Paper and the word from Silver Glitter Paper. I adhered it to my panel using glue dots. My card was almost complete, but I decided to add some enamel dots dots in red and green to tie it all in together. Finally, I matted my panel to Silver Glitter Paper, and then adhered it down to a white side folding card base. 


To start off, I stamped the floral image from the Full Bloom Stamp Set in Peach Fuzz on a piece of Canson Montval Watercolor Paper to do no-line colouring. I don't consider myself to be a very good colorist, but I still wanted to give this technique a try and see how it goes. I coloured the imnage using an array of Pinkfresh Studio Liquid Watercolours: Bubblegum, Candy Apple, Clementine, Key Lime, and Emerald City. I mixed some of the colours to create colour variations. 

Once my image was coloured, I die cut it using the coordinating Full Bloom Die. Next, I started working on my card background. I took a piece of White Cardstock and watercoloured it using a blend of Aquamarine and Emerald City. I diluted the latter with lots of water to get a pale green colour and mixed it with Aquamarine to create a nice, soft teal colour. I wadded gold and black paint splatters to the panel for more interest. I then die cut this panel using the Colour Block: Gradiating Stripes Die and foam mounted it to a white card panel. 

It was now time to assemble the card together. I foam mounted the watercolored image to the die cut background, and adhered the card front to a panel of Gold Mirror Cardstock, which was then adhered to a white card base. The sentiment is again die cut from the  Classic Words Die Set. I die cut the outer shadow from Vellum Paper and the word die from Gold Mirror Cardstock. The accompanying stamped sentiment is from the Floral Notes Stamp Set. I stamped it on a strip of white cardstock using Hybrid Black ink. I finished off the card with a couple of White Jewels


Hope you enjoyed looking at my cards today! I would love to hear what you think of them.
Thank you so much for stopping by!