Hi, friends!
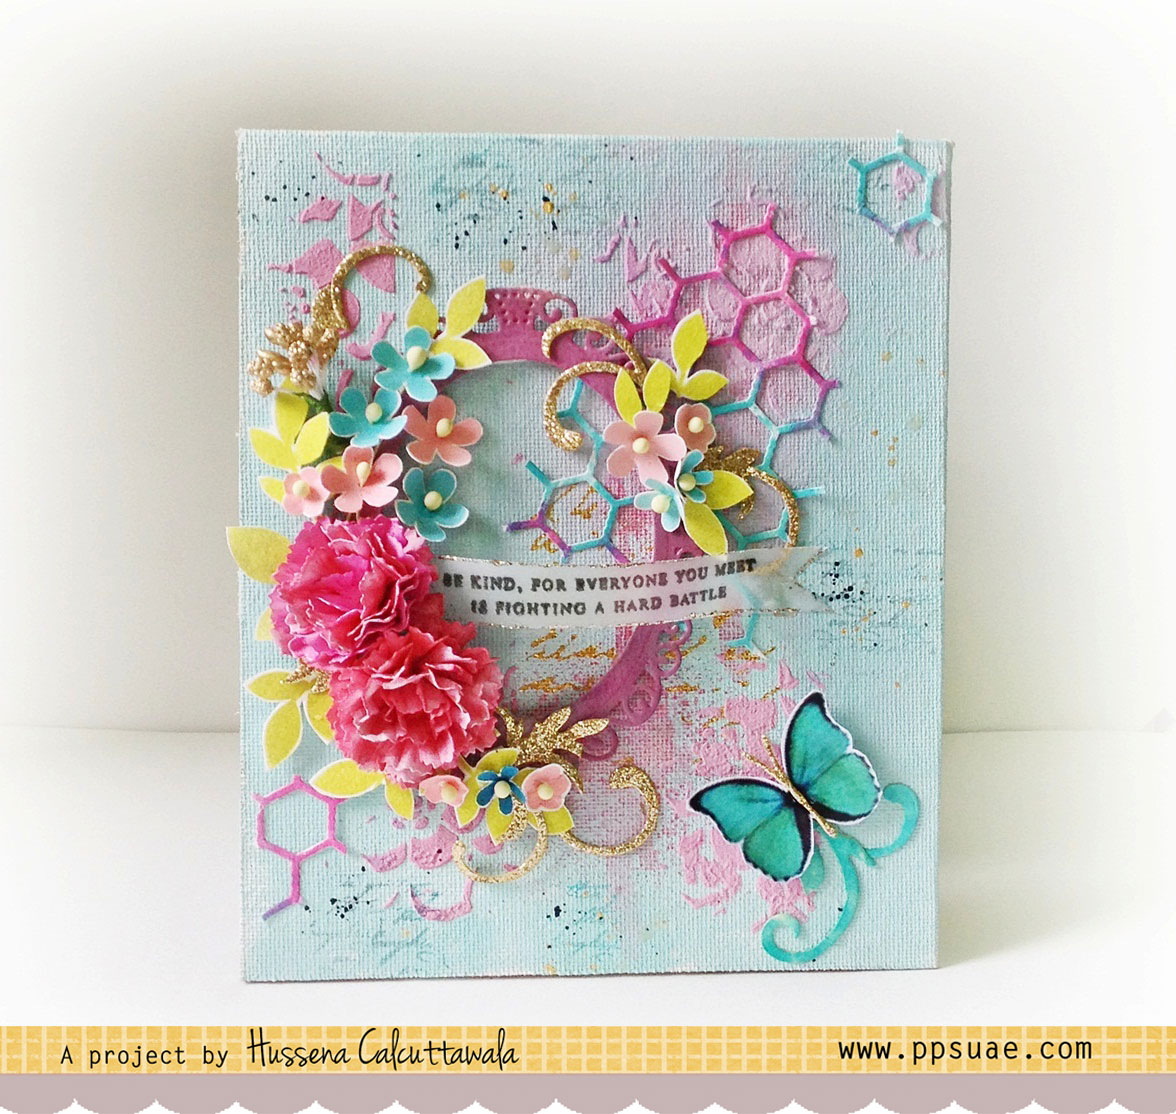
I have a Canvas to share today which I made for my DT post at Pretty Paper Studio. It's been a while since I made one of these and I was pretty happy with the outcome. I am also sharing a step by step tutorial on how I made it. Here's a look at my canvas first :


- - - - - - - - - - - - - - - - - - - - - - - - - - - - - - - - - - - - - - - - - - - - - - - - -
PHOTO TUTORIAL
Here’s how I went about creating this Canvas :
Step 1 – I have used a canvas board which is 6 inches X 7 inches in size for my base. I prepped the surface with some Gesso and Prima Texture Powder to give it some tooth.

Step 2 – After priming the base with Gesso, I then painted the entire canvas with Prima Egg Blue Chalkboard Paint using a broad, flat brush.

Step 3 – Once my background was painted, I started gathering my supplies to embellish my canvas. I first die cut some oval frame using Spellbinders Elegant Oval dies from a watercolor paper which is 300 gsm in thickness

Step 4 – I then started to work some colors on my background using Heidi Swapp Color Shine sprays .I have used Rose color below.I then gessoed my oval frame and colored it using the Rose Color spray.

Step 5 – I wanted to incorporate some foiling in my project so I used the Prima Adhesive Rub Ons along with some Prima Golden Girl Foil Sheets.I selected a script pattern for my canvas.

Step 6 – The shine that this foil gives is really very beautiful.I found that this adhesive rub on works better on very smooth surfaces like paper rather than a uneven texture of canvas.

Here’s a close up of the foiling I did, as you can see it has some partial foiling in it rather than a crisp image. This was due to the uneven surface of the canvas.

Step 7 – Once the foiling was done I added in more texture using the Tim Holtz Lace stencil along with texture paste which I made by mixing Gesso with the Prima Texture Powder and a little bit of Heidi Swapp Color Shine Raspberry spray which I stencilled through the Tim Holtz Lace stencil.

Step 8 – To create my flowers, I die-cut some flowers using a white cardstock and colored them using the Rose color from Heidi Swapp Color Shine spray.

Step 9 – To further create some foliage and flower sprays for my canvas, I stamped the leaves and flowers from the Paper Smooches Botanicals 3 set using the Prima Lime Pie Chalk ink and some Altenew inks from the Four Scoops Mini set.

After stamping and fussy cutting the flowers, I embossed them using a embossing stylus and added a pollen in the centre to make a dimensional flower.
Step 10– Finally, I added some hexagon die cuts in the background to accent it and also used a butterfly to finish off my canvas.

I'm linking this canvas to the Ranganjali Monthly Challenge - Favorite Technique (I love making handmade flowers and have incorporated those here), STAMPlorations - Mixed Media Challenge, Quick Quotes - Handmade Flowers, Love to Create - Mixed Media, Mod Squad Challenge - The Die's the thing

I hope you liked my project. If you did and also have any queries please do let me know in the comments below.


Such a beautiful Tutorial Hussena. Curious about the texture powder...what additional benefit does it give?
ReplyDeleteWow ..I just loved the cheerful colors on this canvas !Never imagined you must have used stamps for the small flowers ,gr8 idea to put stamps to use :)
ReplyDeleteThank you Dr Sonia :)...Regarding the texture powder I am answering your query here instead of mail as it might benefit others who have the same question regarding it.
ReplyDeleteThe Prima texture powder can be also used as a texture paste if you mix it with a little water or mist and gesso... you can use it with stencils.I have used it on my card too with stencils. Link here : http://ppsuae.com/layered-birthday-card-photo-tutorial/
Gorgeous! Love all the details and your choice of colors is always amazing :)
ReplyDeleteThis is so gorgeous!! The texture is amazing!! I love the colors and the beautiful flowers!! The details are fabulous!! Absolutely stunning, Hussena!! Have a great day!! Big hugs :)
ReplyDeleteLisa
A Mermaid's Crafts
It's Awesome! Love the colors and textures! Thanks for the tutorial! :)
ReplyDeleteThis is just beautiful, and so inspiring. You have captured the essence of collage perfectly! Great take on the challenge, thanks so much for playing along with us this week over at the Mod Squad!
ReplyDeleteJudy - Mod Squad Challenge Host
omg... am loving the honey comb.... and the small dimensional flowers with pollens... great work Hussena. Beautiful
ReplyDeleteAwesome project, love your background and your embellishing with the flowers is just beautiful, I love making frames with our dies, I just did that tonight on a card I made :)
ReplyDeleteI am always a step back at making mixed media like these - so the tutorial really helps me get an idea on how to do things, so thanks!! I really love the details and the art on this one!!
ReplyDeleteIt is gorgeous! LOVE all the colours and details!
ReplyDeleteAwesome work and tutorial.
ReplyDeleteMeena xx
http://cardscraftandart.blogspot.in/2016/08/hidden-die-cut-card.html
Beautiful canvas and amazing tutorial, Hussena! Thanks so much for playing along at the Stamplorations' Mixed Media Challenge. Good Luck! :-)
ReplyDeleteThis is lovely, Hussana. What a soft and pretty canvas and a great tutorial. Thanks for playing along at STAMPlorations' Mixed Media Challenge for August.
ReplyDeleteBeautifully done canvas!!! Thanks for joining us at Quick Quotes!
ReplyDeleteabsolutely beautiful canvas!!! glad you joined us at STAMPloratios Mixed Media August Challenge
ReplyDeleteBeautiful canvas and I love the quote you chose to feature! Great job on the step by step instructions, to! Thanks for playing along with our challenge over at Quick Quotes and Congrats on making Top 3!!
ReplyDelete