Saturday, May 7, 2022

Altenew Craft-A-Flower: Butterfly Bush Release Blog Hop + Giveaway (Total of $200 prizes)


Hello, crafty friends!
I'm so happy and honoured to be joining Altenew for the Craft-A-Flower: Butterfly Bush Release Blog Hop today showcasing the next installment in their monthly Craft A Flower series: Butterfly Bush! Craft-A-Flower is a monthly subscription plan for their Craft-A-Flower Die Set. When signed up, you are guaranteed a spot in their monthly Craft-A-Flower releases and will receive a set each month - at a specially discounted price! ($35.99 →$29.99)

If you arrived here from Eva Bussom's Blog, then you are on the right track. If this is your first stop, then you will want to start at the beginning, the Altenew Card Blog. We've got tons of inspiration and giveaways for you on the hop today, so keep reading till the end of this post for more information.

The Craft-A-Flower: Butterfly Bush Die Set is so beautifully intricate, with gorgeous details and a lovely, substantial size. I have a vibrant blended project for you today, so let’s get started with the details.


To create my card, I first took a 4.25″ x 5.5″ panel of Neenah Classic Crest Solar White Cardstock and placed the flower dies from the Butterfly Bush Die Set about one-third of the way down and as far to the right as possible and ran it through my Platinum 6 Die Cutting Machine.  I repeated the same steps with the leaf and the butterfly layer dies. Next, following the layering guide, I watercolored a layer of Cotton Candy, Coral Berry, and Rubellite from the Altenew Watercolor 36 Pan Set with the lightest color on the base layer. I largely concentrated the color in the center of the flowers and used liquid glue to adhere them altogether. 

I mixed shades of green (Evergreen, Forest Glades, Bamboo, Frayed Leaf) from the Altenew Watercolor 36 Pan Set to get varying shades of green on my leaf die-cut pieces and used liquid glue to adhere them together. Next, to colour the branch and the body of the butterfly, I mixed Mocha and Espresso from the Altenew Watercolor 36 Pan Set to give the design more definition.

Next, to create the card background, I took a piece of Neenah Classic Crest Solar White Cardstock and I used blending brushes and Lagoon, Parrot, and Buttercream inks to add lots of bold, saturated color to the card front. I did a few layers of ink blending to make sure that the color was really vivid and saturated, then spritzed some plain water into my hand and splattered it onto the blended card front with my fingertips, immediately blotting it up with a paper towel. I also added some black splatters using the Jet Black Ink Spray.

Then, I die-cut a frame out of  Neenah Classic Crest Solar White Cardstock and White Foam using the Layer 3 Die from the Precision Layering Mini Slimline A Etched Dies and adhered the layers together with Craft Glue for depth. Next, to colour the butterfly, I used some vibrant blue and purple Copic markers to do flick feathering to the image. I started the lighter color on the outer edges of the butterfly wing, turned my paper around, and then used the darker colour towards the inside of the wing. After coloring the butterfly, I cut out the shadow wing from White Cardstock and coloured it with Lagoon ink and then adhered the layers down using foam adhesive. I really love the additional butterfly dies included in the set. They are so pretty and make for just the perfect accent to add to a card.

Once that was done, I stamped a sentiment from the Castle Garden Stamp Set onto the background panel using Obsidian Pigment Ink. Then, I mat my card panel with Dazzling Diamond Cardstock before adhering it a top-folding A2 white card base using tape runner.


Giveaway Prizes:
$200 in total prizes! To celebrate this release, Altenew is giving away a $50 gift certificate to 2 lucky winners and a $20 gift certificate to 5 winners! Please leave a comment on the Altenew Card Blog and/or each designer’s blog post on the blog hop list below by 05/13/2022 for a chance to win. Altenew will draw 7 random winners from the comments left on each stop of this blog hop and announce the winners on the Altenew Winners Page on 05/15/2022.


 Blog Hop Order:
Next Stop on this Blog Hop is the wonderful, Nandini Karmarkar's blog. Just in case you lose your place along the way, here is the complete list of participants so that you can find your way back:


I really appreciate you stopping by and participating in this blog hop! 
If you like what you've seen from me, please give me a follow over on my Instagram (@hussena_cal) and/or subscribe to my blog if you haven't already.

Wednesday, May 4, 2022

Altenew May 2022 Dreams Come True Collection Release Blog Hop + Giveaway ($300 in total prizes)


Hello, crafty friends!
I am excited to be joining  Altenew for their May 2022 Dreams Come True Collection Release Blog Hop! This release features so many beautiful new stamps and dies along with other wonderful goodies for your crafty stash!

If you arrived here from, Daniel Diaz's Blog, then you are on the right track. If this is your first stop, then you will want to start at the beginning, the Altenew Card Blog. We've got tons of inspiration and giveaways for you on the hop today, so keep reading till the end of this post for more information.


Stunning florals, elegant designs, unique sentiments, and more. This complete crafting bundle featuring the Dreams Come True stamp, die, stencil, and embossing folder release is full of beautiful inspiring designs to add to your craft room so you can create amazing paper crafting projects. Whether you enjoy card making, scrapbooking, or journaling, this bundle has something for you!

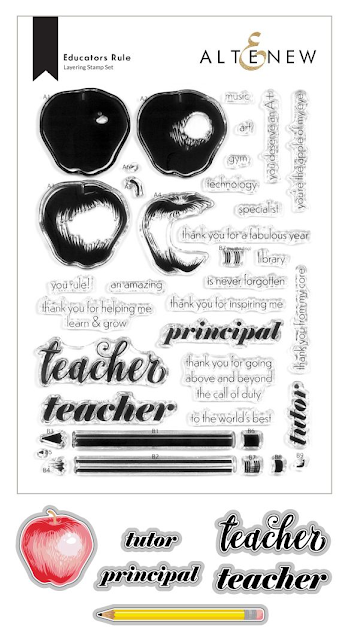
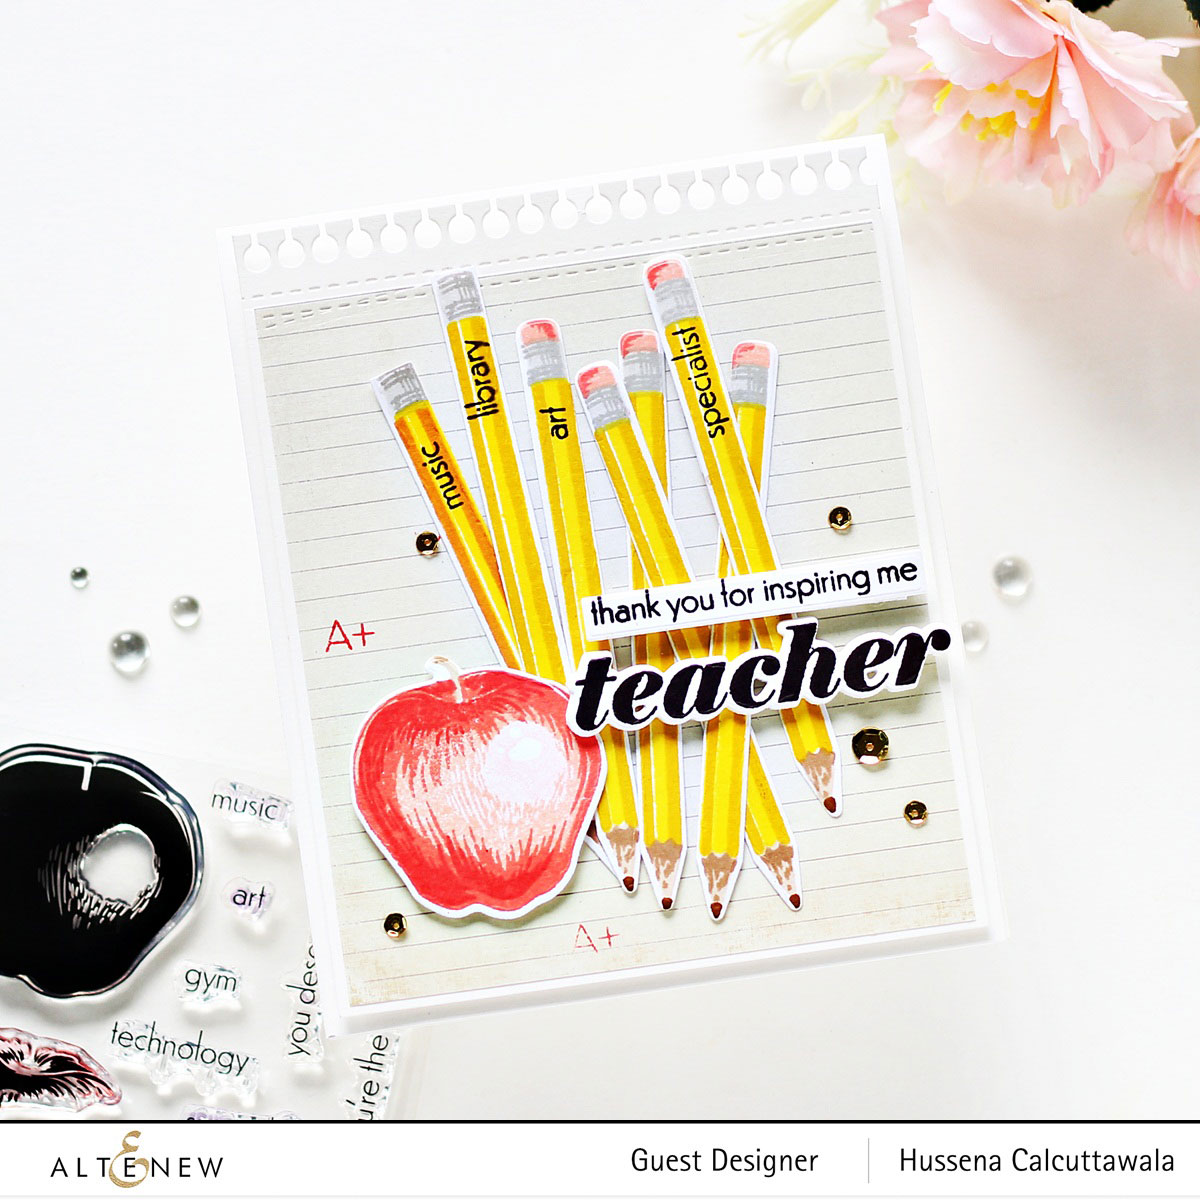
My first card features the Educators Rule Stamp & Die Bundle along with the Creative Edges: Notebook Die. I absolutely love this set!

To create my card, I stamped the the pencil and eraser images from the Educators Rule Stamp Set onto Neenah Classic Crest Solar White Cardstock using the exact recommended ink colors in the layout stamp packaging of the set. This made my job so much easier- I would highly recommend using the suggested ink colours if you want to create the same effect as depicted in the packaging. For the pencils themselves, I picked an ink slightly darker (or lighter) to act as the other coordinating shade in the pencil barrel and then stamped away with the help of my MISTI Stamping Tool. Once that was done, I used the coordinating die to cut out the pencils. 

Next, for my card background, I pulled out a ledger patterned paper from a very old My Mind's Eye Paper Pad and randomly stamped the 'A+' sentiment on the background using Crimson ink. Then, I die-cut Neenah Classic Crest Solar White Cardstock and the patterned paper using the Creative Edges: Notebook Die to get that classic notebook page look, complete with perforation lines. Once that was done, I adhered the two layers together using Craft Glue.

I then stamped the apple onto a piece of White Cardstock using the Red Sunset Oval Dye Ink Set and cut out the image using the coordinating die, before popping it to my panel using foam tape.

Next, for my greeting, I used the large and cursive “teacher” from the Educators Rule Stamp Set. I stamped it using Obsidian Pigment Ink onto Neenah Classic Crest Solar White Cardstock and then die-cut the image using the coordinating die. I also die-cut the sentiment from White Foam and adhered the layers together with Craft Glue for depth. Once that was done, I adhered the pencils clustered around the stamped sentiment using Craft Glue, then added a sentiment strip from Educators Rule, stamped on a strip of White Cardstock using Obsidian Pigment Ink and popped up using foam tape.

I then adhered the card panel to a top-folding A2- white card base using tape runner. I finished the design with some sparkling Antique Gold - Sequins to embellish.


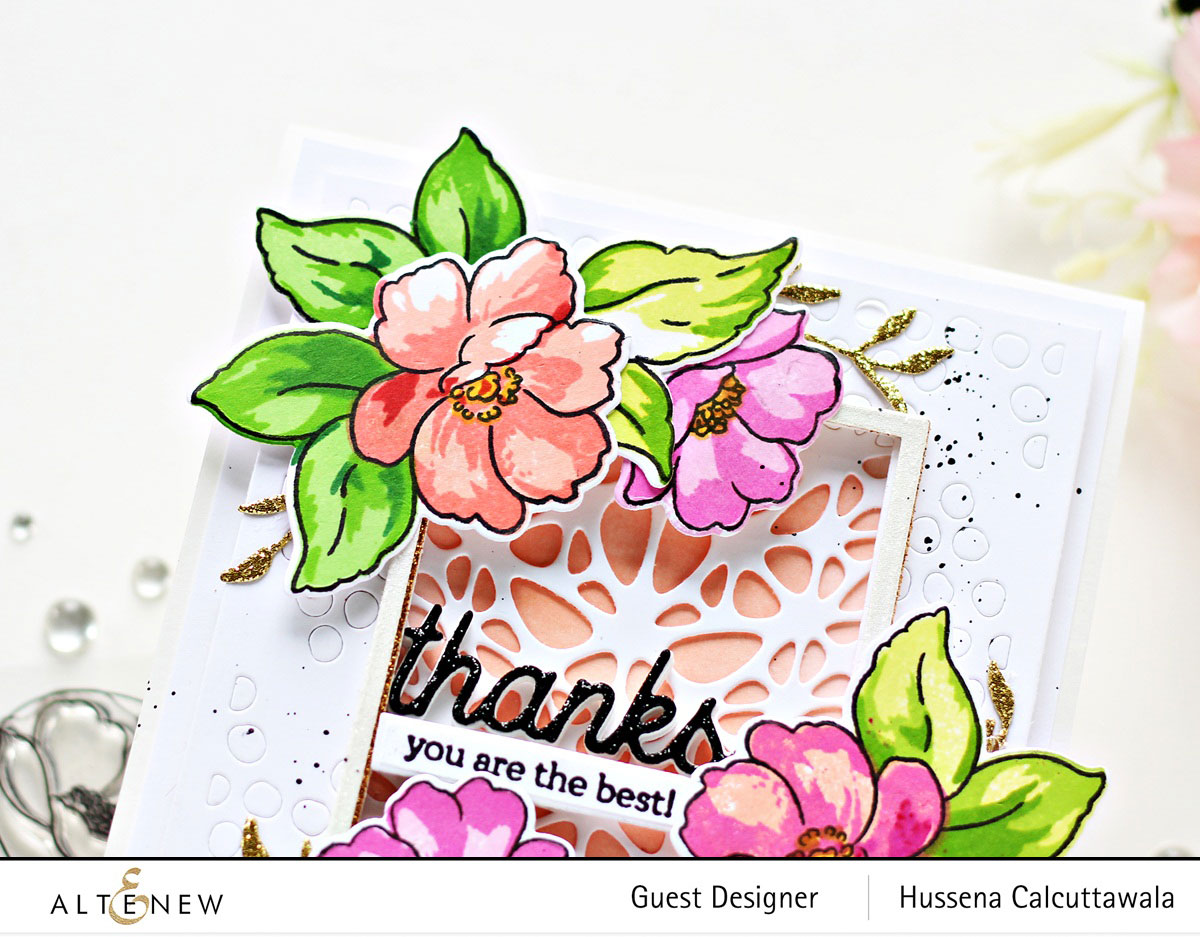
My next card features the Wispy Joy Stamp & Die Bundle along with the Detailed Web Cover Die and the Mini Delight: Petite Reverie Stamp & Die Set.


I started off my card by stamping the Altenew Wispy Joy Stamp Set onto Neenah Classic Crest Solar White Cardstock. I used Altenew Obsidian Pigment Ink for the outlines and then Altenew Warm and Cozy and Rose Petal Crisp Dye Inks for the layers of the flowers, and for the leaves, I used Altenew Tropical Forest Crisp Dye Inks. I stamped the flower centers using Orange Cream Crisp Dye Ink and then die-cut the stamped images using the coordinating dies.

Next, to create my card background, I debossed a panel of Neenah Classic Crest Solar White Cardstock  using the Detailed Web Cover Die in my Platinum 6" Die Cutting Machine, then used the Jet Black Ink Spray to add some splatters on the background. Then, I die-cut a frame out of the top portion of the panel using the Layer 3 Die from the Precision Layering Mini Slimline A Etched Dies. Next, I die-cut White Glitter Foam and Citrine Cardstock using the Layer 3 and Layer 4 Dies from the Precision Layering Mini Slimline A Etched Dies, then offset the gold glitter die cut to create a shadow, before adding it to my card front. Once that was done, I die-cut Citrine Cardstock using the leafy branch die in the Virginia Rose 3D Die Set for some additional foliage and assembled the flowers and leaves around the frame using foam adhesive.

Next, on another piece of Neenah Classic Crest Solar White Cardstock, I blended Orange Cream and Sunkissed inks with a Blending Brush to give the background panel more dimension. Next, I die-cut Neenah Classic Crest Solar White Cardstock  using the Detailed Web Cover Die and adhered it over the blended background panel using Craft Glue.

Then, to finish, I die-cut Black Glitter Cardstock and White Foam using the 'Thanks' die included in the Mini Delight: Petite Reverie Die Set, and adhered the layers together with Craft Glue, for depth. Next, I stamped the rest of the sentiment from the Castle Garden Stamp Set onto a strip of White Cardstock using Obsidian Pigment Ink and adhered it on my panel using foam adhesive. 

Once that was done, I adhered my card panel a top-folding A2 white card base using tape runner.


Giveaway Prizes:
$300 in total prizes! To celebrate this release, Altenew is giving away a $50 gift certificate to 2 lucky winners and a $25 gift certificate to 8 winners! Please leave a comment on the Altenew Card Blog and/or each designer’s blog post on the blog hop list below by 05/10/2022 for a chance to win. Altenew will draw 10 random winners from the comments left on each stop of this blog hop and announce the winners on the Altenew Winners Page on 05/12/2022.


Free Gifts
  • Get a FREE brand new Dreams Come True Mini Inspiration Guide with every order from 05/04/2022 through 05/06/2022. Shop HERE!

  • Get a FREE brand new Dreams Come True Stamp & Die Release Inspiration Guide Ebook  (worth $5.99) with every order of high-value Sweet Moments Bundles. Shop HERE! *Exclusions apply.

  • Get a FREE brand new Online Cardmaking Class with every order from the new Dreams Come True Stamp & Die Release Collection from 05/04/2022 through 05/10/2022. Shop HERE!


Blog Hop Order:
Next Stop on this Blog Hop is the wonderful, Nandini Karmarkar's blog. Just in case you lose your place along the way, here is the complete list of participants so that you can find your way back:

Altenew Blog

Vicky Papaioannou

Terri Koszler

Vicki Boutin 

Jaycee Gaspar

LauraJane

Nathalie DeSousa

Angela Brennan

Michelle Short 

Virginia Lu

Nenette S. Madero

Laurie Willison

Bridget Casey

Jenny Colacicco

Natasha Davies

Tenia Nelson

Linda Westfall

Reiko Tsuchida ***Note: Due to strict regulations in Japan, you might not be able to leave a comment on her blog post.

Rosie Neustaedter 

Emily Midgett 

Amy Hill

Maryam Perez

Sande Woodson

Susan Stagno

Katrina Howe

Mindy Eggen

Eva Bussom

Ann Taylor

Daniel Diaz

                         Hussena Calcuttawala (You are HERE)

Nandini Karmarkar

SathyaKala Sankaran

Susan Busada


Well, that’s all for my projects today! Thanks so much for stopping by and reading. I hope you have a wonderful day!

If you like what you've seen from me, please give me a follow over on my Instagram (@hussena_cal) and/or subscribe to my blog if you haven't already.

Sunday, May 1, 2022

Altenew Build-A-Garden: Magnificent Branch Release Blog Hop + Giveaway ($200 total prizes)

Hello and welcome!
It's the first of the month and I am delighted to be joining  Altenew for their Build-A-Garden: Magnificent Branch Release Blog Hop! The Altenew Build-A-Garden project set is an exciting monthly package that is sure to get the creative juices flowing! Each month includes a stamp set along with a coordinating stencil set and/or die set PLUS a customer-favorite Mini Blending Brush! When signed up, you are guaranteed a spot in their monthly Build-A-Garden releases and will receive a set each month - at a specially discounted price! ($35.99 →$29.99)

If you arrived here from, Mindy Eggen's Blog, then you are on the right track. If this is your first stop, then you will want to start at the beginning, the Altenew Card Blog. We've got tons of inspiration and giveaways for you on the hop today, so keep reading till the end of this post for more information.


 The Build-A-Garden: Magnificent Branch Set can help you create two card fronts at once with this first-of-its-kind floral stamp set! The imaginative set features a magnificent tree branch bearing flowers that you wouldn't normally see together in nature. Cut the design just right for a card featuring the cupped rose and another card featuring the flat rose. Stamp the heartwarming sentiments and quotes to inspire your loved ones. 

This set contains the following products:

- one 6" x 8" stamp set containing 10 stamps made in the USA from high-quality photopolymer
- one layering stencil set containing 4 stencils that coordinate with the stamp set
- one Mini Blending Brush for ink blending

Note: These products are NOT sold separately. 

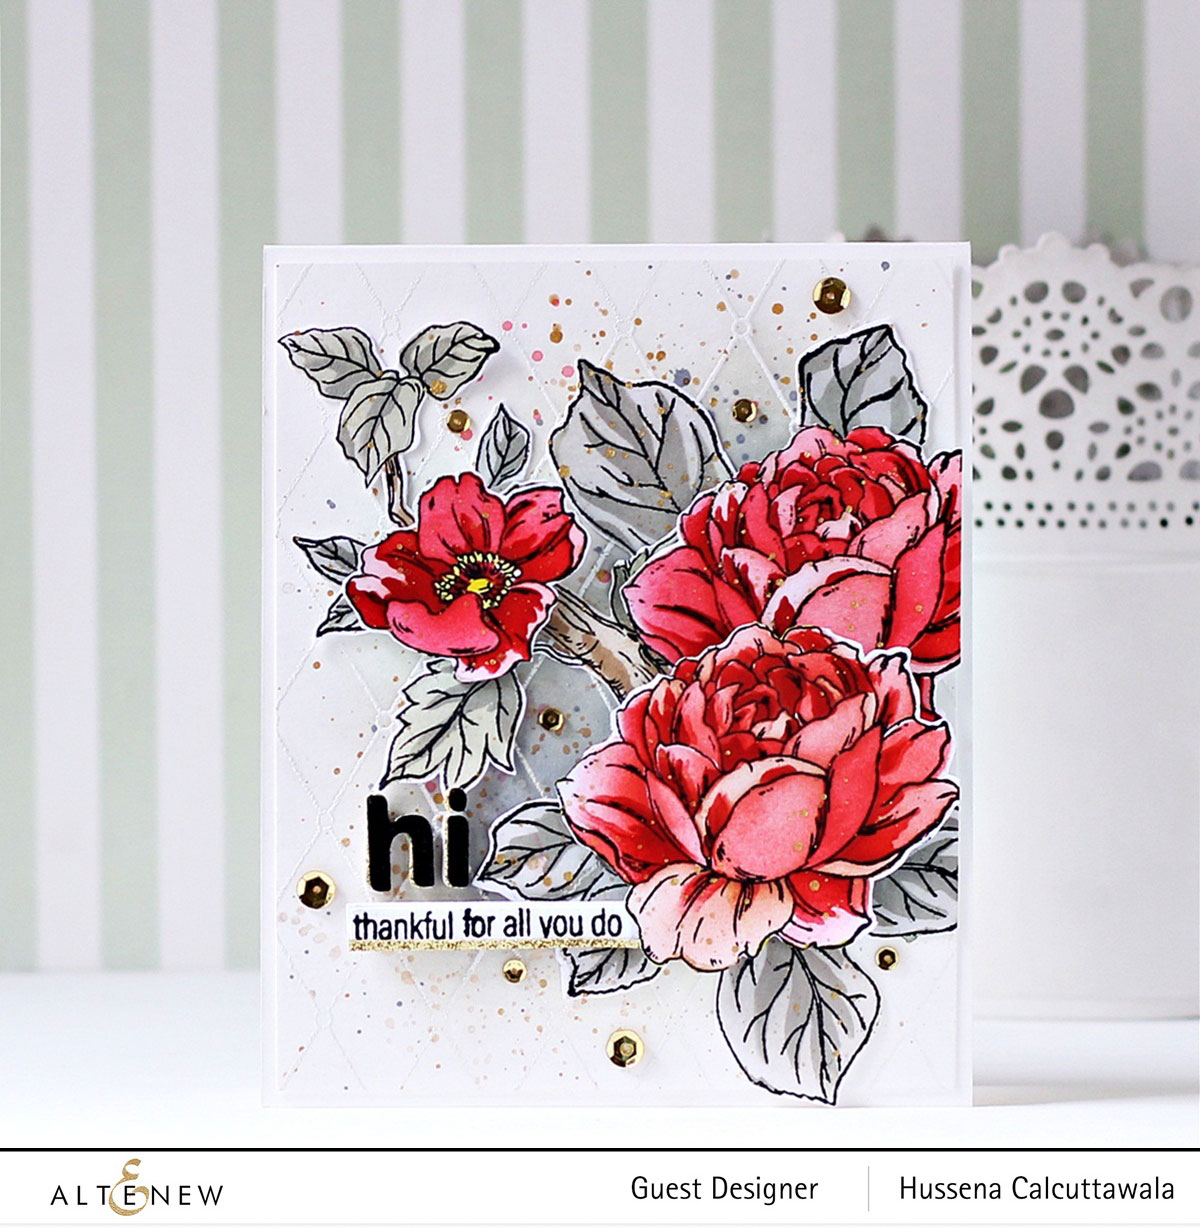
I made a bright and cheerful thank-you card using the Build-A-Garden: Magnificent Branch Set, Pattern Play: Diamond Stamp Set, and Simple Alpha Die Set.


The Build-A-Garden: Magnificent Branch Set is simply incredible! The layering stencils in the set function very similarly to the layering stamps for which Altenew is known so well, but they allow for huge versatility in size and technique that can’t be achieved as easily with a stamp set. 
To create my card, I started by stamping the image on a card panel of Neenah Classic Crest Solar White Cardstock using Obsidian ink. Then, I added color, layering one stencil at a time (there are 4) using Mahogany Bark, Burnt Red, Canyon Clay, and Pastel Sunrise inks for the flowers and Evening Gray, Moon Rock, and Lava Rock inks for the leaves on Neenah Classic Crest Solar White Cardstock plus Hazelnut and Milk Chocolate inks for the branches using the Mini Ink Blending Tool Brush Set.

I trimmed the panel down a bit and then fussy-cut the different images using a pair of scissors and kept them aside to work on my card background. To create the background, I stamped the background design from the Pattern Play: Diamond Stamp Set in Versamark Ink onto Neenah Classic Crest Solar White Cardstock, then sprinkled some White Embossing Powder over the image, and melted the powder with a Heat Tool. Then, I watercolored the panel using Lava Rock Brush Markers and drug the color out loosely with water for a soft, watercolored background. 

Once that was done, I splattered the card front with Enchanted Gold, Sterling Silver, and Rose Quartz paints from the Metallic Watercolor Set for a fun, artsy look. I also used some Antique Gold Metallic Spray to add some shiny, shimmery gold splatters to the flowers and leaves. Then, I used the Instant Dimension Foam Tape and Craft Glue to add lots of layers of the stenciled  pieces to the card panel. I adhered them all over the card front, leaving a small space on the left side for a greeting.

For a greeting, I die cut the word 'Hi' three times from the Simple Alpha Die Set from some Black Glitter Cardstock and Citrine Cardstock, then adhered them all together to create a dimensional die cut and adhered it to the left of the blended bouquet. The thick charcoal die cut pops off of the center of the heat-embossed background!  Then, I stamped the sentiment from the Build-A-Garden: Magnificent Branch Stamp Set onto a strip of White Cardstock using Obsidian Ink and affixed it to my panel using foam adhesive. The sentiment in the set isn't present in a vertical line, so I masked the stamp to have it combined into one line. Many of your sentiment stamps can be masked off to create different messages. Simply arrange your stamps on the block, then place a piece of tape over the word(s) you don’t want to stamp. You can use clear tape, washi tape or any other kind of low-tack tape!
\

To complete, I adhered the panel to a top-folding A2-sized white card base using tape runner. I added a few Antique Gold - Sequins to help add some sparkle to the card front.


Giveaway Prizes:
$200 in total prizes! To celebrate this release, Altenew is giving away a $50 gift certificate to 2 lucky winners and a $20 gift certificate to 5 winners! Please leave a comment on the Altenew Card Blog and/or each designer’s blog post on the blog hop list below by 05/07/2022 for a chance to win. Altenew will draw 7 random winners from the comments left on each stop of this blog hop and announce the winners on the Altenew Winners Page on 05/092022.


Blog Hop Order:
Next Stop on this Blog Hop is, Laurie Patterson's blog. Just in case you lose your place along the way, here is the complete list of participants so that you can find your way back:

Altenew Card Blog

Vicky Papaioannou

Emily Midgett

Cheryl Espie

Jaycee Gaspar

Carol Hintermeier

Jenny Colacicco

Natasha Davies

Laurie Willison

Nathalie DeSousa

Rosie Neustaedter

Terri Koszler

Bridget Casey

Virginia Lu

Sande Woodson

Michelle Short

Nenette S. Madero

Colleen Balija

Tenia Nelson

LauraJane

Maryam Perez

Amy Hill

Mindy Eggen

                       Hussena Calcuttawala (You are HERE)

Laurie Patterson

Nandini Karmarkar

Daniel Diaz

Susan Busada

Katrina Howe

Ann Taylor

Eva Bussom

Linda Westfall

Susan Stagno

Preeti Chandran

SathyaKala Sankaran


Well, that’s all for my projects today! Thanks so much for stopping by and reading. I hope you have a wonderful day!

If you like what you've seen from me, please give me a follow over on my Instagram (@hussena_cal) and/or subscribe to my blog if you haven't already.