Hi Friends,
Today I am sharing with you all a short tutorial on how to color your Seam Binding ribbons -For all those of you who are wondering what seam binding ribbon is ...Its a very soft malleable ribbon which comes in two colors mainly ...White and Natural ...But many branded companies sell these ribbons in variety of colors and sizes and these are used a lot in crafting ..Whether it be card making ,scrap booking or any type of projects ...These are very versatile and they really add a little special touch to your projects :)...And as I mentioned earlier these ribbons come in two colors and that's where my tutorial comes in ...I am sharing with you a simple and fast method on coloring these ribbons to any color of your choice:)
Here's the supplies that you will need :

-You will require :
1.Seam Binding Ribbon -( Color Conceptions Store )
2.Any DYE -BASED Inks pads /Distress Ink/ Stains /Glimmer Mists
3.A small bottle of a Mini Mister -Mine is a local buy
4.Any laminated sheet / Ranger Craft Sheet
And this is how you go about coloring it :-

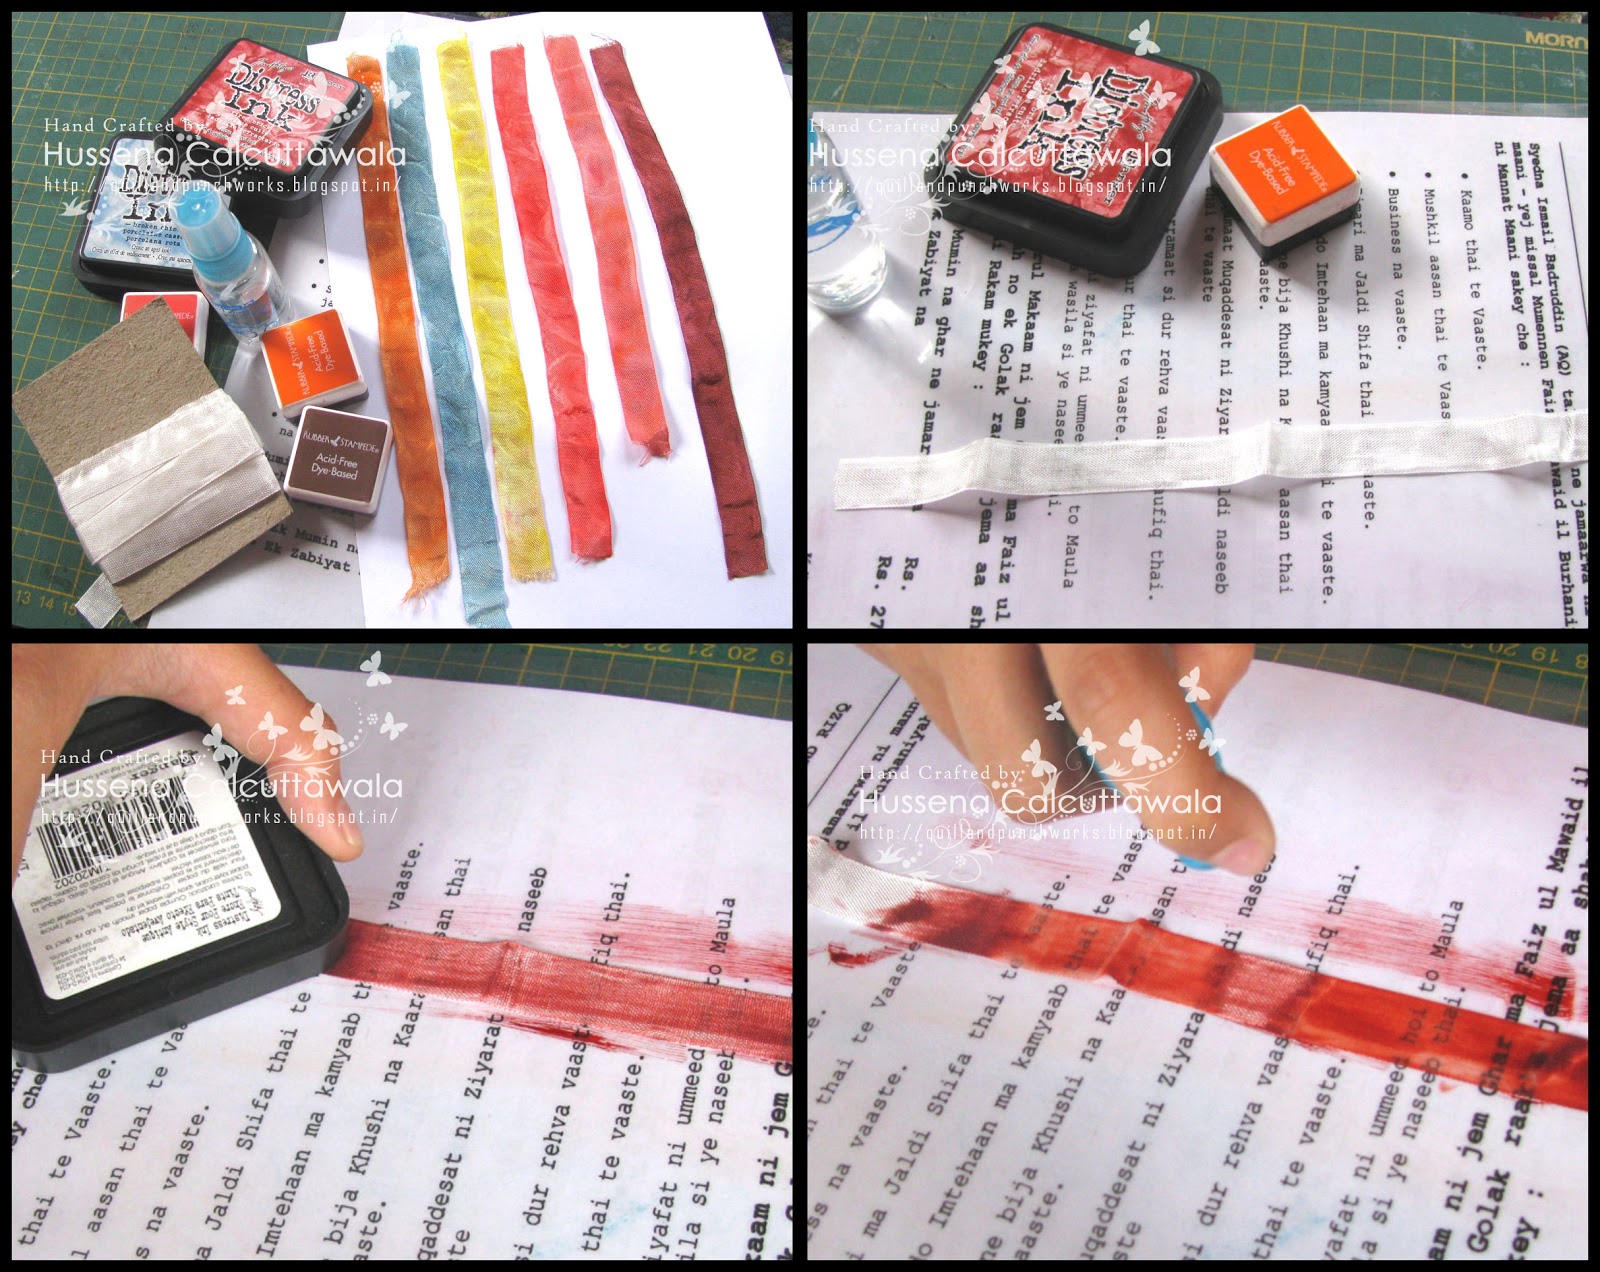
Step 1 -Get your supplies ready!
Step 2 - Take your seam binding ribbon and keep it on a laminated craft sheet -Since I don't have a craft sheet took a A4 size paper & got it laminated and it works perfectly as a craft sheet...First came across this idea from Piali's blog! :)...Thank you Piali :D
Step 3- Apply your ink pad directly to the ribbon...You can color it completely or just dab on the ribbon depending on how bright you want your color!
Step 4 - Take your mini mister & spray water twice or thrice on to the ribbon ....This also depends on the size of the ribbon!

Step 5 -Once you have sprayed the ribbon with water start scrunching/crinkling it completely.
Step 6 - Then try soaking up all the left -over ink in your craft sheet by rubbing your seam binding ribbon over it...This will also help you to give it an even color!
Step 7 -Then open the ribbon & lay it straight..You can either let it air -dry or dry it using a heat tool or a hair dryer...Either thing works! :)
And taddaa!...Your ribbon is ready in 2 minutes & in any color of your choice :)) ...These ribbons are perfect for creating the Shabby chic look at the same time they look very elegant too!
 I had some old Rubber Stampede Dye based ink pads which I had not been using because the colors were too dark...But these seem to work perfect with these ribbons & I even tried my hand at using Memento Dew Drops with the ribbon and the colors came out so well..!!
And now if you are wondering where you would you get these ribbons from..??..Then I am very happy to let you know that Priya from Color Conceptions Store has them at very Reasonable rates in her store right now!..So if you are like me & want to try this out then go ahead & place your order with Priya :))
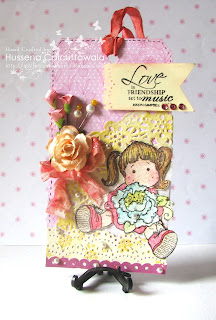
And here are My Card & Tag using these awesome ribbons! :)
.JPG) Here I have used the ribbon to make a small bow below the flower in the exact shade as my leaves ...And because the ribbon is so malleable I scrunched into shape & stuck it with glue & it retained its shape so well...That is the best thing about the ribbon that you can scrunch it ,mold it in any shape & unlike stain or cotton ribbons this always retains its shape..!!
Here I have used the ribbon to make a small bow below the flower in the exact shade as my leaves ...And because the ribbon is so malleable I scrunched into shape & stuck it with glue & it retained its shape so well...That is the best thing about the ribbon that you can scrunch it ,mold it in any shape & unlike stain or cotton ribbons this always retains its shape..!!
And here's my tag where I have scrunched the ribbon & made a bow out of it...I could'nt have done this with a satin ribbon even if I wanted but with seam binding it worked perfectly! :-
Well hope you all liked the tutorial..If you have any queries do leave me comment below..I will be happy to answer them!
Have a nice day everyone! :)
Today I am sharing with you all a short tutorial on how to color your Seam Binding ribbons -For all those of you who are wondering what seam binding ribbon is ...Its a very soft malleable ribbon which comes in two colors mainly ...White and Natural ...But many branded companies sell these ribbons in variety of colors and sizes and these are used a lot in crafting ..Whether it be card making ,scrap booking or any type of projects ...These are very versatile and they really add a little special touch to your projects :)...And as I mentioned earlier these ribbons come in two colors and that's where my tutorial comes in ...I am sharing with you a simple and fast method on coloring these ribbons to any color of your choice:)
Here's the supplies that you will need :

1.Seam Binding Ribbon -( Color Conceptions Store )
2.Any DYE -BASED Inks pads /Distress Ink/ Stains /Glimmer Mists
3.A small bottle of a Mini Mister -Mine is a local buy
4.Any laminated sheet / Ranger Craft Sheet
And this is how you go about coloring it :-
Step 1 -Get your supplies ready!
Step 2 - Take your seam binding ribbon and keep it on a laminated craft sheet -Since I don't have a craft sheet took a A4 size paper & got it laminated and it works perfectly as a craft sheet...First came across this idea from Piali's blog! :)...Thank you Piali :D
Step 3- Apply your ink pad directly to the ribbon...You can color it completely or just dab on the ribbon depending on how bright you want your color!
Step 4 - Take your mini mister & spray water twice or thrice on to the ribbon ....This also depends on the size of the ribbon!

Step 5 -Once you have sprayed the ribbon with water start scrunching/crinkling it completely.
Step 6 - Then try soaking up all the left -over ink in your craft sheet by rubbing your seam binding ribbon over it...This will also help you to give it an even color!
Step 7 -Then open the ribbon & lay it straight..You can either let it air -dry or dry it using a heat tool or a hair dryer...Either thing works! :)
And taddaa!...Your ribbon is ready in 2 minutes & in any color of your choice :)) ...These ribbons are perfect for creating the Shabby chic look at the same time they look very elegant too!

And now if you are wondering where you would you get these ribbons from..??..Then I am very happy to let you know that Priya from Color Conceptions Store has them at very Reasonable rates in her store right now!..So if you are like me & want to try this out then go ahead & place your order with Priya :))
And here are My Card & Tag using these awesome ribbons! :)
.JPG)
And here's my tag where I have scrunched the ribbon & made a bow out of it...I could'nt have done this with a satin ribbon even if I wanted but with seam binding it worked perfectly! :-

Well hope you all liked the tutorial..If you have any queries do leave me comment below..I will be happy to answer them!
Have a nice day everyone! :)


Hussena!! Thats a lovely tutorial and amazing card and tag to showcase the ribbon!! Thanks for sharing sweetie :)
ReplyDeleteWow...Hussena. Love the card!!! Heard above seam binding coloring...First time here to see a tute and thanks for sharing idea...And much thanks for sharing craft sheet idea...Its of great great help :)
ReplyDeletewow... you really are an amazingly creative one... love the colors... fabulous stuff Hussena!
ReplyDeleteGorgeous tag and card!!
ReplyDeleteLove the design and all the details!!
If you have Copics, gelatos, and other inked pens I heard they work well to color the ribbons too. I have never tried it with the Copics though?
Hugs!
Great tutorial Hussena!! Thank you so much for sharing, We can also do this same technique with satin ribbons too.. rt?
ReplyDeleteHey! Bought some seam binding ribbon from priya and i was gonna do the same thing... Your ribbons are just so awesome...and the card and tag too are! :) thanks so much for the tutorial..
ReplyDeleteVery nice tutorial and equally beautiful card.Love the way you showed how to use that coordinating and colored ribbon.Thanks for sharing.
ReplyDeleteThanks for sharing hussena ...never had this ribbons .so it is nice to know about various craft products..loved the card n tag..gorgeous as always..:)
ReplyDeleteGr8 tutorial with excellent card and tag.....n for laminated sheet we can also use old laminated table mates or u get cheaper laminated tablemates .which also works gr8.
ReplyDeleteFabulous card and the tag! Thanks for sharing the tutorial :)
ReplyDeleteYour card looks fabulous Hussena.
ReplyDeleteI just cant handle ribbon but sure enjoy seeing your beautiful creations!!
ReplyDeleteUseful tute Hussena... Thanks for sharing.
ReplyDeleteVery informative tutorial, Hussena. And, your card and tag are very pretty.
ReplyDelete