Showing posts with label Pretty Pink Posh Sequins. Show all posts

Friday, October 13, 2017

There's no place like Home | Card

Hello friends!
I have a new card to share today which is pretty different from my usual style. This card has no flowers on it. (LOL!)
Here's a look at my card :


I have again used a stencil from CrafTreat on this card. This one is called the Layered Cityscape. This stencil comprises of two designs - the negative and positive of the Cityscape. The positive consists of all the windows and the details that you see in the buildings. The negative creates the silhouette of the cityscape.

To create this card, I first stenciled the silhouette of the buildings using Black Soot Distress ink. I sponged it quite heavily on a watercolour paper to give that extreme crisp black outline.  Using the positive design of the stencil, I create the window details by using the Papericious White Modelling Paste and with a spatula, I spread the paste over the design to create that raised effect. It looks super cool in real life!

I then did some ink blending on the background of the cityscapes using Distress inks and I die-cut a semicircle using a Spellbinders circle die on my card panel which I then popped over the inked background using foam dots. Before adhering the card panel, I stamped some red hearts and the black birds from the Winnie and Walter Our Town and Comfort + Joy stamp sets respectively. I also stamped the sentiment on the card front which is from the Winnie and Walter Happiest of Holidays by Evelin T Designs stamp set. I added a strip of gold glitter paper and a strip of stamped back stripes along with few clear sequins to finish off my card.


I'm entering my card in the following challenges :


I hope you liked my card. I would love to hear your comments/suggestions on it. They always make my day :)

Thank you so much for dropping by!

Hugs for being Amazing | Card

Hi friends,
I am back with my second post for the day :D I have one more card to share using the same Rose stencil that I used in my previous post. If you have missed my first post, you can check it out HERE.

This time I have used shades of yellow to colour the rose.


The Rose stencil is a three-layered stencil and is very easy to work with as the stencils already have marks for alignment etched on it. I used Altenew Pocketful of Sunshine inks to colour this gorgeous rose. The leaves were also coloured using Altenew Tropical Forest inks. I coloured and fussy-cut them out and arranged them on my card panel.

I watercoloured light grey stripes on my card panel to compliment the yellow rose. I die-cut the word 'Hugs' out of black cardstock 4-5 times for creating that stacked look. The 'for being amazing' has been heat-embossed using White embossing powder on a strip of black cardstock. I also added two gold glitter butterflies, some clear sequins and black paint splatters to finish off my card.

This is how the card looks assembled together.

I am entering this card in the following challenges :
Winnie and Walter Background Building Challenge with Mayuri ( I have created my own background by watercoloring the grey stripes)
The Flower Challenge - Use Your Favourite Flower (If I win, I would like to go with The Ton)


I hope you liked my card. I would love to hear your comments/suggestions on it. They always make my day :)

Thank you so much for dropping by!

Saturday, September 30, 2017

Leading Lady | Post Four

Hello everyone,
Today is my final post as a Leading Lady this month on the Winnie and Walter blog. I am really honoured to have been given this opportunity and I had so much fun working with their old and new releases to create cards and other projects. Today, I have two cards to share and I've gone floral all the way :D


For my first card, I have used the flower from the In Bloom : Elsa's Flora set. I lightly coloured it using Peacock Feathers Distress ink and did my shading using Prismacolor pencils.

The leaves, berries and the entire foliage is also from the In Bloom: Elsa's Flora stamp set. I wanted to go with a monochromatic look by highlighting only the colour of the flowers against the grey background so I coloured my leaves and other foliage in grey. 

I also added a pop of colour here and there by adding the stamped and fussy-cut berries. If you see closely, I have also done some light yellow stenciling using the Do You See What I See Creative Screening.  The sentiment banner is from the The Big, the Bold and the Extras stamp and die set. I finished off the card by adding few black paint splatters and silver sequins. 


Moving on to my second and last project.

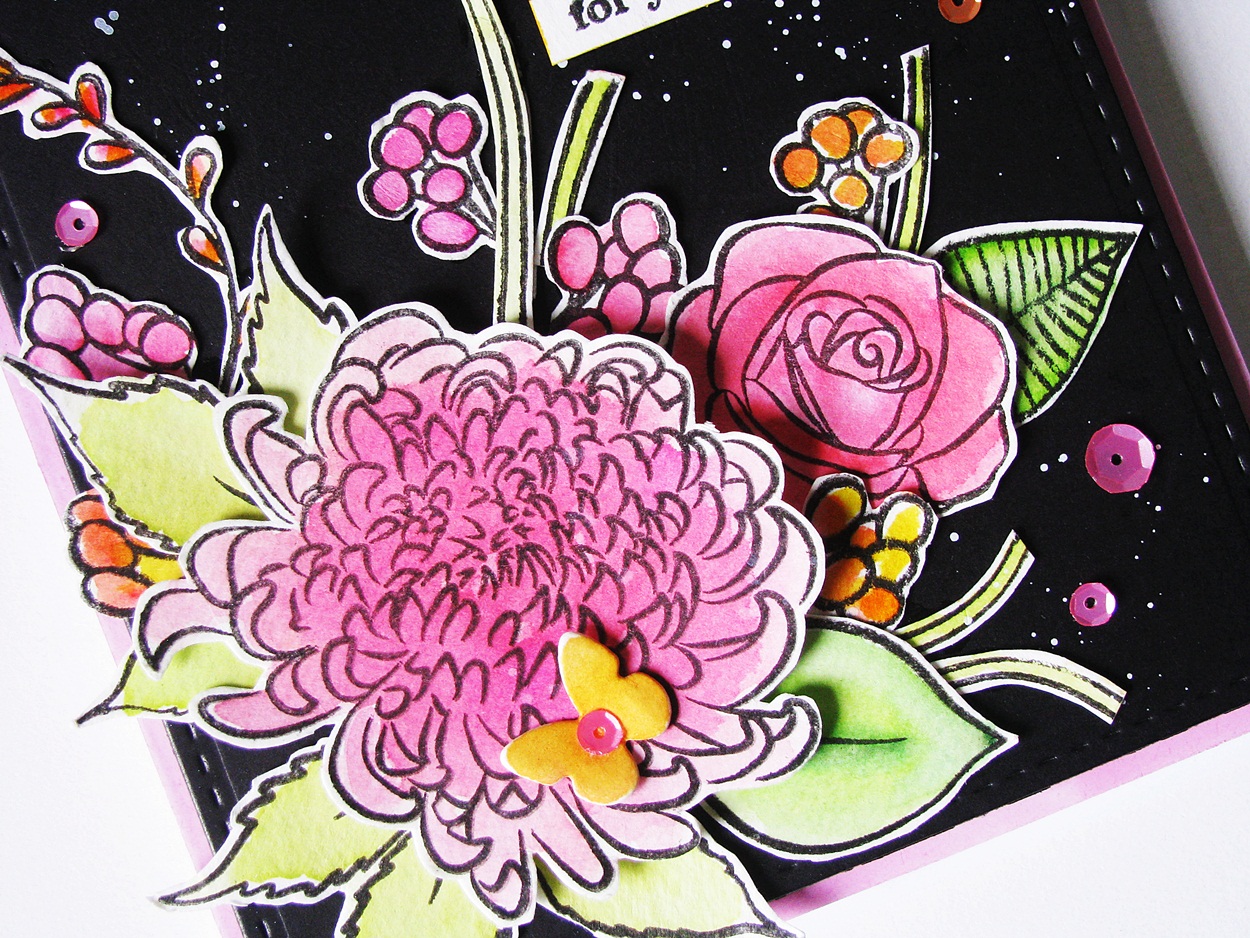
This card has a riot of things going on. Haha :) It's a rather full design and I tried to do something different. I love the way the colours pop against the black background!
I have used the flowers and leaves from the In Bloom: Anna's Flora and In Bloom: Renee's Leaves. I stamped the images on watercolour cardstock using Versafine Onyx Black ink and did loose watercolouring using various shades of Distress inks. I fussy-cut the images and have popped some using foam-dots while others are stuck directly on the card  panel.

For the sentiment, I have heat embossed the word 'thankful' from the Happiest of Holidays stamp set and the 'for your friendship'  is also from the same set. The butterflies have been die-cut using the Audrey's Cutaways die set and watercoloured. The sequins are from Pretty Pink Posh.

I added some white paint splatters to make the look more bold and dramatic :)

So with that, we come to an end to this post. I had a wonderful time sharing my projects and hope you liked them too. I would love to hear what you think of today's cards :)

Thank you so much for dropping by! I have a $30 gift card to give away to the w and w store.

Have a nice day everyone!

Saturday, September 16, 2017

Winnie & Walter Leading Lady | Post 2

Hello everyone!
I am back with my second post at the w & w blog. Today I will be sharing cards I made using products from the new August release.


Again, I am starting out with a floral card first :
To make this card, I stamped and die-cut some flowers and leaves from the In Bloom: Shirley's Blooms stamp and die set. For the flowers, I have used two different colored dye inks for contrast between the inner and the outer petal. I also did some pencil shading using Prismas on the centres of the flowers.
I stamped the polka dot circles using stamps from the Ring in the Celebration set. I then die-cut the buds using the dies from Shirley's Blooms Cutaways.


To die-cut the frame, I first stamped the scalloped circle with Versafine Onyx Black ink and then die-cut it out using the coordinating dies from the Ring in the Celebration Cutaways.


I also die-cut a card panel using the largest rectangle scalloped frame die from the Audrey's Cutaways set. My background was created by randomly stamping the black rings from the Shirley's Blooms set. I also colored in these rings using Prismacolor pencils.  Finally I popped the flowers and leaves on foam dots. The sentiment is from an older set - The Big, the Bold and You.


For my second card I have created a fun shaker :)

I decided to work with some soft colours. I started by stamping my card panel with three tiny images from the Ring in the Celebration set. I used different shades of dye inks to stamp them.


The little cake in the centre of the card was stamped and die cut using the coordinating die from the same set. I also added two more stamped and die-cut circle frames, one with a sentiment around it and one a decorative frame. Both were popped on foam dots. The ribbon banner and the sentiment is again from a old set - The Big, the Bold and Extras. I finished off the card by adding a little bit of Clear Stickles to the stars, the cake and the centre of the gift bows.


I love how this came together really quick - the set is perfect for making birthday cards and pretty tags which I shall be sharing in my next post. The Ring in the Celebration set is really very versatile and I'm definitely going to be reaching for it soon.


I hope you liked my cards and are inspired to create your own. I would love to hear what you think of them. Don't forget to comment on my blog post for a chance to win a $30 gift certificate to the Winnie & Walter store. Winner will be announced on my blog, at the end of the month.


Have a great day ahead!

Saturday, July 29, 2017

Just Saying Hello | Card

Hi friends,
I am back to share another card today. I had made this a few days back, but just got around editing the pictures. I have made this card using some of my newest crafty goodies.  Here's a look at it :


 Close-up of the magnolias which I have watercoloured.


A flat-lay view of the card :

To begin with, I stamped the magnolias, the leaves and buds from the Altenew Magnolias For Her set using Versamark Embossing ink. I stamped it on Canson Montval watercolor cardstock and then heat-set the images in white. After I heat-embossed them, I coloured them using my Zig Clean Color brush pens. This is my favourite watercolour mediums these days and I love using them for all my projects. I fussy-cut the images and arranged them on my card base. The sentiment is from the Altenew Super Script stamp and die set. The 'just saying' has been heat-embossed in gold on a strip of white cardstock which I then distressed on the edges using Worn Lipstick Distress ink. I also watercoloured the base of my card base using Hickory Smoke Distress ink. I then added a strip of gold cardstock which I created by smooshing my Versamark ink pad on a piece of white cardstock and then heat-embossing it in gold. Finally I added few sparkling clear sequins from Pretty Pink Posh and gold paint spatters.

I hope you liked my card. I'm entering this in the Altenew Inspiration challenge this month. I really loved the colours and had to play along!


Thanks for dropping by! See you soon with another card on Monday :)

Wednesday, April 26, 2017

You Are Amazing | Card

Hello everyone,
Thank you so much for leaving me so many amazing comments on my previous post. I really loved reading each and every comment. If you haven't checked it out yet, HERE is the post.
I have a card to share today which I have made to enter the April Inspiration Challenge at Altenew. This color combination is very close to my heart. Absolutely love these colors together and when I first saw the inspiration picture, the Vintage Roses stamp set came to my mind. It's one of the most popular sets released by Altenew, but amazingly I have quite recently acquired it. I have been having so much fun with this set creating cards, money wraps, tags and much more! Here's a look at my card based on the inspirational colors :


To create this card, I first took a card base measuring 4 1/2 inches by 5 and 1/2 inches. Then I took a card panel and ink blended it using Squeezed Lemonade Distress ink on the top right corner of my card. For my focal I used the Altenew Vintage Roses stamp set for the oh-so-gorgeous roses as well as Altenew Peony Bouquet set for stamping the leaves and foliage. For the flowers, I used the Glacier Caves inks for stamping and for the leaves I used the Sea Shore inks. They were then all die-cut using the coordinating Vintage Roses die set. I have fussy-cut the leaves and foliage from the Peony Bouquet set. The pretty butterflies are from the Altenew Painted Butterflies set. I used the inks from the Summer Afternoon set for stamping them. The sentiment is also from the Painted Butterflies set. I have heat embossed it in white on some black cardstock and added a strip of silver glitter Washi Tape and black striped Washi tape to accentuate it further. Lastly, I adhered some clear sequins from Pretty Pink Posh.


I'm entering my card in the Altenew Inspiration Challenge. 


I hope you like my card! Thank you so much for stopping by.

Saturday, March 25, 2017

Soft Watercoloring with Masking Fluid | Card

Hello bloggy friends,
I have a card to share today which I created for my inspiration post over at Pretty Paper Studio. It's something I have never tried before so I really enjoyed the creative process. I have a tutorial to share as well on how I created my card.


I have used masking Fluid by Winsor and Newton to mask my flowers and background. Here's a look at the step by step process :

For this technique, all you need is a bottle of masking fluid, a paint brush and ofcourse some watercolour paper and mediums. To begin with, draw some loose florals using your masking fluid on a watercolour paper. I used a real-life stamp set from the Wplus9 Freehand Florals set for my inspiration. You can use any stamped image or even an illustration for your reference. After you use your paint brush to draw using your masking fluid, let it dry.

A look at the image after using Masking Fluid.

Once it’s dry, start adding watercolours around your masked areas. Let the water do all the work for you by picking very little pigment of watercolour as shown below. I have used Zig Clean Colour Real Brush pens for colouring, but you can definitely use any medium of your choice. I’m not a pro at colouring nor a professional artist, I have just played around with the masking technique to create a look which was pretty to me.

I continued colouring free hand with my Zig Markers to create the delicate foliage and flowers. Once I was happy with the floral arrangement, I die-cut this card panel using a Winnie and Walter die and mounted it to my card base. I stamped my sentiment which is from the Altenew Amazing You stamp set and added few clear sequins and black paint splatters to finish off my card.


I am linking my card to the :


I hope you liked my card and enjoyed reading my post. Let me know if you have any questions or would like to know anything more. Thank you so much for dropping by!