Showing posts with label Shaker Card. Show all posts

Tuesday, October 26, 2021

Waffle Flower Guest Designer | October Challenge - Rainbow Shakers

 
Hello there, crafty friends!
I am thrilled to share that I am joining in with the Waffle Flower October Challenge with Arjita for this week’s inspiration using Rainbow colors. 

This month is all about Shaker Cards and this week's challenge in particular is to use Rainbow Colours on your project. Shaker Cards are so much fun to make and even more fun to shake! :D I absolutely loved this challenge! I haven't made Shaker Cards in a while now, so it was so wonderful to create one for this week's challenge.

I have made a pastel floral card using the Anemone Stamp and coordinating Die Set, Quilt Cross Panel Die, and the Simple Stems Stamp and coordinating Die Set

To create my card, I used the Quilt Cross Panel Die not only for the shaker part, but also as my background. I started by die cutting Snowdrift Cardstock twice using the Quilt Cross Panel Die to use as the layers to build up the shaker. I then cut out the same Quilt Cross Panel Die using Acetate and White Foam Sheets for my shaker piece. Once that was done, I watercolored an A2 white panel cut from Snowdrift Cardstock in pastel rainbow colours using an assortment of watercolor half-pans from the Watercolor 36 Pan Set using a Watercolor Brush.

Then, to assemble it all, I adhered four of the outline layers together with liquid glue. I placed the watercolored panel in the center and filled it with Iridescent Micro Beads before adhering a piece of acetate on top, followed by another die cut layer. My shaker panel was now ready to be popped on my card base! 

I stamped the anemones and the leaves from the Anemone Stamp and the Simple Stems Stamp Sets onto Neenah Solar White Classic Crest Cardstock using Versafine Onyx Black ink. I coloured the flowers using the Nuvo Alcohol Markers from the Apricot Ombre Set, while the leaves were coloured using Persian Lime and Pea Pod markers from the Irish Clover Set. Once I had coloured the images, I cut them out using the Anemone coordinating Die Set and Simple Stems coordinating Die Set. I assembled the pieces on to my card panel and adhered them down using foam adhesive. Next, I stamped the sentiment from the Anemone Stamp onto a strip of Snowdrift Cardstock using Versafine Onyx Black ink and cut out the piece using the coordinating Die Set. I popped the piece onto my card panel using foam adhesive for dimension. Then, I adhered my shaker panel down to a top-folding white card base. Finally, to complete, I added Ranger Diamond Stickles to the centres of the flowers for a bit of glitz and glam!

I hope you liked my floral shaker card and thank you so much for stopping by today. A huge thank you to Sunshine and Arjita at Waffle Flower for inviting me as guest designer and making me feel very welcome!

Please head on over to the Challenges at Waffle Flower Blog and have a look at more inspiration by Arjita for Week 4: Rainbows, along with inspiration for weeks 1-3 of the October Shaker Cards Challenge. You'll love what you see and want to play along for sure! Don’t forget to post your Waffle Flower Shaker Challenge Cards on Instagram so we can see them. Make sure to tag Waffle Flower and use the hashtag #WFChallenge2110


If you like what you've seen from me, please give me a follow over on my Instagram (@hussena_cal) and/or subscribe to my blog if you haven't already.

Wednesday, March 10, 2021

Spellbinders & Amazing Paper Grace Die of the Month | March 2021


Hello, crafty friends!
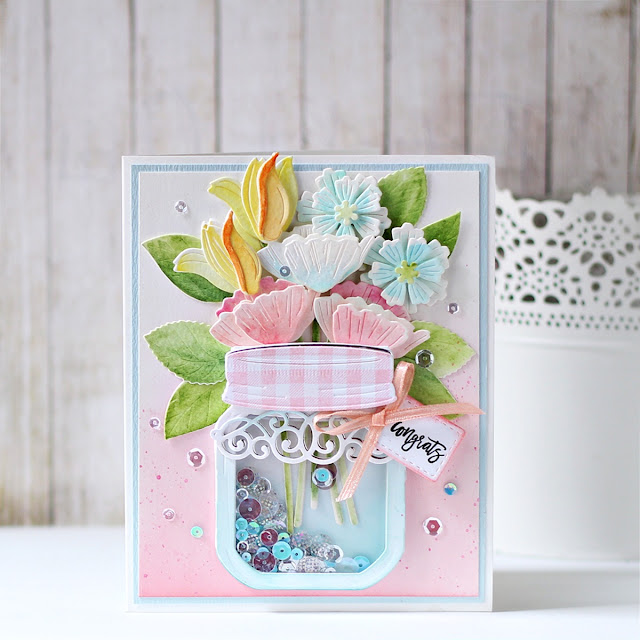
I have a Card to share today featuring the Spellbinders + Amazing Paper Grace March 2021 Die of the Month Set. This month's "Mini 3D Vignette Floral Mason Jar" Set is perfect for making gorgeous cards, gift boxes, gift bags, and more in no time! This die set features 16 dies.

I created a side-folding Mason Jar Shaker Card filled with dimensional flowers using the Mini 3D Vignette Floral Mason Jar. This is a beautiful set of dies and it features a bouquet as well as lovely dimension, and folds flat like all of the 3D Vignettes.

I have a soft corner for Mason Jars and I was thrilled to find that Becca has designed this stunning die set for this month.  To create my card, I die cut the jar, the various flowers, stems, leaves, the lid, the little tag, and the filigree lace element from White Cardstock using my Spellbinders Platinum 6" Machine

Once that was done, I die cut the jar from Acetate, White Fun Foam, and White Cardstock to create the shaker piece for my card front. I also die cut an aperture in the front of the jar, so that the sequins and stems would be visible. I added a bit of soft colour to the front and back pieces of the jar using Pool Play ink with a blending tool for visual interest.

The flowers, stems, and leaves were coloured using Mermaid Markers by Jane Davenport. Once they were dry, I assembled the different flowers together to create a nice bouquet. For my card background, I blended Rustic Rose ink on a piece of White Cardstock using a blending brush, concentrating the colour towards the bottom, to create an ombre effect. I also blended the ink around the sides with a blending brush just to define the edges and added some paint splatters for a nice, artsy look. 

I assembled all the different pieces of the mason jar together and popped it over on my card panel. To create the patterned lid, I used a Gingham Stamp to stamp on the die cut piece in Rustic Rose ink. Then, I adhered it using foam squares to the jar. The little lace filigree element was lightly coloured using Pool Play ink with a blending tool and tucked in below the lid using Craft Glue. I stamped my sentiment on the stitched tag using with Black Licorice ink and threaded some satin ribbon on the top to add over the jar. 

The flowers were all adhered using foam squares, while the leaves were glued down using Craft Glue. I affixed my ink blended background piece to a panel of light blue cardstock and then adhered it to a side-folding white card base using Craft Glue. As the finishing touch, I adhered a couple of Sparkling Clear Sequins. 


The Amazing Paper Grace Die of the Month is available exclusively at Spellbinders Paper Arts during March 2021. You can get the Mini 3D Vignette Floral Mason Jar Set at the special Cub Kit price, along with other membership perks.

If you'd like to see some more project inspiration using the Amazing Paper Grace Die of the Month, check out the Spellbinders Blog where Becca shares some stunning project samples using it.  

Amazing Paper Grace Die of the Month Membership


That’s it for me today! I hope you liked my take on the die set! If you like what you've seen from me, please give me a follow over on my Instagram (@hussena_cal) and/or subscribe to my blog if you haven't already.

Thank you so much for your visit to my blog today!

Thursday, March 15, 2018

Spellbinders Guest Post | Three

Hello everyone!
I am sharing my final post I made as a Guest Blogger on the Spellbinders blog. I have had an absolutely amazing time working with the 3D Vignettes Die Collection by Amazing Paper Grace. You can check out my first and second post using these dies on the Spellbinders blog HERE and HERE. The designs are so versatile, and can be used for all occasions starting from Weddings to Birthdays.  
Today, I have two cards to share. The first card is an anniversary card, while the second is a baby shaker card.

To create this card, I first die cut the Tiera Rondelle Etched dies out of some gold foil cardstock, and backed it over white cardstock to make it sturdy. I also adhered the coordinating inlay piece left over after cutting the Tiera Rondelle frame.

Next, I worked on the sentiment for my card - '5th Anniversary". I die cut the number 5 from the Filigree Numbers Etched dies. They were die cut twice, once from gold foil cardstock, and the second time from some white cardstock, which was later inked to make it a light blue color. The 'Th" was created in the exact same manner, and is a die from the same set. The word anniversary has been stamped using black dye ink, and is from the Giving Occasions stamp set.

The florals are handmade by me using the Cinch and Go Flowers III Etched dies. They were cut from White Foamiran sheets, and lightly colored using dye inks to give a soft look. The leaves are from the Cinch and Go Flowers III Etched dies set as well, and were also cut from Foamiran and colored.

For the small filler flowers, I used the mini flower die from the Petite Double Bow and Flowers die set. They were cut from White Foamiran sheets as well,  and then lightly colored. I even made small rose buds using the same die. The dies are very versatile, and you do have a lot of possibilities with each set.

Here are some pictures showing you a closer look at the flowers.


I adhered the card panel to a light blue coloured A2 card base, and my card was done.


My next card is a baby themed shaker card. I thought it would be fun to make a shaker card using these dies, and I hope you like the idea too!

I started by die cutting the Dome from the Grand Dome 3D Card Etched dies from some yellow polka dots pattern paper. This was layered over the Grand Arch from the Grand Arch 3D Card Etched dies

The yellow intricate fence is die cut from fence included in  the Ornamental Arch Etched dies.

The white stork die cut is from the Bundle of Joy Etched dies. The stork comes with a frame, but I snipped off that frame, so that I could just get the image of the stork and the baby bundle. They have been paper pieced with a pink polka dots pattern paper. The rattle and the baby feet are also from the same set, and have been lightly colored using dye inks.

The small flower cluster is again made using the dies from the Cinch and Go Flowers III Etched Dies. The flowers have been cut from Foamiran sheets and inked using dye inks, while the leaves are cut out of white cardstock and then colored and embossed. 

The sentiment has been stamped on a strip of white cardstock. I have used the sentiment stamp from the Giving Occasions stamp set to stamp it using black dye ink.

I created the shaker using some gold and clear sequins, and my card was done!


Spellbinders Supplies :
T-001 Tool 'N One
PE-100 Platinum 6 Die Cutting and Embossing Machine 6"

Other supplies used : Neenah Solar White 110 LB cardstock, DCWV Fresh Floral 12×12 pattern paper, Papericious Gilded Onyx 12 X 12 pattern paper, Gold Foil Cardstock, White Foamiran sheets, White Fun Foam; Adhesive: Scrapbook Adhesives 3D Foam Squares, Tombow Mono Multi Liquid Glue, Glue Gun; Versafine Onyx Black Ink Pad, Distress inks, Altenew Dye inks, McGill Inc. Paper Blossoms Tool kit, Pollens, Fillers, Clear Sequins, Gold Sequins

I hope you like my my cards for today. If you have any queries/questions regarding any technique or product used, please feel free to leave a comment below, and I will get back to you. I truly loved creating and sharing my projects and hope you enjoyed seeing them too :)

Saturday, September 16, 2017

Winnie & Walter Leading Lady | Post 2

Hello everyone!
I am back with my second post at the w & w blog. Today I will be sharing cards I made using products from the new August release.


Again, I am starting out with a floral card first :
To make this card, I stamped and die-cut some flowers and leaves from the In Bloom: Shirley's Blooms stamp and die set. For the flowers, I have used two different colored dye inks for contrast between the inner and the outer petal. I also did some pencil shading using Prismas on the centres of the flowers.
I stamped the polka dot circles using stamps from the Ring in the Celebration set. I then die-cut the buds using the dies from Shirley's Blooms Cutaways.


To die-cut the frame, I first stamped the scalloped circle with Versafine Onyx Black ink and then die-cut it out using the coordinating dies from the Ring in the Celebration Cutaways.


I also die-cut a card panel using the largest rectangle scalloped frame die from the Audrey's Cutaways set. My background was created by randomly stamping the black rings from the Shirley's Blooms set. I also colored in these rings using Prismacolor pencils.  Finally I popped the flowers and leaves on foam dots. The sentiment is from an older set - The Big, the Bold and You.


For my second card I have created a fun shaker :)

I decided to work with some soft colours. I started by stamping my card panel with three tiny images from the Ring in the Celebration set. I used different shades of dye inks to stamp them.


The little cake in the centre of the card was stamped and die cut using the coordinating die from the same set. I also added two more stamped and die-cut circle frames, one with a sentiment around it and one a decorative frame. Both were popped on foam dots. The ribbon banner and the sentiment is again from a old set - The Big, the Bold and Extras. I finished off the card by adding a little bit of Clear Stickles to the stars, the cake and the centre of the gift bows.


I love how this came together really quick - the set is perfect for making birthday cards and pretty tags which I shall be sharing in my next post. The Ring in the Celebration set is really very versatile and I'm definitely going to be reaching for it soon.


I hope you liked my cards and are inspired to create your own. I would love to hear what you think of them. Don't forget to comment on my blog post for a chance to win a $30 gift certificate to the Winnie & Walter store. Winner will be announced on my blog, at the end of the month.


Have a great day ahead!

Thursday, March 2, 2017

You are my Home | Shaker Card

Hello lovely people,
I am back to share another card that I have created for the Winnie and Walter 3rd Birthday Celebrations.This time it's a cutesy shaker card. My first one ever..Can you believe it !! I seem to have finally joined the Shaker Cards bandwagon so late!
Well, now that I have that off my chest, here's a look at my card and some details on how I created it .


For my card, I first blended some Tumbled Glass Distress ink on my card panel on the top and added a few drop of water to bleach out the color from certain areas. Then I die-cut a circle window from it using my Spellbinders Circle dies. I knew I wanted to create a shaker window so I added some ink blending and stamping on an another piece of cardstock which was to be layered below the die cut window. I colored and fussy cut the bird, branch and the house which are from the Winnie & Walter - Happiest of Holidays with Evelin T Designs, In Bloom: Hollie's Festive Florals and Our Town stamp sets respectively and popped it on a foam base on my card panel. Finally stamped my sentiment from the W & W - Happiest of Holidays with Evelin T Designs set on the front panel along with the hearts. I filled my die-cut circle with sequins and adhered a scalloped frame over it and foam mounted this panel onto the stamped panel and glued it to my card base.

I am entering my card in the following Winnie and Walter challenges :
  1. Cute Critters Challenge with Gayatri
  2. Sequins Challenge with Kate
  3. Ink Blending Challenge with Vanessa
  4. Three Challenge with Shay (I have used three different stamp sets from Winnie and Walter on this one)

Hope you like my card. Please do drop in your comments I love to hear from you.

Have a nice day everyone :)