Friday, July 31, 2020

Flower Play | Pinkfresh Studio

Hello, crafty friends!
I am so excited to to share my projects for my very first post on the Pinkfresh Card Blog! I am showcasing the Embroidered Blossoms Stamp and Die set and the Fancy Blooms Stamp and Die set for my projects today. I have created a total of THREE projects, so let's dive right in! 


My first Card features the Embroidered Blossoms Stamp and coordinating Die Set along with the Diagonal Stitched Rectangles Die Set. To begin, I stamped the various flowers and foliage from the set using a variety of Pinkfresh Inks (Sparkling Rose, Bubble Gum, and Coral Reef for the flowers and Grassy Knoll and Olive for the leaves). I stamped all the images on Neenah Classic Crest Solar White 110 LBS Cardstock and then die cut them using the coordinating Embroidered Blossoms Die Set. I also stamped and die cut some additional filler flowers and foliage pieces for my design.

For the focal of my card, I decided to do something interesting. I used the Diagonal Stitched Rectangles Die Set to de-boss the design on my card using a regular Tan Embossing Mat in my Die Cut Machine. I did this technique using two nesting dies from the set and really loved how it helped frame the card design! At this point, I also went ahead and added a few pink and grey paint splatters to help add interest to the design. Once that was done, I die cut a rectangle frame from the Diagonal Stitched Rectangles Die Set from Silver Glitter Cardstock and adhered it to my panel using foam tape. 

I adhered down all my stamped and die cut images to this panel using foam dots. I wanted the design to look balanced, hence I used a varied mix of colours for my card. 

My sentiment is from the Essentials: Classic Words Die Set and I love the font of the dies in this set. It looks very stylish! I die cut the word from Black Cardstock and adhered it to my panel using fun foam.


My next Card features the Fancy Blooms Stamp and coordinating Die Set. I decided to some quick and simple watercolouring on this card to colour the gorgeous floral images. I stamped the floral clusters using the Detail Black Ink on Canson Montval Watercolor Paper and then die cut them using the coordinating Fancy Blooms Die Set. I coloured the flowers using Clementine Liquid Watercolor, while the leaves and foliage were coloured using a mix of Key Lime and Emerald City. I diluted all the colours with water before colouring, to get a soft, pastel look.

For my card background, I decided to create some broad watercolour stripes. I used the Sunshine Liquid Watercolor and a flat paintbrush to make the stripes on a Canson Montval Watercolor paper panel. I love how it turned out and it contrasted really well with the colours of the floral cluster. Next, I added some black paint splatters to this panel for some interest and then die cut it using the largest rectangle die from the Diagonal Stitched Rectangles Die Set.

Then, I die cut a circle from the centre of this panel to create an aperture. I used one of the dies from the Braided Circles Die Set for it. I adhered this to my card base using foam tape. Once that was done, I adhered all the stamped images using foam dots on my panel. 

For the sentiment, I die cut the outer shadow and the word piece from the Essentials: Classic Words Die Set. I coloured the pieces in contrasting shades for added interest. The finishing touch was adding some glitter to the sentiment piece. 


My last project for today is a Mini Shaped Card which I made using the Embroidered Blossoms Stamp and coordinating Die Set and the Braided Circles Die Set. The idea for this card came when I finished creating the first card and I had some leftover stamped floral pieces. I decided to whip up this quick and simple Card using them.  

I love making Shaped Cards and this one was created using the Braided Circles Die Set. I used two different nesting dies from this set to create the base for my card from Neenah Classic Crest Solar White 110 LBS Cardstock. Once my card base was done, I die cut another circle from the set and popped it to my panel using foam dots. 

 The bloom, leaves, and filler flowers are from the Embroidered Blossoms Stamp and coordinating Die Set. I used the leftover stamped pieces from my first card here, and simply popped them to my panel using foam dots. The sentiment is from the Essentials: Classic Words Die Set. I die cut the outer shadow from Black Cardstock and the main word die from Silver Glitter Cardstock. 

I love how this Card turned out, and it hardly took me time to put together as well, so that was really awesome! I hope this inspires you to use your leftover stamped images or die cuts too to make mini notecards/tags! 

Hope you liked my cards for today and are inspired to pull out your floral stamp sets!
Thanks for stopping by and have a great day!

Monday, July 27, 2020

Spellbinders July 2020 Clubs Inspiration Blog Hop | Winner


Hello everyone!
I'm here to announce the winner from the Spellbinders July 2020 Clubs Inspiration Blog Hop. Thank you so much for your kind words on my post! I am glad to know you liked my Gatefold Card! :)

I used random.org for selecting the winner.


The lucky Winner is 
.
.
.


Congratulations to you, Meghan! Please e-mail Spellbinders at socialmedia@spellbinders.us by 2/08/2020 with the subject line Spellbinders July 2020 Blog Hop Winner from Hussena's Blog to claim your certificate.

Thank you once again, everyone!

Thursday, July 23, 2020

Spellbinders July 2020 Clubs Inspiration Blog Hop + Giveaway!


Hello, crafty friends!
I'm so happy and honoured to be joining Spellbinders for the July 2020 Clubs Inspiration Blog Hop today. Spellbinders is celebrating all their Club Kits in shop for July 2020. If you arrived here from the talented, Varada's Blog, then you are on the right track. If this is your first stop, then you will want to start at the beginning, the Spellbinders Blog. We've got tons of inspiration and giveaways for you on the hop today, so keep reading till the end of this post for more information.

I have made a Gatefold Card for the hop today using the Amazing Paper Grace – July Die of the Month. In case you missed, it I shared a Card on my blog few days ago using this month's "Fanfare" Set, which you can check out HERE.
Amazing Paper Grace Die of the Month Membership

The dies for Spellbinders Monthly Clubs are exclusive to Spellbinders and you won't find them anywhere else. If you want to find out more about the Club – prices, how you sign up and what’s included, please look ——–> HERE. These dies are only available through the Club and are limited to the month of July, so hurry before they are sold out.

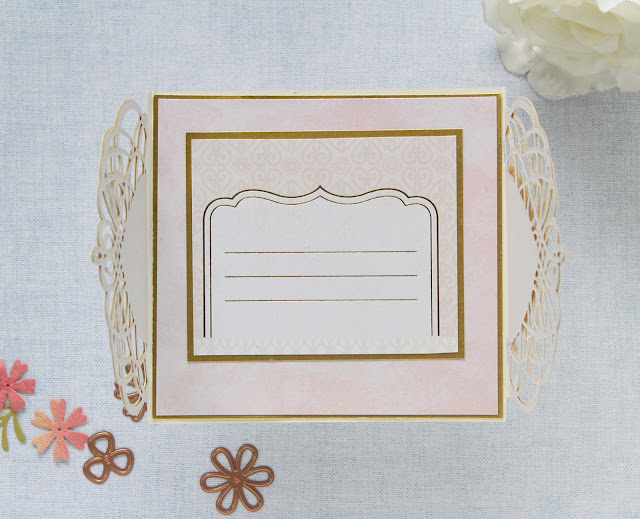
I wanted to create something different and unique using the Fanfare Set, so I came up with the idea of creating a Gatefold Card. The main delicate oval filigree pattern die in the Fanfare Set is so elegant and I simply loved creating with it. Here's a look at my Card:

To create my card, I first took a piece of Buttercream Cardstock measuring 12" X 12" and trimmed it to 12" X 5". Next, I took the oval filigree pattern die from the Fanfare Set and die cut it using my Spellbinders Platinum 6 Die Cutting Machine to create the flaps for my card. I used the partial die-cutting technique for doing so and I scored the flaps at 3 1/2" on either side to create the Gate Fold Card pattern.

Once my basic Card structure was in place, I started working on the insides of the Card. I trimmed two different patterned papers to use inside my card, which is from the DCWV Blush Patterned Paper Stack. I also used two mat layers of Brush Gold Cardstock before adhering the patterned papers in order to accentuate the look. I adhered them all down to my base using the Journey Craft Glue.

Next, I die cut the oval filigree die included in the Fanfare Set from Brush Gold Cardstock and snipped it in two to add to the flaps. I off-set them before adhering them in order to add some interest to my design. For my belly band, I used the Papericious Vellum Paper to create a sturdy band to keep my card together.

To embellish it, I die cut a circle from the Elegant Twist Circled Etched Dies from Gold Mirror Cardstock and Buttercream Cardstock, and adhered the two together to create a small base for my floral spray. I die cut the flower petals from the Sweet Cottage Flower Etched Dies using Deckle Edged Paper. I inked the layers using Distress Wild Honey Spray Stain and added a sparkle self-adhesive drop to the centre for a more complete look.

I also die cut some filler flowers using the flower dies in the Fanfare Set. I die cut those as well from White Deckle Edged Paper and inked them using Distress Spray Stains in Abandoned Coral and Spun Sugar. I added cream wire pollens to the centres of the small flowers and tucked them in beside my main flower.

The leaves and foliage were die cut using the dies included in the  Sweet Cottage Flower Etched Dies using Deckle Edged Paper. I used Distress Twisted Citron Spray Stain to colour them. I really enjoyed creating this card and hope you like it too!

Affiliate Disclosure
All products in today's post are linked throughout the post. These are my personal affiliate links which you can shop from at no cost to you! Thank you for your support!

Giveaway:
To celebrate this release, Spellbinder is giving away a $50 gift certificate to 3 lucky blog readers – selected from the comments on our blog. Hop along for additional chances to win. Giveaway closes on Sunday, July 26th, 11:59 pm EDT. The winner will be announced in the blog hop post the following Tuesday. The winner is responsible for shipping cost, duties and taxes.

Additional Giveaway:
The generous folks at Spellbinders have allowed me to giveaway a $25 gift certificate to ONE lucky winner! For your chance to win, leave a comment on this post by 26th July, 2020. Winner is responsible for shipping cost, duties and taxes.
Please note, store credit (gift certificate) cannot be applied to Club Subscriptions. Store credit can be applied to shop past Club products, Club extras and regular releases.

Blog Hop Order:
Next Stop on this Blog Hop is, Jeanne Jachna's blog.
Just in case you lose your place along the way, here is the complete list of participants so that you can find your way back:
Spellbinders Blog
Nichol Spohr
Tina Smith
Carrie Rhoades
Bibi Cameron
Kathy Clement
Alicia Havranek
Jill Hilliard
Laurie Willison
Joy Baldwin
Jean Manis
Virginia Lu
Ilina Crouse
Varada Sharma
                       Hussena Calcuttawala (You are HERE)
Jeanne Jachna
Gemma Campbell

Thank you so much for your stopping by and reading this blog post. I hope you liked my project! If you would like to see more of my work using Spellbinders, do follow my Instagram Page - @hussena_cal
Wishing you a wonderful day ahead!

Saturday, July 4, 2020

Spellbinders + Amazing Paper Grace Die of the Month | July 2020


Hello, crafty friends!
Hope you are doing well and are safe and healthy!
Wishing a very happy fourth of July to my US friends. 💛
I have a Card to share today featuring the Spellbinders + Amazing Paper Grace July Die of the Month. This month's "Fanfare" Set is perfect for making exquisite cards, boxes, bags, envelopes, and more.
Amazing Paper Grace Die of the Month Membership
If you want to find out more about the Club – prices, how you sign up and what’s included, please look ——–> HERE. These dies are only available through the Club and are limited to the month of July, so hurry before they are sold out. If there are any leftovers, they are added to the Spellbinders store for sale at full price. You can see all of the past Dies of the Month HERE.

The 'Fanfare' set is so exquisite and I decided to create a Shaped Card to showcase the design in its full glory. I know, I say this every month, but Becca's dies always leave me spellbound. She keeps outdoing herself each time and I LOVE each and every design of hers. Here's a look at my Card:

To create my card, I first took a sheet of Buttercream Cardstock and die cut the main Card frame die using my Spellbinders Platinum Die Cutting & Embossing Machine.  I used the partial die-cutting technique here to create a hinged card base. If you don't know how to create one, you can check out Becca Feeken's tutorial HERE where she shows you how to create one.

Once my card base was ready, I started working on the main focal for my card. I die cut the decorative inlay piece from the Fanfare Set from Buttercream Cardstock and Gold Mirror Cardstock. I also die cut it from Fun Foam and adhered it to my card base for dimension. Then, I adhered the other two layers over this foam layer, albeit I off-set them a little, so that the gold would peek through.

The filigree oval is super beautiful and I did not want to take the focus away from it, so I kept my embellishments minimal. I die cut a circle from the Nestabilities Hemstitch Circles Etched Die Set and stamped my sentiment on it. I used the Studio Katia Birthday Greetings Stamp Set for my sentiment and stamped it using Black Licorice True Fusion ink. Next, I die cut the fanfare motif die from Whipped Cream Cardstock. I die cut two pieces of them and tucked them in beside the circle on both sides.

For my floral spray, I used the flower dies included in the Fanfare Set. I die cut them from White Deckled Edged Paper and coloured them using Distress Spray Stains in Abandoned Coral and Wild Honey. I also lightly shaped the centres using an Embossing Ball Tool tip from the Stylus Tips for Tool N' One and added pollens to the centres for a more natural look. I also tucked in some leaves and foliage to complete the look. And that's about it! This card was such a joy to create!

If you haven't had a chance to look at the Spellbinders Club Kits yet, do check them out. You can find more information about them HERE.

If you would like to see more project inspiration using the Amazing Paper Grace Die of the Month, visit the Spellbinders blog to see the project samples created using it. There is also a super helpful YouTube video which you can see HERE which shows you how to use the die set in a creative way!
The Club dies are absolutely great value for money and the cost of the kit includes shipping cost within USA. So, what are you waiting for? Sign up as soon as possible!
Amazing Paper Grace Die of the Month Membership
That's it from me for today! I hope you liked my card.
If you would like to see more of my work using Spellbinders, do follow my Instagram page @hussena_cal
Thank you so much for your visit to my blog today!

Thursday, July 2, 2020

Spellbinders July 2020 Card Kit | Vintage Mementos


Hello, crafty friends!
It's the start of a new month which means it's time for a new Card Kit from Spellbinders. I have a couple of cards to share today featuring the July 2020 Card Kit by Spellbinders - Vintage Mementos. If you haven't heard about the Monthly Card Kits by Spellbinders or don't know how to subscribe to one, you can go over to the Spellbinders website and/or blog and read more about them HERE

This "Vintage Mementos" Kit, like all their other Card Kits, gives you everything you need to create 10 unique cards and even more. You now also get better goodies, including a 40 sheet paper pad, clear stamps, an adorable die set, tons of embellishments, and more!
Card Kit of the Month Membership

I have FIVE Card ideas to share with you today using this kit, so let's get started!

Card #1
My card uses the Vintage Mementos Paper Pad, Vintage Mementos Die Cut Shapes Set, Vintage Mementos Clear Stamp Set, and the exclusive dies in this month's Card Kit.

I have never really worked with Vintage colours or prints for my projects, so this Card Kit was pretty challenging yet exciting to work with at the same time. For my card, I first selected a patterned paper design from the Vintage Mementos Paper Pad which would work with the design I had in mind. I trimmed it and added it to my card panel. I also added a piece of Navy Blue Cardstock to the bottom of my card for contrast.

The dies in this month's kits are really beautiful and I decided to combine some of them for my card design. I die cut the border die from the Card Kit from Gold Mirror Cardstock and adhered it down to my panel to cover the seams of the patterned paper and cardstock.

Next, I die cut a circle from the Elegant Twist Circles Etched Die Set from Gold Mirror Cardstock and adhered it down to my panel. I then added the coordinating inlay piece which was die cut from Buttercream Cardstock. I also tucked in two die cuts at the top and bottom of the circle to give it a regal look, which was again die cut from Gold Mirror Cardstock using dies from the Amazing Paper Grace July Die of the Month Set. I then popped a die-cut piece from the Vintage Mementos Die Cut Shapes Set and heat embossed my sentiment in gold using a sentiment stamp from the Vintage Mementos Clear Stamp Set. That's it and my card was ready!


Card #2
My card uses the Vintage Mementos Paper PadVintage Mementos Die Cut Shapes Set, and the exclusive dies in this month's Card Kit.

For my card, I again started by selecting a patterned paper print from the Vintage Mementos Paper Pad and adhered it down to my panel. I also trimmed a piece of Navy Blue Cardstock and adhered it to my panel, which is included as a part of the Card Kit.

Next, I die cut a lace using the border die from the Card Kit and adhered it to my panel. Then, I die cut a circle using the Elegant Twist Circles Etched Die Set from Vellum and added a die-cut piece from the Vintage Mementos Die Cut Shapes Set over it. I also adhered some bird die-cut pieces and a butterfly to create my main focal. Finally, I added a sentiment die-cut tile to my card panel. If you notice, I have also adhered gold circle pieces all over the patterned paper for added interest. I think it makes for an interesting detail, what do you think?


Card #3
My card uses the Vintage Mementos Paper PadVintage Mementos Die Cut Shapes Set, and the exclusive dies in this month's Card Kit.

To create this card, I first pulled out one of the patterned papers from the Vintage Mementos Paper Pad which would work well for my card background. Then, I die cut a rectangle frame from the Elegant Twist Rectangles Etched Dies from Whip Cream Cardstock. I adhered this down to my panel using glue.

Next, I die cut the gorgeous frame die included in this month's Card Kit from Gold Mirror Cardstock and adhered it to my panel using foam dots. I then picked out a couple of floral die-cuts from the Vintage Mementos Die Cut Shapes Set to create my card design. To complete my card, I added a sentiment banner and a butterfly which were again die-cut pieces from the Vintage Mementos Die Cut Shapes Set. I quite like how this came together!


Card #4
My card uses the Vintage Mementos Die Cut Shapes Set, Vintage Mementos Clear Stamp Set, and the exclusive dies in this month's Card Kit.

This card is my personal favourite from the lot as the sentiment I have used here is one of my forever favourites. To create this card, I first die cut a rectangle frame using the Elegant Twist Rectangles Etched Dies from Whip Cream Cardstock. Then, I took a piece of Watercolor Paper and lightly watercolored the background using Tumbled Glass Distress ink. I wanted to give it a loose, ethereal look which is why I went in with a very light watercolour wash.

Then, I die cut a frame from using the die from the Card Kit and adhered it to my panel using foam dots. I also tucked in the square sentiment piece, which is from the Vintage Mementos Die Cut Shapes Set. Next, I used a stamp from the Vintage Mementos Clear Stamp Set to stamp and heat emboss the feathers on Vellum using Gold Tinsel Embossing Powder. I like the sparkly, glitter finish of this powder and it worked perfectly with my card design. I then used the Journey Gold Twine to create a bow and adhered it down to my panel. I also added some light blue flowers and a bird chipboard piece to further accentuate my card.

As my final step, I added a butterfly and music note die-cut, both of which are from the Vintage Mementos Die Cut Shapes Set.


Card #5
My card uses the Vintage Mementos Clear Stamp Set.

My idea with this Card was to create a CAS design to showcase the beautiful images from the Vintage Mementos Clear Stamp Set. I started with a piece of Classic Crest Solar White Cardstock and die cut a circle in the centre using the Elegant Twist Circles Etched Die Set. Next, I took another piece of White Cardstock and coloured it using Haystack Ink Pad. I then adhered this down to my card base and added the die cut panel over it.

 I ink blended this piece using Pool Play True Color Fusion Ink Pad and stamped some birds from the Vintage Mementos Stamp Set using Black Licorice Ink Pad.

Next, I stamped the image of the birds sitting on a branch using Black Licorice Ink and coloured it using Zig Markers. Then, I fussy cut the image and adhered it to my card panel. All that was left to do was to add a sentiment, and I picked one from the Vintage Mementos Set and stamped it directly on my panel.


If you want to find out more about the Club – prices, how you sign up and what’s included, please look ——–> HERE
 The Card Kits for Spellbinders Monthly Clubs are exclusive to Spellbinders and you won't find them anywhere else, so be sure to gets yours before it gets sold out! If there are any leftovers, they are added to the Spellbinders store for sale at full price. You can see all of the past Card Kits HERE.

If you'd like to see some more project inspiration using the Card Kit, check out THIS super helpful YouTube video that has some awesome card ideas using the Card Kit. 


That's it from me for today! I hope you liked my cards. Let me know if you have any favourite(s)! I would love to hear from you.
If you would like to see more of my work using Spellbinders, do follow my Instagram page - @hussena_cal
Thank you so much for your visit to my blog today!