Monday, August 26, 2019

Spellbinders Becca Feeken Holiday 2019 Blog Hop + Giveaway


Hello, crafty friends! 
I'm beyond thrilled and honoured to be joining Spellbinders for their Blog Hop today featuring the 3D Holiday Vignettes & Glistening Holiday Collections by Amazing Paper Grace. You should have arrived here from the super talented and amazing, Becca Feeken's Blog.
 We've got tons of inspiration and giveaways for you on the hop today, so keep reading till the end of this post for more information.


For my first card, I used the Merry Filigree Quatrefoil Glimmer Hot Foil PlateNestabilities Hemstitch Squares Etched Dies, and the Shapeabilities Flourished Square Etched Dies.

The Glistening Holiday Glimmer Plates designed by Becca are so beautiful that they make every project made with it look so elegant. For my card, I started by foiling the square filigree frame from the Merry Filigree Quatrefoil Glimmer Hot Foil Plate using the Glimmer Hot Foil Roll - Gold.

While my Glimmer Hot Foil System was out, I also foiled the sentiment from the Merry Filigree Quatrefoil Glimmer Hot Foil Plate using the Glimmer Hot Foil Roll - Rose Gold. I die cut the filigree frame using the Nestabilities Hemstitch Squares Etched Dies, and the sentiment using the Nestabilities Standard Circles LG Etched Dies

I wanted to add some layering to the background so that the foiled pieces would remain the main focal of my card. I die cut the flourished square frame die from the Shapeabilities Flourished Square Etched Dies using Gold Mirror Cardstock.

It was now time to start adhering the various components of the cards together. I first adhered a light pink patterned paper to my card base, and then added layers of White & Mirror Gold Cardstock to give it a finished look. Next, I adhered the flourished square frame and the foiled pieces. I used White Fun Foam while adhering the foiled pieces to give it some added dimension.

To embellish my card, I used a faux Silk flower, some mulberry flowers and rose buds, as well as some leaves. I also added white satin bows below my floral arrangement to complete the card design.


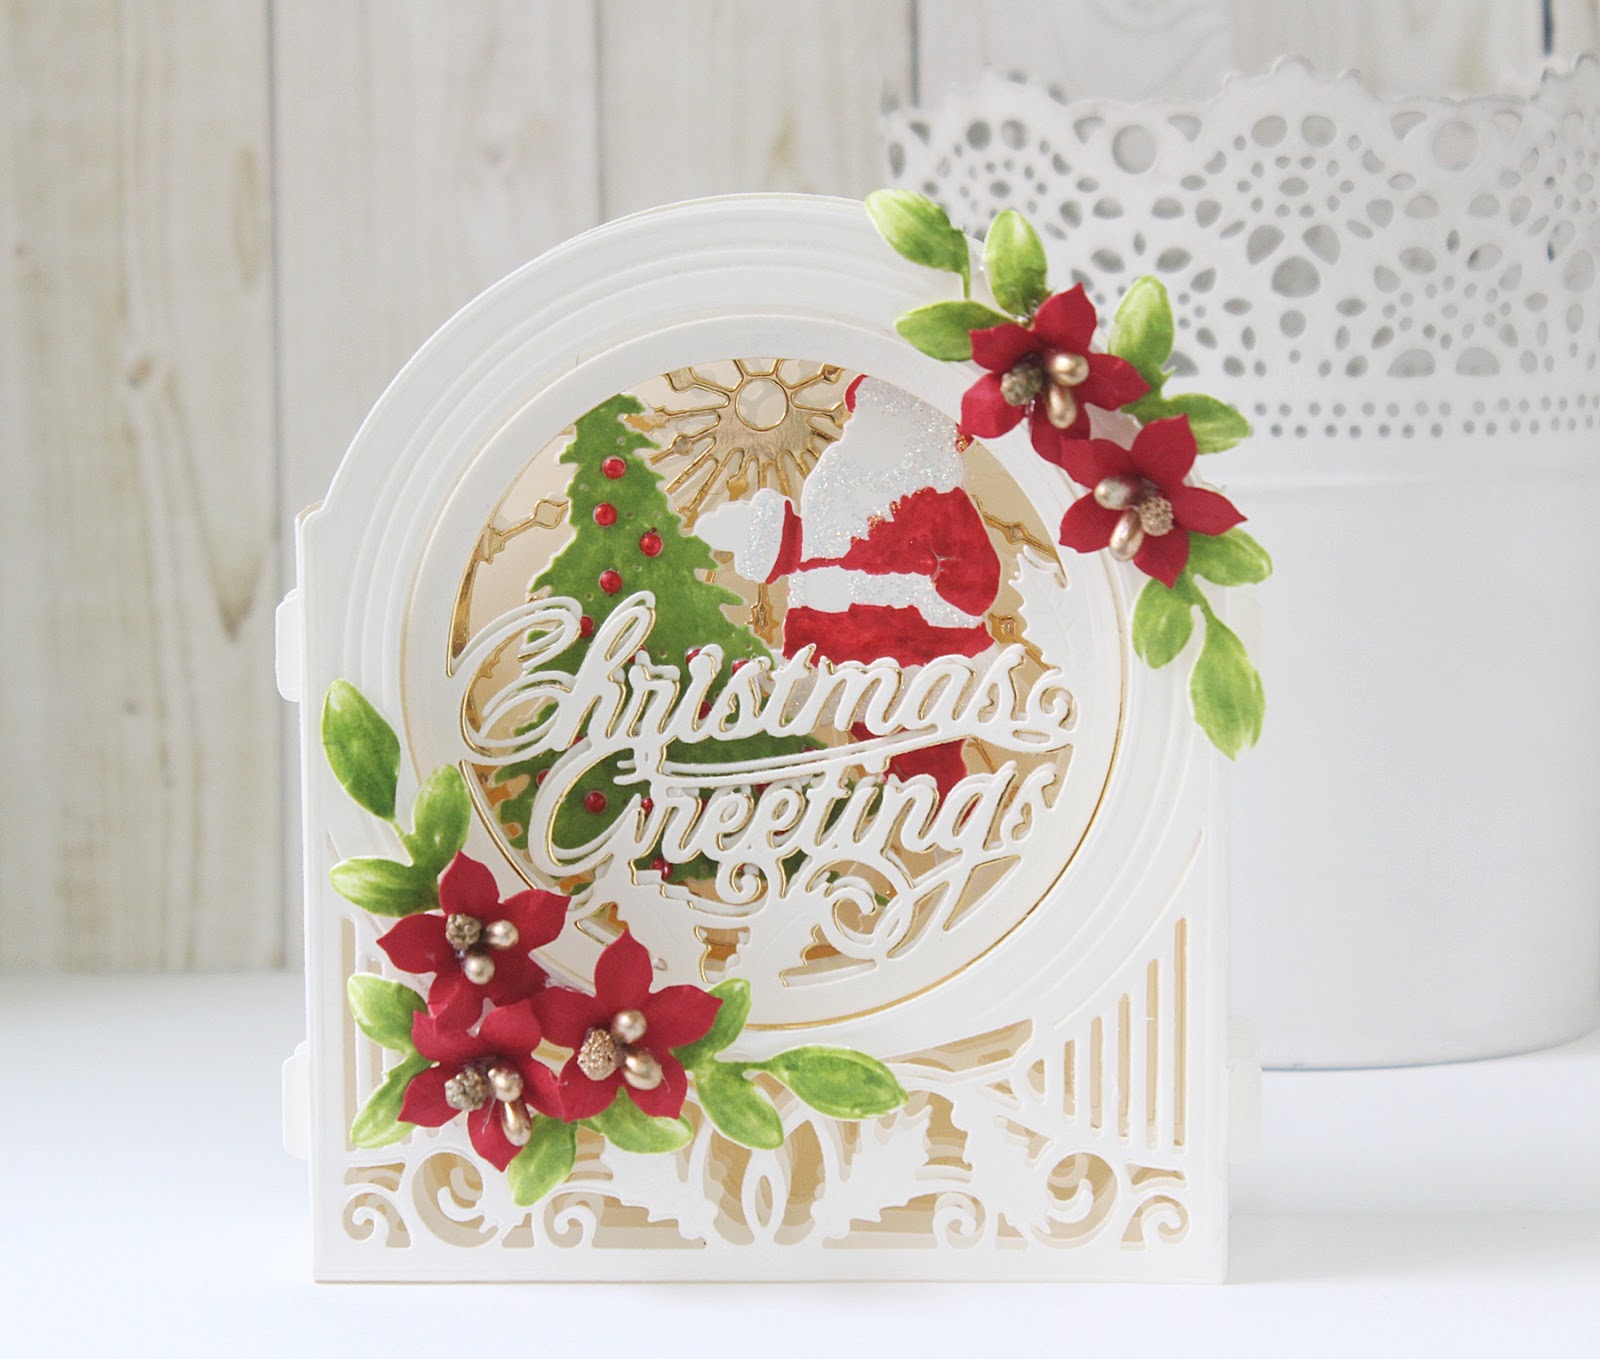
My second and last card for today features the Shapeabilities Grand Christmas Lattice Arch Etched DiesShapeabilities Nativity Layering Set Etched Dies, and the Shapeabilities Cinch and Go Poinsettia Etched Dies.

For my card, I first started by die cutting the lattice arch frame die from the Shapeabilities Grand Christmas Lattice Arch Etched Dies using Neenah Classic Crest Solar White 110 LBS Cardstock. I also die cut the arch inlay die and the sentiment die from the same set.

I used Chipped Sapphire and Mermaid Lagoon Distress inks to colour the background of the arch inlay to depict the Nativity scene. Next, I die cut the silhouette images and the insert for the outer frames from the Shapeabilities Nativity Layering Set Etched Dies using White Cardstock & Gold Mirror Cardstock. I adhered these die cuts together on my card panel.

To embellish my card, I die cut some poinsettias from the Shapeabilities Cinch and Go Poinsettia Etched Dies Etched Dies using White heavy weight Cardstock. I embossed the centres using an Embossing Ball Tool and added golden stamens to the centres for a richer look.

To complement the flowers, I die cut some holly leaves from the Shapeabilities Grand Snow Globe Etched Dies using Gold Mirror Cardstock. I adhered these around my poinsettias and my card was almost complete. I matted this panel to my card base and my card was finished.

If you would like to see more inspiration using the 3D Holiday Vignettes Collection, you can check out THIS post on my blog or on the Spellbinders Blog.
Disclosure:
Where available, I use compensated affiliate links which means if you make a purchase I receive a small commission at no extra cost to you. Thank you so much for your support!

Giveaway:
To celebrate this release, Spellbinders is giving away a $50 gift certificate to one lucky blog reader – selected from the comments across all of the blogs in the hop. Giveaway closes on Sunday, September 1st, 11:59 pm EDT. The winner will be announced in the blog hop post the following Tuesday. The winner is responsible for shipping cost, duties and taxes.

Blog Hop Order:
Next Stop on this Blog Hop is, Bibi Cameron's blog.
Just in case, you lose your place along the way, here is the complete list of participants so that you can find your way back.
                           Hussena Calcuttawala (You are HERE!)


Thank you so much for your stopping by and reading this blog post. I hope you liked the cards I made! I would love to hear if you have a favourite!

Have a wonderful day!

Wednesday, August 21, 2019

Spellbinders Guest Post | Holiday 3D Holiday Vignettes by Becca Feeken


Hello everyone! 
I am absolutely thrilled and honoured to be guest designing on the Spellbinders Blog today! I have three cards to share that showcase the 3D Holiday Vignettes by Becca Feeken

3D Holiday Vignettes Collection brings the holiday spirit to life with layers and dimension to make your projects special. This collection can be mix and matched with the Shadowbox and 3D Vignette Collections for more elegant designing options.

My first card for today uses the Grand Snow Globe Etched Dies, the Santa Claus Layering Set Etched Dies. I wanted to create a 3D Vignette Card for my first card using traditional Christmas colours.

I die cut the outer frame, the inlay pattern and the side panel frame dies, all from the Grand Snow Globe Etched Dies from Cream Cardstock. I wanted to create a festive scene on my card, so I went ahead and also die cut the circle frame with the image of Santa Claus and the circle inserts from the Santa Claus Layering Set Etched Dies  from White Cardstock and Gold Mirror Cardstock respectively. I coloured the Santa Claus die cut pieces and the tree using a mix of Alcohol Markers & Zig Clean Clear Brush Markers. I added some Crystal Clear Glitter to add some shimmer to the beard, gloves, and belt, for added interest! I also added red pearls to the Christmas tree.

It was time to assemble all the panels together. I wanted the sentiment to be one of the main design elements of my card, so I die cut it and adhered it to the front of the card panel instead of adding it to the panel inside. I die cut it twice, once from White Cardstock, and once from Gold Mirror Cardstock, so that it would give the effect of a shadow. I die cut them using the sentiment frame insert die from the Grand Snow Globe Etched Dies. I also die cut some poinsettias from the same die set using Red Cardstock. The leaves are from an older die set by Becca, and I die cut them from White Cardstock and coloured them using Alcohol Markers. I also added some gold pollens for the poinsettia centres to give them a fuller look.

Here's a picture showing you the overall dimension. The best part about these 3D Holiday Vignettes, is that they can be folded flat for mailing. Isn't that so cool?!


My next card features the Christmas Damask Jubilee Glimmer Hot Foil PlateCinch and Go Poinsettia Etched Dies Etched Dies, and the Glimmer Hot Foil Roll - Gold. I wanted to use these plates for a non-traditional Christmas card and hence came up with this card. 

For this card, I started by foiling the Christmas Damask Jubilee Glimmer Hot Foil Plate on a piece of Neenah Classic Crest Solar White 110 LBS Cardstock using the Glimmer Hot Foil Machine. I used the Glimmer Hot Foil Roll - Gold for foiling the plates. I was very happy with the end result as it gives such an elegant look to the card.

I used the 'Seasons Greetings' Glimmer Plate included in the Christmas Damask Jubilee Glimmer Hot Foil Plate for the sentiment. Next, I die cut a fishtail banner and inked the edges using FSJ Gold Pigment Ink. I added three pearls on the banner for added interest. At this point, the card felt a little too CAS for my taste, so I went ahead and die cut a bunch of poinsettias using the Cinch and Go Poinsettia Etched Dies Etched Dies from Cream Cardstock. I embossed the petals and added gold pollens in the centres. The leaves are die cut from the Cinch and Go Flowers III Etched Dies

I love this damask design and can't wait to use it for some more projects! 


My third card again features traditional Christmas colours, albeit I have used the 3D Holiday Vignettes dies here to create a simple, layered card. This card showcases the Grand Holiday Cabinet Etched DiesReindeer Prance Layering Set Etched Dies, and the Grand Snow Globe Etched Dies. 

This card has loads of layering which is one of my favourite styles of card making. To start with, I die cut the Grand Holiday Cabinet Etched Dies twice from White Cardstock and then again from White Fun Foam. I did this so that I could adhere the cardstock die cut panels over the Fun Foam to get a raised effect on my card. 

Next, I die cut the sentiment insert from the Grand Holiday Cabinet Etched Die Set using Gold Mirror Cardstock. I also wanted to add a backdrop to the sentiment piece, so I die cut one of the frames from the Reindeer Prance Layering Set Etched Dies using White Cardstock. Then, I partially coloured the reindeer since the rest of the design would be covered by the sentiment. 

The poinsettias were created using the poinsettia die included in the Grand Snow Globe Etched Dies. I die cut them from White Cardstock, coloured them using Distress inks, embossed the petals and added gold pollens for the centres. The holly leaves are also from the same die set. I die cut them from White Cardstock as well and coloured them lightly using Distress inks. Finally, I added a White Satin bow and placed a poinsettia and holly leaves as the finishing touch. 

Other Supplies: 
Neenah Solar White 110 LB cardstock, Cream Linen Textured 12 x 12 Cardstock, Gold Mirror Cardstock, White Fun Foam; Inks: Festive Berries Distress ink, Fired Brick Distress ink, Twisted Citron Distress ink, Shabby Shutters Distress ink; Adhesive: Scrapbook Adhesives 3D Foam Squares, Tombow Mono Multi Liquid Glue, Double Sided Foam Tape, Mini Glue Gun; McGill Inc. Paper Blossoms Tool kit, Gold Pollens.

I hope you liked the cards I shared today. I had so much playing with die sets from the 3D Holiday Vignettes by Becca Feeken. I can't wait to make some more projects using them!

Thank you so much for visiting! If you would like to see more of my work using Spellbinders dies, do visit my blog and follow my Instagram page.
Have an amazing day!

Friday, August 16, 2019

Altenew Guest Designer | August 2019


Hello, crafty friends!  
I am so excited and honoured to be Guest Designing on the Altenew Card Blog this month. Altenew is one of my all-time favourite companies and I totally love creating with their products. 

I’ve created four cards to show you different ways to use your layering stamps and dies.


To create my card, I first die cut the different flowers from the Garden Picks 3D Die Set from Canson Montval Watercolor Cardstock. Then, I coloured all the different layers using  Watercolor Brush Markers from the Tropical Fiesta Set. The Brush Markers are so rich and vibrant in colour that a little goes a long way! I used a diluted version of Purple Wine and Crimson for the flower petals and Sweet Leaf and Lime for the leaves. After all the die cuts had dried, I assembled them together. 

I am a sucker for foliage and love how the Garden Picks 3D Die Set offers so many possibilities! I die cut few flowers and extra foliage from the Layered Floral Elements Die Set as well and colored the pieces using the same colours that I had used for the bigger flowers and leaves. The elements in these sets coordinate so well with each other. 

The only stamping that is present on this card is in the form of the stamped sentiment which is from the Magnolias For Her Stamp Set. I stamped it on a strip of white cardstock using the Obsidian Pigment Ink, which has become my absolute favourite ink to use these days. The stamped impressions with it are so clean and crisp!

I wanted to do something different and striking for my card background, so I die cut the Watercolor Stripes Cover Die from Canson Montval Cardstock and placed it horizontally on my card base. I colored the stripes in between the watercolor stripes using the Fresh Lemon Brush Marker from the Tropical Fiesta Set.

I die cut an oval from the Create-A-Wreath Die Set from White Glitter Cardstock and adhered all my flowers and foliage around this frame with the help of foam dots. I adhered my sentiment banner in the centre of this frame and my card was done. For the finishing touches, I added some clear sequins and black paint splatters to my card panel.

To create this card, I started by stamping the different roses from the Sweet Rose Bouquet Stamp Set on a piece of 4.25" X 5.5 " Neenah Classic Crest Solar White 110LBS Cardstock. I used the Red Sunset Oval Set for the roses and for the leaves, I used the Tropical Forest Oval Set. This is a fairly easy layering stamp set and it didn't take me too much time to align the layers together.
Once I was done with all the stamping, I die cut an oval frame from the Create-A-Wreath Die Set and adhered it over my stamped panel. I used foam tape while adhering it for added dimension.

I didn't want to take away the focus from the background and hence kept the rest of the card simple. I used the Script Words Die Set to die cut the word 'Hugs' from white cardstock. I die cut it from fun foam as well, so that I could adhere the white die cut piece over the fun foam piece to achieve a raised effect. I tend to do this a lot when adhering die cuts in order to ensure that the pieces have uniform dimension. The other part of my sentiment comes from the Sweet Friend Stamp Set. I heat-embossed it using the Pure White Crisp Embossing Powder on a strip of black cardstock.

I matted this panel onto another layer of cardstock which was then adhered to an A2 sized top-folding card base.  I added some clear sequins and white and pink black paint splatters to complete my card.


The third card I have made showcases the Floral Art Stamp Set and the Best Mom Stamp Set.

I find the Floral Art Stamp Set really elegant and wanted to use it in a way which would highlight the gorgeous stamp layers. For my card, I first started by stamping the different layers of the large flower using Jet Black, Pink Pearl, and Coral Bliss inks. I also stamped some leaves using Bamboo Crisp Dye Ink using stamps from the same set. 

Next, I stamped the floral image from the Best Mom Stamp Set and coloured the flowers and buds using the Coral Berry Artist Marker (Set A). I used only a part of the image for my card as I wanted to use it as additional foliage for my card design. I then die cut the image using the coordinating Best Mom Die Set. I also die cut three flowers from the Layered Floral Elements Die Set and coloured them using the Coral Berry Artist Marker to match with the colours of my card.

The sentiment is also from the Best Mom Stamp Set. I find it really meaningful and is so apt to use for several occasions. I heat-embossed it using the Pure White Crisp Embossing Powder on a strip of black cardstock. I added a thin strip of Silver Glitter Washi Tape to the sentiment piece for added interest.

I kept the background for this card really simple. I dry embossed the background using the Feeling Dotty Stencil. Then, I  lightly coloured the embossed dots using the Limestone Crisp Dye Ink. Next, I adhered all the stamped images except the leaves using foam tape on my card panel. For the finishing touches, I added some Black Nuvo Drops and black paint splatters to the background. Finally, I mounted this to an A2 sized top-folding white card base and my card was complete.


My final card features the Beautiful Peony Stamp Set, Cube Cover Die, and Spring Shower Cover Die.

To start off, I stamped several peony flowers and leaves from the Beautiful Peony Stamp Set using Embossing Ink. I used the Pure White Crisp Embossing Powder to heat emboss them in white and then die cut them out using the coordinating Beautiful Peony Die Set. I coloured the flowers using the Crimson Brush Marker and leaves using a combination of Sweet Leaf and Lime. The Brush Markers are very concentrated, so while colouring, I mixed the colours with a lot of water to achieve a lighter hue.

 Next, I die cut the Spring Shower Cover Die from white cardstock and used the left-over die cut pieces as foliage for my card. I coloured the leaves also using the Sweet Leaf and Lime Brush Markers from the Watercolor Brush Markers - Tropical Fiesta Set.

I wanted to include some texture on my background, so I used the Cube Cover Die to emboss the panel. To do so, I simply added an Embossing Tan Mat while running it through my die cutting machine, so that it wouldn't cut the panel and just emboss it. Once it was embossed, I used the Limestone Crisp Dye ink to lightly colour the background, making sure to add only a tinge of colour so that the coral flowers would pop against it. I placed my flower arrangement on this panel and adhered them down. 

For the sentiment, I used the Hope Die Set to die cut the word 'Hope' from white cardstock. I coloured it using the Crimson Brush Marker from the Watercolor Brush Markers - Tropical Fiesta Set. The second part of my sentiment comes from the Hope Stamp Set. I stamped it using Obsidian Pigment Ink on a strip of white cardstock. 
As usual, I added some clear sequins and grey and coral paint splatters to complete my card design. I then mounted this panel on to an A2 sized top-folding white card base. 

That’s it from me for today! Huge thanks to Altenew for having me as a guest today. Thanks to you all, crafty friends, for looking! Hope I was able to inspire you with my cards.
Thank you for stopping by!

Friday, August 2, 2019

Guest Post using CrafTreat Stencils


Hello, everyone!
I have some projects to share today I created using stencils from CrafTreat's April 2019 Release. Without further ado, let's get started!

My first card features the Round Dot Mandala Stencil. I have never worked with Mandala stamps or stencils before, so I was thrilled when I saw this design. To create my card background, I used Prima Marketing's Light Paste mixed with different shades of dye inks to achieve the colour hues I wanted for my card design. Once that was done, I used Papericious' Twinkling Spark Glitter Powder to sprinkle glitter all over the stenciled mandala design. This gave a really subtle yet pretty shimmer to the card. 

To complete my card, I fussy cut a couple of flowers and leaves from Altenew's Botanical Rhapsody Washi Tape and adhered them to my panel using foam dots for added dimension. 

Here's a look at the gorgeous shimmer and texture. I honestly am in love with the sherbet colours. These are my all-time favourites!

To complete the card, I added a sentiment to the centre and matted it on some grey textured cardstock. This was then adhered to an A2 sized top folding card base. 
  

My next card is different from my usual style and is created using the Flower Fusion Positive Dots & Flower Fusion Negative Dots Stencils. This is something really new from CrafTreat and I was really excited to give it a try!

For my card, I wanted to use some fresh and bold colours reminiscent of spring. I started by stenciling my card panel using the Checkered Rose Stencil and Altenew's Modelling Paste. Once that was dry, I lightly watercolored the background.

For my card focal, I stenciled the flowers and leaves from the Flower Fusion Positive Dots & Flower Fusion Negative Dots Stencils. I sketched the outline of both the flowers and leaves using a Black Microtip Pen to add some definition to the design. I fussy cut these out and arranged them on my card panel. I also stamped my sentiment on a banner and popped it up on my card panel.

To accentuate my card design, I added a strip of Gold Mirror Cardstock and Papericious' Monochrome Patterned Paper along the right side of my card. I also added some gold sequins and black paint splatters to finish off my card. 


My third card for today is even more different from my regular cards. The Flower Fusion 2 Step Stencils were quite challenging for me to use and this is my take on them!

For my card, I used the Flower Fusion Step 1 Stencil to stencil the lovely tile design using Altenew Limestone Dye ink. My next step was to stencil the flowers over this background. I would like to say this here, that it is absolutely not necessary to use both these stencils together, you may just stop at one step or use both. That's the beauty of them! I went ahead with the Step 2 stencil and coloured the flowers and leaves using Prismacolor Pencils. 

I didn't want to take the focus away from the amazing background so I kept the rest of the card simple. I stamped the first half my sentiment on a banner and the other directly on the panel. I added some clear sequins for the finishing touches. I matted this panel onto some Gold Mirror Cardstock which was then adhered finally to an A2 sized top folding card base.

There are various ways you could use these Flower Fusion stencils! I really love that tile background and can see myself using it on a lot of projects. By the way, I am sorry that the Gold Mirror Cardstock is not reflecting in this picture. It's not a dark brown cardstock. :)


Now, I have some Gift Tags to share with you using the Flower Fusion Triangles Stencil. I have masked and used only a small portion of the stencil on the tags, but it adds so much to the design. Here's a look at them:

 I used the Flower Fusion Triangles Stencil and Altenew's Limestone Dye ink for stenciling on the bottom of the tags. Once that was done, I die cut and coloured the flowers and leaves and added them to the gift tags. All that was need to complete them was a sentiment, and that's it. They were done! 

These were really simple to put together and are great for mass producing or creating in bulk.


My final project for today is a Money Wrap. I love creating them and wanted to do something slightly different on this one, so I combined stenciling with Foamiran flowers. I used the Beaded Flourish Stencil for creating that flourish design on the patterned paper. Then, I embellished my wrap with a handmade Foamiran rose and some filler flowers and foliage. 

I tend to create very elaborate designs, but if you don't want to do that, you can make it simple by cutting down on the number of filler flowers and foliage. The stenciled design makes for a great background for envelopes and you can use it in different ways to achieve different results!

That brings me to the end of this post! I hope I gave you some ideas to use these stencils. I would like to thank Priya and her team for inviting me to guest design on the CrafTreat blog. This post was supposed to go live back in April, but I couldn't send it across at that time, so I am finally sharing these projects now. I hope you liked them! :)

Supplies Used:


If you have any questions regarding any of the projects or the supplies used, please don't hesitate to ask me in the comments section below. I would be happy to help you out.

Have a lovely day, you all!