Showing posts with label Zig Clean Colour Real Brush Pens. Show all posts

Friday, March 4, 2022

Altenew March 2022 Folktales & Stories Collection Release Blog Hop + Giveaway ($300 in total prizes)


Hello, crafty friends!
I'm ecstatic and honoured to be joining Altenew for the March 2022 Folktales & Stories Collection Release Blog Hop today showcasing new stamps, dies and more!

If you arrived here from Norine Borys's Blog, then you are on the right track. If this is your first stop, then you will want to start at the beginning, the Altenew Card Blog. We've got tons of inspiration and giveaways for you on the hop today, so keep reading till the end of this post for more information.


I loved the details in the beautiful floral stamp from the Endless Florescence Stamp & Die Set. and thought it would look wonderful embossed in white with just a touch of color added.  To keep the focus on the s embossed images, I added just a simple ink blended background to complete the card.


I started off by stamping the floral image from the Endless Florescence Stamp Set in Versamark Ink onto Neenah Classic Crest Solar White Cardstock, sprinkled White Embossing Powder over the image, and melted it with a Heat Tool. Next, I coloured the image using Zig Clean Color Real Brush Markers and cut it out with the coordinating die.

Once that was done, I die-cut Neenah Classic Crest Solar White Cardstock using the Layer 3 Die from the Precision Layering Mini Slimline B Etched Dies. Next, I adhered thin strips of Masking Tape all around the panel and blended Firefely ink (Green Valley Ink Set) around the edges and in the centre of the cardstock to give the panel a little depth. I let the panel dry and then added some black and green  paint splatters for interest. Next, I stamped a sentiment from the Endless Florescence Stamp Set onto the bottom left of the panel using Obsidian Ink and adhered the embossed images on the panel using foam squares for dimension.

Once that was done, I die-cut Pink Sand Cardstock using the Layer 2 Die from the Precision Layering Mini Slimline A Etched Dies to create a mat for my card front and then attached it to an top-folding white card base using tape runner. Then, to finish, I adhered some Antique Gold - Sequins to embellish my panel.


My second card features the new Botanical Bookmark Stamp Set and coordinating Dies (also available as a bundle) against a heat-embossed background made using the new Rosy Blooms Stamp Set.


To make this card, I started off by stamping the leaves from the Rosy Blooms Stamp Set in Versamark Ink onto Neenah Classic Crest Solar White Cardstock, then sprinkled some White Embossing Powder over the images, and melted the powder with a Heat Tool. Next, I applied Sweet Leaf and Minty Mint inks on the top two-thirds of the panel using an ink blending tool to highlight and bring out the embossed areas more.  

Next, I stamped the sentiment layers from the Botanical Bookmark Stamp Set in Parrot, Razzleberry, and Mangrove Root inks onto Neenah Classic Crest Solar White Cardstock. Then, I die-cut the image using the coordinating die and adhered the pieces on the panel using foam squares for dimension.  Next, I stamped the accompanying sentiment from the Botanical Bookmark Stamp Set onto Rubellite Cardstock in Versamark Ink, then covered some White Embossing Powder over the image, and melted the powder with a Heat Tool and added to the card with two layers of foam tape for more dimension. Once that was done, I added some pink and blue paint splatters using the Altenew Watercolor 36 Pan Set for interest.

Then, to complete, I mat my card panel with layers of Dazzling Diamond and Rubellite Cardstock before adhering it down to a side-folding A2-size white card base using tape runner.  I finished the design with some sparkling silver sequins around the sentiment to embellish.


Next up, I have two bookmark designs to share which I made using the new Rosy Blooms Stamp Set, coordinating diesBotanical Bookmark Die Setand the Altenew Watercolor 36 Pan Set. The blooms in this set are so gorgeous and they’re the perfect size to scatter across a card panel.

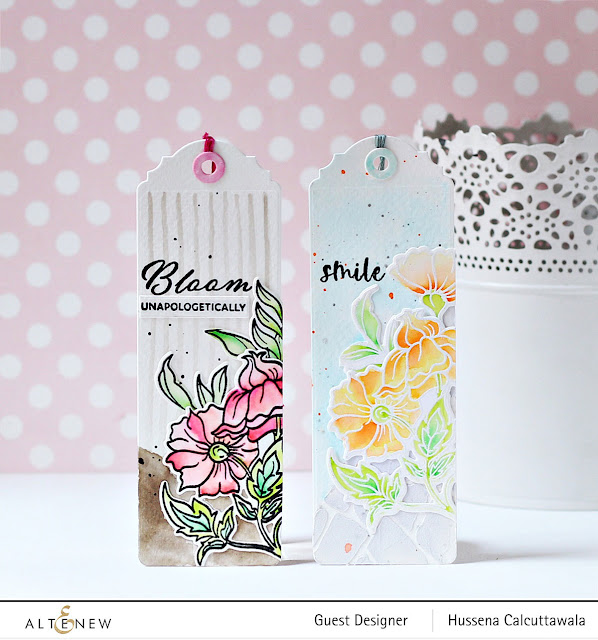

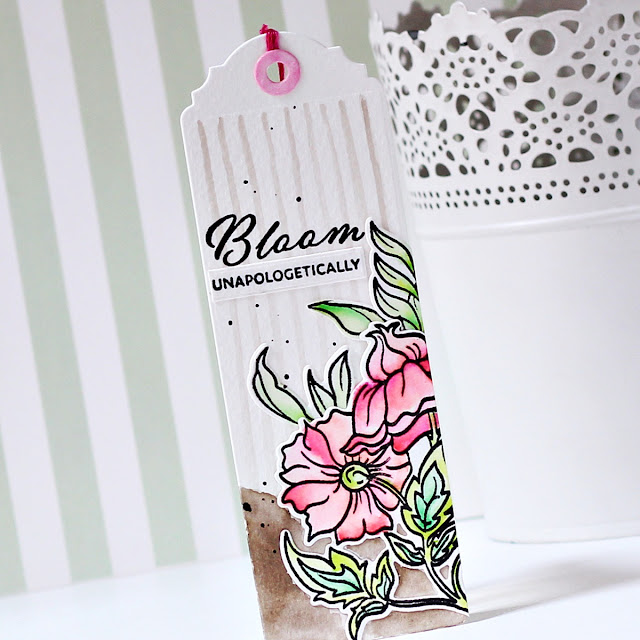
I started by trimming a piece of Neenah Classic Crest Solar White Cardstock (110 LBS) to about 7″ x 2″.  (I like this cardstock for projects like these because it’s bright white and works with so many different techniques.)  Then, I die-cut the strip with the Botanical Bookmark Die Set to form my basic bookmark shape.

Next, I used a very fine paint brush to paint some loose pale grey stripes on the bookmark using Industrial Diamond paint. After this dried, I sprinkled some black paint splatters around by tapping my brush onto my paper. I also added some sketchy sand to the bottom with the Watercolor 36 Pan Set and blended it out a bit with water.  Next, I  stamped the floral images from the Rosy Blooms Stamp Set using Obsidian Ink onto Neenah Classic Crest Solar White Cardstock. I then coloured the images using the Watercolor 36 Pan Set and cut them out with the coordinating dies.

I adhered the images to the bookmark using liquid adhesive and then stamped the word 'Bloom' from the Rosy Blooms Stamp Set using Obsidian Ink. Next, I stamped the accompanying sentiment from the Rosy Blooms Stamp Set onto a strip of Neenah Classic Crest Solar White Cardstock using Obsidian Ink and adhered it to the bookmark. I added a reinforcer and a handmade tassel with some beads to finish off the bookmark. 

For my next bookmark, I started by trimming a piece of Neenah Classic Crest Solar White Cardstock (110 LBS) to about 7″ x 2″ and then die-cut the strip with the Botanical Bookmark Die Set to form my basic bookmark shape. I thought it would be fun to add a stenciled design on the bookmark, so I secured my Stone Wall Stencil on top of the bookmark using Washi Tape and added Embossing Paste mixed with Lava Rock Re-inker to the bottom right-hand side of the bookmark with a spatula. Next, to create the blue background, To create the blue background, I simply did a wash of “Caribbean Sky” by mixing in some water with the paint and spreading it over my paper using a wide brush.

I stamped the floral images from the Rosy Blooms Stamp Set in Versamark Ink onto Neenah Classic Crest Solar White Cardstock, then covered it with some White Embossing Powder, and melted the powder with a Heat Tool. Next, I coloured the images using Zig Clean Color Real Brush Markers and cut them out with the coordinating dies. I adhered the images to the bookmark using liquid adhesive and then stamped the word 'Smile' from the Rosy Blooms Stamp Set using Obsidian Ink. Then, to finish, I added some orange and grey paint splatters around by tapping my brush onto my paper. Just like the previous bookmark, I added a reinforcer and a handmade tassel with some beads to complete the bookmark. 


Giveaway Prizes:
$200 in total prizes! To celebrate this release, Altenew is giving away a $50 gift certificate to 2 lucky winners and a $25 gift certificate to 8 winners! Please leave a comment on the Altenew Card Blog and/or each designer’s blog post on the blog hop list below by 02/23/2022 for a chance to win. Altenew will draw 7 random winners from the comments left on each stop of this blog hop and announce the winners on the Altenew Winners Page on 03/12/2022.

 Free Gift: 

  • Get a FREE brand new Folktales & Stories Mini Inspiration Guide with every order from 03/04/2022 through 03/06/2022. Shop HERE!
  • Get a FREE brand new Folktales & Stories Stamp & Die Release Inspiration Guide Ebook  (worth $5.99) with every order of high-value Sweet Moments Bundles. Shop HERE! *Exclusions apply.
  • Get a FREE brand new Online Cardmaking Class with every order from the new Folktales & Stories Stamp & Die Release Collection from 03/04/2022 through 03/10/2022. Shop HERE!


 Blog Hop Order:
Next Stop on this Blog Hop is the incredibly talented, Emily Midgett's blog. Just in case you lose your place along the way, here is the complete list of participants so that you can find your way back:

Altenew Blog

Jennifer McGuire

Jenny Colacicco

Vicky Papaioannou

Norine Borys

                            Hussena Calcuttawala (You are HERE)

Emily Midgett

Colleen Balija

Nathalie DeSousa

Mindy Eggen

Erum Tasneem

Jaycee Gaspar

LauraJane

Michelle Short

Cheryl Espie

Terri Koszler

Nichol Spohr

Lilith Eeckels

Nenette S. Madero

Laurie Willison

Preeti Chandran

Tenia Nelson

Therese Calvird

Virginia Lu

Nandini Karmarkar

Maryam Perez

Bridget Casey

Reiko Tsuchida

Natasha Davies

Svitlana Shayevich

Katrina Howe

Agnieszka Małyszek

Teresa Litchfield

Rosie Neustaedter

Linda Westfall

SathyaKala Sankaran

Arjita Singh

Sande Woodson

Daniel Diaz 


I really appreciate you stopping by and participating in this blog hop! If you like what you've seen from me, please give me a follow over on my Instagram (@hussena_cal) and/or subscribe to my blog if you haven't already.

Monday, February 21, 2022

Spellbinders February 2022 Clear Stamp & Die Club Kit | Old School Notes


Hello, crafty friends!
Hope your Monday is off to a great start! I have a Birthday Card to share today made using the Spellbinders Clear Stamp & Die of the Month  Old School Notes.

The Spellbinders Clear Stamp of the Month features a cute typewriter with stamped details inside, several types of flowers, and darling sentiments, which you can mix and match with the other Club Kits for February Kits such as the Large Die of the Month Kit for endless possibilities! This is a 17-piece clear photopolymer 4 x 6 stamp set perfect for many cardmaking projects and lots of occasions. This “Old School Notes” stamp set features made in the USA stamps from high-quality photo-polymer for clear, crisp impressions. 

There is also a Spellbinders Clear Stamp Club Kit without the die set, which you can opt for if you don't wish to receive the coordinating dies.

 You may notice a theme from my last post - Typewriters. I’m having such a blast creating with these this month! I decided to create a watercolored Birthday Card using the Old School Notes Stamp set along with the Typing Class Die Set and the Nestabilities Hemstitch Rectangles Etched Dies.

To create my card, I first stamped a number of the images from the  Old School Notes Stamp set on to Snowdrift Cardstock using Versafine Onyx Black ink. Next, I colored the images using the Jane Davenport Watercolors Neutrals Set. Once the images were all colored and dry, I die cut the images using the coordinating dies

Next, I die-cut Beeswax, DahliaRainforest, and Teal Topaz Cardstock using the flower and leaf dies included in the Typing Class Die Set. Then, I went ahead and stamped some additional solid leaves from the stamp set on to Snowdrift Cardstock using Electric Lime ink and cut them out using the  coordinating dies to use as foliage. Next, I die-cut Snowdrift Cardstock using the typewriter message die included in the Clear Stamp & Die of the Month Club and stamped a sentiment on it using Versafine Onyx Black ink and popped it on my panel using foam adhesive

Next, to create my card background, I die-cut Snowdrift Cardstock using the Extra Large Frame Die from the Hemstitch Rectangles Etched Die Set. Then, I wet my panel with water and used Tumbled Glass, Peacock Feathers, and Cracked Pistachio Distress Inks with a Water Brush in a dabbing motion, allowing the colors to mix slightly. I let the panel dry and then added some grey and teal paint splatters for interest. Then, I stamped one of the sentiment pieces from the Old School Notes Stamp set using Pumice Stone Distress Oxide ink randomly all over the panel to create a vintage letter look. I really love how it adds a little something to the background. 

Once that was done, I adhered the stamped images to the background panel using foam adhesive. Then, I matted the panel with layers of Silver Glitter and Silver Fox Cardstock before adhering it to a top-folding white card base with tape runner. 


I hope you liked my card and thank you so much for stopping by today. You can subscribe to any of the Spellbinders Clubs between the 1st - 24th of each month and never miss a fun kit like this again!
  

Don't miss out on the Be our Valentine Sale that is currently going on at Spellbinders. You can SAVE $25 Off $100+ on your orders on the Spellbinders website. This is a cart-level discount that will be applied to all orders with a subtotal of $100+, clubs are not eligible for this promotion.


 If you like what you've seen from me, please give me a follow over on my Instagram (@hussena_cal) and/or subscribe to my blog if you haven't already.
Wishing you a great day ahead!

Saturday, January 22, 2022

Spellbinders January 2022 Clear Stamp & Die of the Month | One Love, One Heart


Hello, crafty friends!
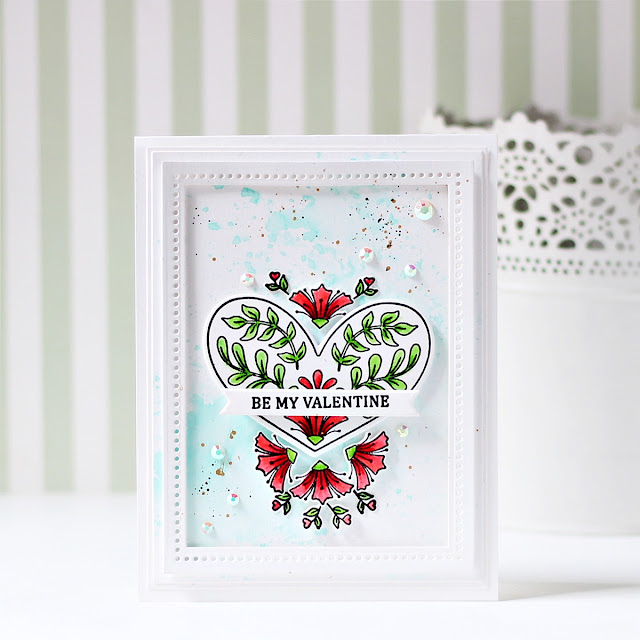
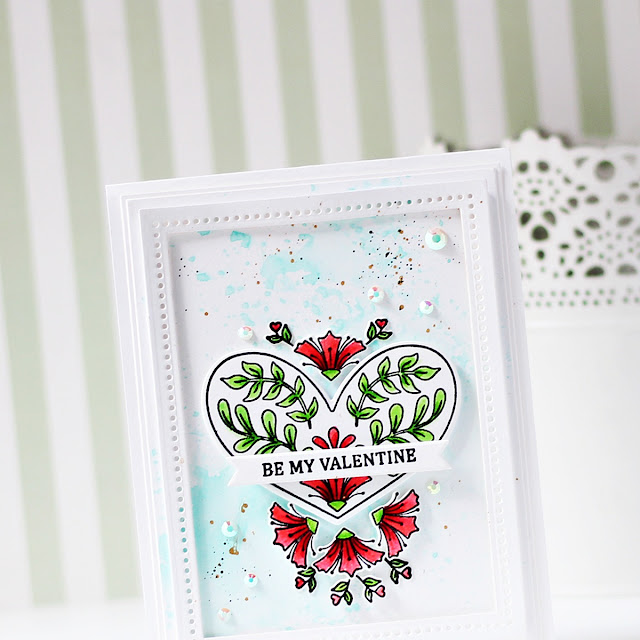
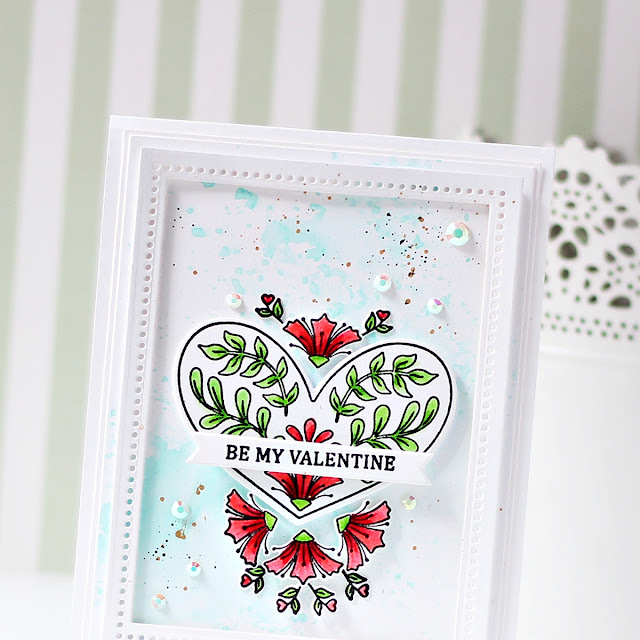
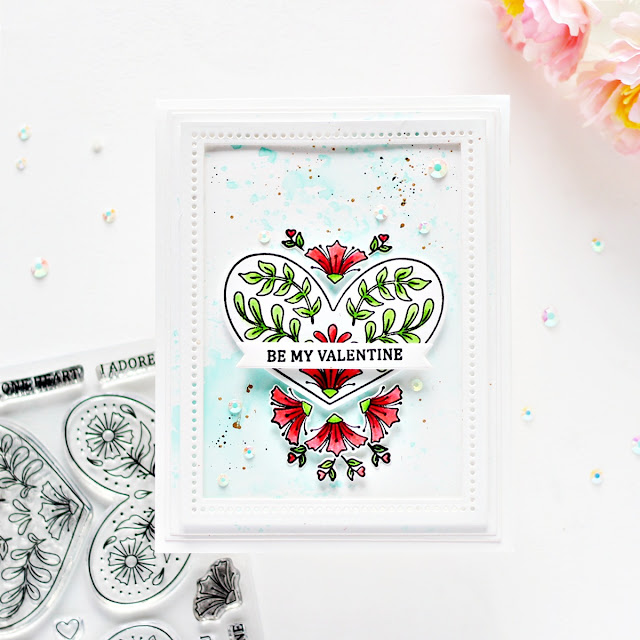
Hope your weekend is off to a great start! I have a Valentine's Day Card to share today made using the Spellbinders Clear Stamp & Die of the Month  One Love, One Heart.

The Spellbinders Clear Stamp of the Month features three wonderful hearts with stamped details inside and beautiful sentiments, which you can mix and match with the other Club Kits for January Kits for endless possibilities! This is a 12-piece clear photopolymer 4 x 6 stamp set perfect for many cardmaking projects and lots of occasions. This “One Love, One Heart” stamp set features made in the USA stamps from high-quality photo-polymer for clear, crisp impressions. 

There is also a Spellbinders Clear Stamp Club Kit without the die set, which you can opt for if you don't wish to receive the coordinating dies.

 The pretty heart designs from the set inspired me to create this love-themed card, which would just perfect to gift to a loved one this Valentine's Day. I used the Clear Stamp and coordinating dies from the set along with the Nestabilities Hemstitch Rectangles Etched Dies for my design.

For my card, I started by trimming a piece of Snowdrift Cardstock to 4″ x 5.25″ and created the background pattern using the 'Ink Smooshing' technique. I just pressed Tumbled Glass and Salty Ocean Distress Inks onto different areas of my craft mat and spritzed them with water until they beaded up. I then pressed my piece of cardstock into the droplets and dried it with a Heat Gun. I continued pressing the cardstock into the ink droplets until I had look that I liked and was happy with.

Next, I I stamped one of the heart designs and the individual floral images from the One Love, One Heart Stamp Set onto Snowdrift Cardstock using Versafine Onyx Black Ink. I coloured the images using Zig Clean Colour Real Brush Markers and then cut them out with the coordinating dies (included if you subscribe to the Clear Stamp & Die of the Month Kit) and popped them up in the middle of the card using foam adhesive. Next, I stamped a sentiment from the same set onto a strip of Snowdrift Cardstock using Versafine Onyx Black Ink and used one of the banner dies included in the Kit to cut out the card sentiment and popped it down on my panel using  foam adhesive.

To accentuate my design, I die-cut Snowdrift Cardstock and White Fun Foam using the Extra Large Hemstitch Die from the Nestabilities Hemstitch Rectangles Etched Dies. I adhered down the frame to my panel using liquid adhesive and then mat the card panel with  Snowdrift Cardstock. Then, to finish, I adhered it to a top-folding A2-sized white card base with liquid adhesive. Lastly, I adhered a few Iridescent Crystal Gems around my stamped design to add some sparkle and shine to the panel. 


I hope you liked my card and thank you so much for stopping by today. You can subscribe to any of the Spellbinders Clubs between the 1st - 24th of each month and never miss a fun kit like this again!
  

Don't miss out on the Feel The Love Sale that is currently going on at Spellbinders with up to 40% off on a wide range of gorgeous dies, stamps, glimmer plates, tools, and more! There are so many AMAZING deals that you definitely shouldn't miss! 
 

 If you like what you've seen from me, please give me a follow over on my Instagram (@hussena_cal) and/or subscribe to my blog if you haven't already.
Wishing you a great day ahead!

Wednesday, September 8, 2021

Spellbinders September 2021 Clear Stamp of the Month | A Little Birdie Told Me


Hello, crafty friends! 
Happy Monday, friends! I am back today with two nature-inspired cards made with the Spellbinders Clear Stamp of the Month - A Little Birdie Told Me. Check out the exclusive coordinating Tweet Friends - Die Set. There's also something NEW this month - Spellbinders now offers a coordinating die set that you can purchase separately as an add-on for the Clear Stamp of the Month Club Sets. I love this option as I can quickly and easily cut my favorite images from the set out and no longer have to fussy cut the images!

The Spellbinders Clear Stamp for September is a 21 piece stamp set containing adorable bird images and sentiments perfect for a variety of occasions. The Stamp Set coordinates with this month's Large Die of the Month Set, so you can mix and match your supplies to create different projects. This “A Little Birdie Told Me” stamp set features made in the USA stamps from high-quality photo-polymer for clear, crisp impressions.  

To create my card, I first stamped a bunch of the little floral and bird images in the set on to a piece of Snowdrift Cardstock using Versafine Onyx Black ink and then coloured them using Artist Markers. Once that was done, I used the coordinating die set to cut them all out.

Next, I stamped the wreath and the bow images on another piece of Snowdrift Cardstock using Versafine Onyx Black ink. Then, I stamped the banner and the sentiment onto Snowdrift Cardstock using the same black ink and used the coordinating die set to die cut the image. 

Next, I used the largest rectangle die from the Candlewick Rectangles Etched Die Set to emboss the die frame on the front of the card. Embossing with dies is easy to do on any machine with the Tan Embossing Mat. You need to just put the paper between the die and the Tan Embossing Mat and run it through your Spellbinders Platinum 6" Die Cutting & Embossing Machine as you would for an embossing folder. This is a great technique to get more out of your dies and adds so much to the look of the card.

It was now time to assemble the card together. I popped up the bird, the floral images, the sprigs, and the sentiment banner on my card panel using foam adhesive. I used the Ranger Stickles Glitter Glue in Diamond to add a bit of shimmer and shine to the flower centers and the wings of the bird. Then, to finish, I adhered my card panel to a top-folding white card base made from Snowdrift Cardstock


My next card is made in a different size from my usual cards. I made a Square Card using the bird and floral images in the A Little Birdie Told Me stamp set. 

For my card, I first stamped a bunch of the little floral and bird images in the set on to a piece of Snowdrift Cardstock using Versafine Onyx Black ink and then coloured them using Zig Clean Color Brush Markers. Once that was done, I used the coordinating die set to cut them all out.

Next, I trimmed a piece of pink polka dot patterned paper to size and stamped a sentiment from the A Little Birdie Told Me stamp set in the centre of the panel using the same black ink. Then, I die cut Alabaster Cardstock using the largest square die from the Hemstitch Squares Etched Die Set. Once that was done, I die cut the panel using the smallest circle die from the Hemstitch Circles Etched Dies to create an aperture. 

I then arranged the various die cut elements around the circle and and popped them on the card panel using foam adhesive. Next, I adhered the patterned paper below the die cut panel using foam adhesive. Then, to finish, I adhered my card panel to a top-folding kraft card base made from Portbello Cardstock. Lastly, I added a bit of Ranger Stickles Glitter Glue in Diamond to the flower centers for some sparkle and shine.


I hope you liked my cards and thanks so much for stopping by today. You can subscribe to any of the Spellbinders Clubs between the 1st - 24th of each month and never miss a fun kit like this again!
  

If you like what you've seen from me, please give me a follow over on my Instagram (@hussena_cal) and/or subscribe to my blog if you haven't already.
Wishing you a great day ahead!