Hello everyone!
I am sharing my third and last guest post today for Spellbinders. I have three projects to share today featuring the ever elegant 'A Charming Christmas' collection by Amazing Paper Grace.
This collection is full of absolutely gorgeous and elegant dies, and I couldn't resist making some non traditional Christmas projects using them. These dies are infinitely versatile, and can be used for a wide variety of projects, and not just Christmas ones. I will be sharing one such example today.
Here's my first project for today! It's a gate-fold card:


To create this card, I first started with a sheet of 12" X 12" Cream Textured Cardstock and cut the paper in half so that I'd have two pieces of 12" x 6'' cardstock. I scored and folded both of them in the middle, that is the 6 inch mark. I adhered both the pieces together in the centre creating two flaps, which I then cut into triangles. Next, I created the insert for the card which was 5.5" x 6" and adhered the Snowflake Toppers Etched dies to the top of the insert.

I die cut the Snowflake Toppers Etched dies from gold foil cardstock. I have started using gold foil cardstock quite recently on my projects, and it is totally inspired by Becca's projects. I love the elegant touch it gives to any project!

I wanted my card to have a belly band which was removable. To create the band, I used a 13" inch strip of cream textured cardstock. (I know most cardstock sheets come only in 12" X 12"size, so what I did is, I attached another 1" strip to the 12" strip to make it 13" in total). I camouflaged the extra strip which was glued on the band by adhering a swirly die cut frame in the centre.

Here's a stand-alone picture of the band. I kept the embellishing very simple on this one: I die cut the outer and inner frame from the Sentimental Christmas Stamp and Die set from cream textured cardstock and gold foil cardstock respectively, and adhered them on the band. I then stamped my sentiment directly on the band using Black Dye ink. I also included a small floral cluster on the left side. The flowers are made with peach Foamiran sheets using the Cinch and Go Poinsettia Etched dies. The leaves are also from the same die set.

Here is a closer look of the flowers on my card. I have a little trick to share here - I used the same Cinch and Go Poinsettia die to create both my Foamiran flowers and leaves. This die can be used for creating leaves as well, and this is a great way to get more out of your dies from a single die set.

I wanted the card design to look balanced, so I adhered some Foamiran flowers directly on the card as well. I also added grey pollens to my flower centres, and some golden pollen bunches and peach micro rose buds as foliage on the card.

Another picture to show the floral arrangement. Flowers are my all time favourite (which some of my crafty friends might be knowing), and I can't stop adding them to each project of mine! :D

Here's an aerial shot of the card. This is a very dimensional card as you can see in the picture.

And here's a flat-lay picture of the card. I hope you liked it!

My next two projects for today are gift tags cum gift card holders. These are again my favourites to make, and I totally love the idea to having a die which can create a tag and gift card holder all at once. I created two very simple Christmas gift card holders:
Both the tags were super quick and fun to put together. For the first tag, I used the Charming Tag Pocket Etched dies for die cutting the base of the tag using White heavy weight cardstock.

Next, I die cut the pocket to add to the front of the tag again from White heavy weight cardstock. I didn't want the pocket to have a very plain look so I took one of the decorative insert dies, and die cut the pocket so that it would have an intricate design on the front.

I also die cut another decorative insert piece, and adhered it to the top half of the gift tag cum gift card holder.

To embellish my project, I added a red poinsettia flower and few holly leaves made using the Cinch and Go Poinsettia Etched dies and Holly Jolly Christmas Etched dies respectively. And this tag was done!

Here's how it looks with a gift card.

The next tag is even more simple in terms of the design. I die cut the tag base using the Charming Tag Pocket Etched dies. I followed the same steps I did for creating my previous tag. This time, I chose to die cut a different design of the decorative insert pocket.

I again added a red poinsettia flower, but this time, I die cut the holly leaves from gold foil cardstock. The poinsettia flower was made using the dies from the Cinch and Go Poinsettia Etched dies, while the holly leaves were die cut from the Holly Jolly Christmas Etched die set.

And here's how it looks with a gift card!

Supplies used:
S5-384 Charming Tag Pocket Etched Dies
SDS-164 Sentimental Christmas Stamp and Die Set
PE-100 Platinum 6 Die Cutting and Embossing Machine - 6" Platform
T-001 Tool' N One
Other supplies used : Neenah Solar White 110 LB cardstock, Cream Linen Textured 12 x 12 Cardstock, American Crafts Colored 12×12 cardstock, White 80 LBS Cardstock Sheets, Gold Foil Cardstock, White Fun Foam; Stick It Double Sided Adhesive Sheets; Adhesive: Scrapbook Adhesives 3D Foam Squares, Tombow Mono Multi Liquid Glue, Double Sided Foam Tape, Glue Gun; Versafine Onyx Black Ink Pad, Foamiran Sheets (Peach), McGill Inc. Paper Blossoms Tool kit, Pollens, Micro Rose Buds, Ribbon.
Thank you so much, for taking out time and reading my post. If you liked my projects, please do leave me a comment below. I always love to hear what you think of my projects. :)
Have a nice day everyone!
I am sharing my third and last guest post today for Spellbinders. I have three projects to share today featuring the ever elegant 'A Charming Christmas' collection by Amazing Paper Grace.
This collection is full of absolutely gorgeous and elegant dies, and I couldn't resist making some non traditional Christmas projects using them. These dies are infinitely versatile, and can be used for a wide variety of projects, and not just Christmas ones. I will be sharing one such example today.
Here's my first project for today! It's a gate-fold card:

This card measures well over 6 x 6 inches. I seldom create cards which are this large in size, but I wanted to create one this time just to use the beautiful Snowflake Toppers Etched dies. Becca always creates the most exquisite and detailed dies and I absolutely love them! The inspiration for creating this card most definitely came from this die set. :)
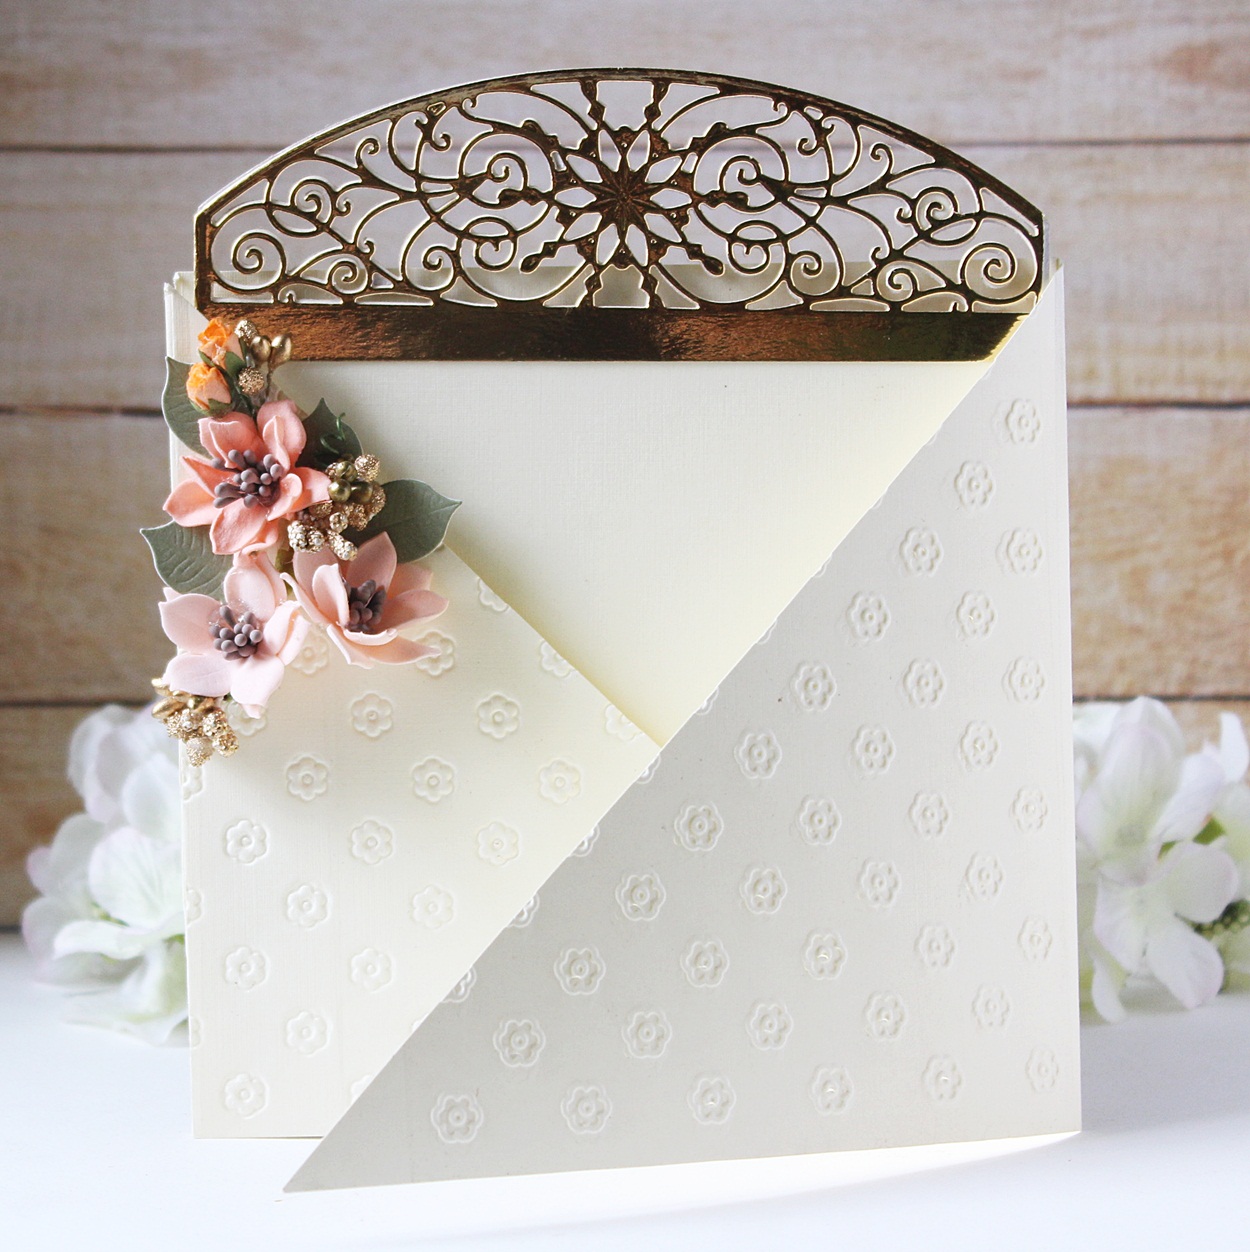
To create this card, I first started with a sheet of 12" X 12" Cream Textured Cardstock and cut the paper in half so that I'd have two pieces of 12" x 6'' cardstock. I scored and folded both of them in the middle, that is the 6 inch mark. I adhered both the pieces together in the centre creating two flaps, which I then cut into triangles. Next, I created the insert for the card which was 5.5" x 6" and adhered the Snowflake Toppers Etched dies to the top of the insert.

I die cut the Snowflake Toppers Etched dies from gold foil cardstock. I have started using gold foil cardstock quite recently on my projects, and it is totally inspired by Becca's projects. I love the elegant touch it gives to any project!

I wanted my card to have a belly band which was removable. To create the band, I used a 13" inch strip of cream textured cardstock. (I know most cardstock sheets come only in 12" X 12"size, so what I did is, I attached another 1" strip to the 12" strip to make it 13" in total). I camouflaged the extra strip which was glued on the band by adhering a swirly die cut frame in the centre.

Here's a stand-alone picture of the band. I kept the embellishing very simple on this one: I die cut the outer and inner frame from the Sentimental Christmas Stamp and Die set from cream textured cardstock and gold foil cardstock respectively, and adhered them on the band. I then stamped my sentiment directly on the band using Black Dye ink. I also included a small floral cluster on the left side. The flowers are made with peach Foamiran sheets using the Cinch and Go Poinsettia Etched dies. The leaves are also from the same die set.

Here is a closer look of the flowers on my card. I have a little trick to share here - I used the same Cinch and Go Poinsettia die to create both my Foamiran flowers and leaves. This die can be used for creating leaves as well, and this is a great way to get more out of your dies from a single die set.

I wanted the card design to look balanced, so I adhered some Foamiran flowers directly on the card as well. I also added grey pollens to my flower centres, and some golden pollen bunches and peach micro rose buds as foliage on the card.

Another picture to show the floral arrangement. Flowers are my all time favourite (which some of my crafty friends might be knowing), and I can't stop adding them to each project of mine! :D


And here's a flat-lay picture of the card. I hope you liked it!

Both the tags were super quick and fun to put together. For the first tag, I used the Charming Tag Pocket Etched dies for die cutting the base of the tag using White heavy weight cardstock.

Next, I die cut the pocket to add to the front of the tag again from White heavy weight cardstock. I didn't want the pocket to have a very plain look so I took one of the decorative insert dies, and die cut the pocket so that it would have an intricate design on the front.

I also die cut another decorative insert piece, and adhered it to the top half of the gift tag cum gift card holder.

To embellish my project, I added a red poinsettia flower and few holly leaves made using the Cinch and Go Poinsettia Etched dies and Holly Jolly Christmas Etched dies respectively. And this tag was done!

Here's how it looks with a gift card.

The next tag is even more simple in terms of the design. I die cut the tag base using the Charming Tag Pocket Etched dies. I followed the same steps I did for creating my previous tag. This time, I chose to die cut a different design of the decorative insert pocket.

I again added a red poinsettia flower, but this time, I die cut the holly leaves from gold foil cardstock. The poinsettia flower was made using the dies from the Cinch and Go Poinsettia Etched dies, while the holly leaves were die cut from the Holly Jolly Christmas Etched die set.

And here's how it looks with a gift card!

Supplies used:
SDS-164 Sentimental Christmas Stamp and Die Set
PE-100 Platinum 6 Die Cutting and Embossing Machine - 6" Platform
T-001 Tool' N One
Other supplies used : Neenah Solar White 110 LB cardstock, Cream Linen Textured 12 x 12 Cardstock, American Crafts Colored 12×12 cardstock, White 80 LBS Cardstock Sheets, Gold Foil Cardstock, White Fun Foam; Stick It Double Sided Adhesive Sheets; Adhesive: Scrapbook Adhesives 3D Foam Squares, Tombow Mono Multi Liquid Glue, Double Sided Foam Tape, Glue Gun; Versafine Onyx Black Ink Pad, Foamiran Sheets (Peach), McGill Inc. Paper Blossoms Tool kit, Pollens, Micro Rose Buds, Ribbon.
Thank you so much, for taking out time and reading my post. If you liked my projects, please do leave me a comment below. I always love to hear what you think of my projects. :)
Have a nice day everyone!


