Hello, crafty friends!
I have TWO Cards to share today on the Pinkfresh Studio Card Blog featuring the gorgeous, Thankful For Friends Stamp Set from the August Release.
I have TWO Cards to share today on the Pinkfresh Studio Card Blog featuring the gorgeous, Thankful For Friends Stamp Set from the August Release.
For my card, I first stamped the floral image from the Thankful For Friends Stamp Set on a piece of Canson Montval Watercolor Paper using a light dye ink. I stamped the image using a very light ink colour as I wanted to do no-line watercoloring. Next, I coloured the image using Liquid Watercolours. I used Bubble Gum and Candy Apple to colour the flowers, and Key Lime and Emerald City for the stem and leaves. This image has very detailed lines and requires quite a bit of patience to colour, but the end result is worth it, in my opinion.
Once my image was coloured, I die cut it using the coordinating Thankful For Friends Die Set. I contemplated for a while about how I wanted to incorporate it as a part of my card design, but ultimately decided to pop it up on my panel using fun foam for dimension. Once I was done, I took another piece of Watercolour Paper and did a watercolor wash on the panel using Licorice Liquid Watercolour. Next, I die cut a circle from this panel using the Essentials: Braided Circles Die Set. Once that was done, I die cut the panel using the Essentials: Diagonal Stitched Rectangles Die Set.
Then, I took a piece of Watercolor Paper and loosely painted stripes on it using Sunshine Liquid Watercolor. I adhered this piece behind my main card panel. I assembled my card together and adhered everything down using liquid glue. The sentiment is from the Thankful For Friends Stamp Set and I stamped it using Detail Black Ink on a strip of White Cardstock. I lightly inked the edges using Fresh Pear ink to give it more definition. I finished off by adhering some yellow Jewels and black and green plaint splatters to my panel.
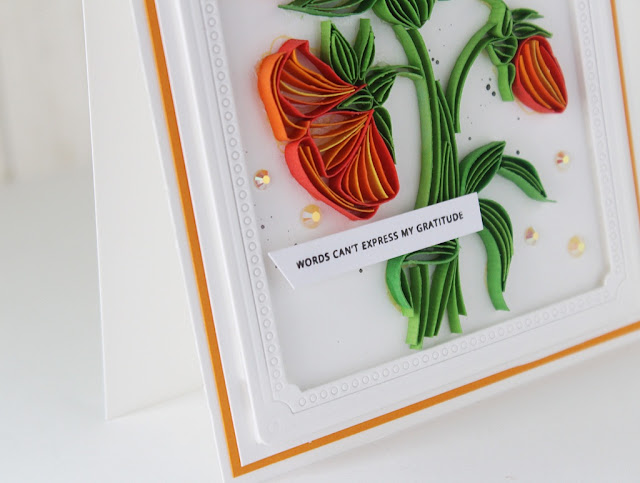
My next Card is somewhat special to me because it features an art form with which I actually began my paper crafting journey - Paper Quilling. I have always been very fascinated with it and decided to incorporate it for my card today with a modern twist. I have done Sculptural Quilling and used the Thankful For Friends Stamp Set for my design.
This took me over two days to complete simply because it is very labor-intensive and requires quite a bit of effort and patience to complete. I am quite rusty with my skills, but I really enjoyed working on this, and hope you like the idea too! The Thankful For Friends Stamp Set is so beautiful and I loved working with it to create this card.
For my card, I started off by stamping the floral image from the Thankful For Friends Stamp Set using a very light dye ink to use as my reference point. Then, I used several 3mm and 5mm paper quilling strips to quill the entire piece. Once I finished working on the entire piece bit by bit, I adhered it down to my card base.
I wanted the design to be very clean and crisp, so I decided to add a die cut frame to elevate the look of the design. I die cut some frames from the Pretty Frames Die Set from White Cardstock and adhered them to my panel using foam strips. I also added few black paint splatters and white Jewels to add a little something to the design without making it too distracting.
To finish off, I added a tiny sentiment strip to my panel which is from the Charming Floral Wreath Stamp Set. I am quite happy with how it's turned out!
To finish off, I added a tiny sentiment strip to my panel which is from the Charming Floral Wreath Stamp Set. I am quite happy with how it's turned out!
I hoped you liked my cards. Thank you so much for stopping by today!
Hugs,


Wow both of these are just gorgeous, love the coloring on the first and like the design, the second is just beautiful, lovely quilling!
ReplyDelete