Showing posts with label Watercolors. Show all posts

Sunday, April 10, 2022

Guest Post using Open Road Collection by Spellbinders


Hello everyone!
I am so excited to be guest designing on the Spellbinders blog. I have three projects to share with you today highlighting the NEW Open Road Collection. The wonderful and fun products in this collection inspired me to create a set of three cards perfect for sending to your friends and family! 


My first project features the Open Road Etched Dies, On Cloud Nine Etched Dies, Head in the Clouds Embossing Folder, and the Open Road Sentiments Clear Stamp Set. I LOVE the convertible die in the set and used it to create soft pastel card for a friend. It was so fun to create this one!

To begin, I embossed the Head in the Clouds Embossing Folder on a piece of 4” x 5 1/4”  Waterfall Cardstock. Next, I trimmed a piece of Grey Woodgrain Paper to size and die-cut a circle in the middle of the pane using the Circle Shape Medium Die from the Essential Circles Die Set. Once that was done, I die-cut White Foam using the same die and adhered the two panels together with Craft Glue.

Next, I die-cut SnowdriftPink SandSilver Glitter Paper, OnyxWhite Foam, and Mirror Gold Cardstock using the Open Road Etched Dies and assembled the car with liquid glue. Then, I blended Squeezed Lemonade and Scattered Straw Distress inks over the convertible and the balloon die-cut pieces using a sponge dauber for depth. I adhered all the pieces down on my panel with Craft Glue.

Next, I die-cut Silver Glitter Paper using the Ribbon/Twine die included in the Assorted Tags Etched Die Set and grouped the die-cut pieces together to create the balloon strings. Next, I die-cut Snowdrift Cardstock using the On Cloud Nine Etched Dies and adhered them down on the card panel suing foam adhesive for a raised effect. Once that was done, I die-cut Pink Sand Cardstock using the large label from the Sentiment Labels Die Set. Next, I stamped a sentiment from the Open Road Sentiments Clear Stamp Set to Snowdrift Cardstock using Versafine Onyx Black ink and cut it out using one of the inserts dies from the Sentiment Labels Die Set. Once that was done, I adhered the sentiment strip on top with liquid glue. Next, I die-cut Silver Glitter Paper using the twine die in the Sentiment Labels Etched Dies. I attached the sentiment label on the card using the twine and adhered it on top using foam adhesive.

To finish, I adhered the embossed panel to a piece of Silver Glitter Paper before adhering it to a top-folding A2-sized Pink Sand card base using tape runner


My next card features the Open Road Etched DiesI Dance Etched Dies. and the Sentiments for You Clear Stamp Set.  I thought the balloons included in the Open Road Die Set were super fun on their own and just perfect for creating this easy and fun graduation card!

To start, I die-cut Barely Peach and Onyx Cardstock using the hand and leg dies from the I Dance Etched Dies.  I assembled the pieces with liquid glue and die-cut BnW Stripes Patterned Paper using the skirt die included in the same set. 

Then, I die-cut Snowdrift and Gold Glitter Cardstock using the balloon dies in the Open Road Etched Dies. I die-cut a bunch of them at once, so that I could use them later for other projects as well. Once that was done, I used an array of Distress Oxide inks to colour the balloons using sponge daubers. This took me some time to do, but I thoroughly enjoyed the process as it was very therapeutic. If you don't want to colour the pieces individually, you can die-cut the pieces from coloured cardstock scraps too. 

Once that was finished, I die-cut Mirror Gold Cardstock using the Ribbon/Twine die included in the Assorted Tags Etched Die Set and grouped the die-cut pieces together to create the balloon strings. Next, I stenciled on the panel with a DIY stencil created using the On Cloud Nine Etched Dies and lightly inked it with Shabby Shutters Distress ink as a way to ground the pieces. Once that was done, I die-cut Snowdrift Cardstock using the grass blade die in the Besties Forever Die Set and the itty bitty flowers and leaves from the Be Bold Blooms Etched Dies. I blended Mowed Lawn Distress Oxide ink over the glass blades using a blending brush to colour them, while the flowers were coloured using Ripe Persimmon, Milled Lavender, Shaded Lilac, and Broken China Distress Oxide  inks. I attached the pieces to the bottom of the panel using with liquid glue and adhered the flowers on the grass blades using foam adhesive for a raised effect. I then assembled the balloons and the skirt down on the panel  using foam adhesive for dimension and interest.

Next, I stamped a sentiment from the Sentiments for You Clear Stamp Set onto the panel using Versafine Black Onyx ink and then used the Antique Gold Metallic Spray and Jet Black Ink Spray to make it extra artsy! To finish things off, I mounted the panel to an A2-sized top-folding white card base using tape runner


My last card for today features the Open Road Etched DiesOn Cloud Nine Etched DiesFluted Classics Circle Etched Dies, and the Open Road Sentiments Clear Stamp Set. The convertible in the Open Road Die Set is super sleek and fun and can be customized with all of the little details included in the set. I added gold accents and colorful balloons to create this textured graduation card.

To begin, I trimmed a panel of Snowdrift Cardstock to 4 1/4” x 5 1/2” and stenciled on the panel with a DIY stencil created using the On Cloud Nine Etched Dies. I used Cracked Pistachio and Mowed Lawn Distress inks to apply ink over the top edge of the panel with a blending brush to give the illusion of blue skies.

Next, I die-cut Snowdrift Cardstock using the Medium Outer Rim and Insert dies from the Fluted Classics Circle Etched Dies. Then, I embossed the piece using the Radiant Burst Embossing Folder and inked the sides and the centre of the die-cut piece with Scattered Straw Distress Oxide ink on the top and Twisted Citron ink on the bottom using an ink blending tool to highlight and bring out the raised areas more.

Once that was done, I die-cut Poppy Field, Mirror GoldOnyx Cardstock, and White Foam using the Open Road Etched Dies and assembled the car with liquid glue. Next, I die-cut Snowdrift Cardstock using the balloon dies from the same set. Then, I coloured the pieces using Spun Sugar, Dried Marigold, Broken China, Mowed Lawn, and Worn Lipstick Distress Oxide inks. Next, I stamped 'Congrats' from the Open Road Sentiments Clear Stamp Set on the pieces using closely coordinating ink colors and arranged the balloons in a cluster with a piece of masking tape. Then, I flipped them over and added foam adhesive, before flipping them back over and adhering them to the card front. Next, I cut several pieces of white and gold Baker's Twine and adhered them under the balloons for a realistic touch. I mounted the embossed circle on my panel using foam adhesive and then adhered the car  over it using  liquid glue.

To finish, I stamped another sentiment from the Open Road Sentiments Clear Stamp Set onto the panel using Versafine Onyx Black ink. I then adhered this panel to an A2-sized top-folding white card base using tape runner and added a few Gold Mix Color Essential Gems to embellish. 


SPELLBINDERS SUPPLIES:

CS-002, CS-005, CS-010, CS-017, CS-027, CS-030, SCS-118, SCS-160, S2-328, S3-413, S3-427, S3-432, S4-1039, S4-1150, S4-1179, SES-028, ST-0147, MBR-EOM, TD055846, TD056294, TD056362,  TD056119, TD056232, TD056218, TD056072, TD056188, AD-0084, MISTI, PCGO4E, PE-100, T-021, STP-066, SCS-129

OTHER SUPPLIES:
Neenah Solar White Cardstock, American Crafts Grey Woodgrain Paper, Citrine Glitter Cardstock, Cracked Pistachio Distress Oxide ink, Versafine Onyx Black Ink, MISTI Stamping Tool, Gold and White Baker's Twine, Antique Gold Metallic Spray and Jet Black Ink Spray, Tape Runner.

That’s it for today’s post! I hope you enjoyed it and have been inspired to create with these stunning dies and stamp from the Open Road Collection. Thank you so much for stopping by!
You can find more inspiration over at my Instagram page

Friday, April 8, 2022

Spellbinders Celebrate You Collection | Guest Design Post


Hello, crafty friends!
I am so excited to be guest designing on the Spellbinders blog today featuring the NEW Celebrate You Collection. This is a large collection with lots of great gifting and greeting cards goodies which pair beautifully with cardstock or patterned paper for a quick easy card, or something a little more stepped up with the addition of floral dies.


My first project is a set of Gift Bags made using the Gift Bag Etched Dies, Be Bold Blooms Etched Dies, the Mini Blooms and Sprigs Etched Dies, and the Geo Screen Embossing Folder. These are so simple and easy to make and are perfect for holding little treats or jewelry and more!

To start with, I die-cut Snowdrift Cardstock using the Gift Bag Etched Dies. Next, I embossed
the front and back panels of the gift bags using the Geo Screen Embossing Folder and assembled the bags with double sided tape. Next, I blended Cracked Pistachio and Worn Lipstick Distress inks over the bottom two-thirds of the cardstock pieces using a blending brush and adhered them down to the front and back of the bags. 


Next, I die-cut Snowdrift Cardstock using the flower and foliage dies from the Be Bold Blooms Etched Dies and the Mini Blooms and Sprigs Etched Dies. I inked the flowers using Worn Lipstick and Peacock Feathers Distress Oxide inks and the leaves using Peeled Paint Distress Oxide ink.

Next, I die-cut Silver Glitter Cardstock, Gold Glitter, and Snowdrift Cardstock using the Large, Medium, and Small circle dies from the Fluted Classics Circle Etched Dies. I stamped my sentiment from the Let's Celebrate Sentiments Clear Stamp Set onto the Small Circle Insert pieces using Versafine Onyx Black ink and adhered the pieces. I adhered the pieces down in the centre of my bags using a combination of liquid glue and foam adhesive. I then assembled my flowers and leaves around it and adhered them down using foam tape for dimension and interest.

Once that was done, I die-cut SnowdriftSilver Glitter, and Gold Glitter Cardstock using the Small Round Tag Die in the Assorted Tags Etched Die Set. I trimmed the glitter die cut-pieces in half and adhered them over the white pieces. Next, I stamped my sentiment from the Sentiments for You Clear Stamp Set onto the die-cut pieces using Versafine Onyx Black ink. I then die-cut the handles of the bags using Snowdrift Cardstock and blended Cracked Pistachio and Worn Lipstick Distress inks over the pieces using a blending brush. I attached the tags to the bag using gold metallic twine and adhered the pieces on top using foam adhesive.


My next project features the Swallowtail Tags Etched Dies, the Romantic Slimline Borders Etched Dies, the Sentiments for You Clear Stamp Set, and the I Dance Etched Dies. I thought the banners in the Swallowtail Tags were so wonderful that they could be a focal point all on their own. I used a multitude of bright colours and paired it with an embossed background for a simple birthday card.

To create my card, I trimmed Snowdrift Cardstock to 4” x 5.25” and embossed it using the Optical Arches Embossing Folder. Next, I die-cut Snowdrift Cardstock using the Perforated Edge and Scalloped Border dies in the Romantic Slimline Borders Etched Dies. There are several beautiful designs you can create with this border set, and they're perfect for any card size. Once my border was die-cut, I went ahead and die-cut Mirror Gold Cardstock using the Ribbon/Twine die included in the Assorted Tags Etched Die Set and adhered it right above the perforated edge for visual interest. 

Next, I die-cut Snowdrift Cardstock using the various tag dies in the Swallowtail Tags Etched Dies. I coloured the pieces using Dried MarigoldMustard SeedBroken ChinaTwisted Citron, and Worn Lipstick Distress inks using a blending brush. Once they were all coloured, I assembled the pieces on my embossed panel using Craft Glue.

Then, I die-cut Dahlia, Fuchsia, Rainforest, Peridot, and Mirror Gold Cardstock using the flower and foliage dies in the I Dance Etched Dies. I assembled the flower together and adhered it down on the left-hand side of the panel using foam adhesive for a raised effect. Next, I tucked in the leaves and foliage underneath the bloom to create a floral spray on my card front. Then, to finish, I stamped a sentiment from the Sentiments for You Clear Stamp Set onto the card panel using Versafine Onyx Black ink. I adhered the embossed panel to a top-folding A2-sized white card base using tape runner to finish off the card. 


My last project for today is a Slimline Card made using the Radiant Burst Embossing Folder, Hats Off to You Etched DiesSentiment Labels Etched Dies, and the Open Road Sentiments Clear Stamp Set. I used the Hats Off to You die set to create a stand-alone focal point with a sentiment for this embossed graduation card. 

To start, I trimmed a piece of Snowdrift Cardstock to 3.50 x 8.50-inch and embossed it using the Radiant Burst Embossing Folder. Next, I blended Cracked Pistachio Distress ink over the top two-thirds of the cardstock using a blending brush. Next, I die-cut the mortarboard cap, with sentiment insert, and button from the Hats Off to You Etched Dies out of Onyx and Dahlia Cardstock. Then, I die-cut the solid mortarboard cap and tassel pieces from Mirror Gold Cardstock and assembled it using Craft Glue. I love the way this die set is designed. It's super cool and simply perfect for graduation cards! Next, I die-cut Snowdrift Cardstock and Vellum using the Fluted Classics Circle Etched Dies. I blended Scattered Straw Distress Oxide ink on the white die-cut piece using a blending brush and then adhered the circle die-cut piece over the circle layer on my panel using foam adhesive.

Once that was done, I stamped a sentiment from the Open Road Sentiments Clear Stamp Set to Snowdrift Cardstock using Versafine Onyx Black ink and cut it out using one of the inserts dies from the Sentiment Labels Die Set. Then, I die-cut Snowdrift Cardstock using the large label from the Sentiment Labels Die Set and blended Candied Apple Distress Oxide ink over the piece using a blending brush. Once that was done, I adhered the sentiment strip on top with liquid glue. Next, I die-cut Mirror Gold Cardstock using the twine die in the Sentiment Labels Etched Dies. I attached the sentiment label on the card using the twine and adhered it on top using foam adhesive.


Next, I die-cut Snowdrift Cardstock using the On Cloud Nine Etched Dies and blended Cracked Pistachio and Broken China Distress inks over the edges of the clouds using a blending brush. Then, I die-cut the seagulls from the Build a Summer Birdhouse Etched Die Set out of Snowdrift Cardstock and coloured them using the same ink colours. I popped the pieces onto my card front using foam adhesive and mat the card panel with Mirror Gold Cardstock. Finally, to complete, I adhered the embossed panel to a side-folding slimline white card base using tape runner. Then, as a finishing touch, I adhered a few Teal Color Essentials Gems around my panel. 

SPELLBINDERS SUPPLIES:
CS-004, CS-012, CS-013, CS-027, CS-030, S2-314, S2-327, S2-328, S3-427, S3-432, S3-434, S4-1108, S4-1150, S4-1165, S4-1179, S5-502,  S6-191, SES-030, SES-032, SCS-118, SCS-148, SCS-151, ST-0147, STP-066, STP-079, MBR-EOM,  TD056089, TD055914, TD056362, TD055846, TD056294, TD056188, TD056119, TD056102, AD-0084, MISTI, PCGO4E, PE-100, T-021


OTHER SUPPLIES:
Neenah Solar White Cardstock, Citrine Glitter Cardstock, Cracked Pistachio Distress Oxide ink, Versafine Onyx Black Ink, MISTI Stamping Tool, Gold Baker's Twine, Tape Runner.

That’s it for today’s post! I hope you enjoyed it and have been inspired to create with these stunning dies and stamp from the Celebrate You Collection. Thank you so much for stopping by!
You can find more inspiration over at my Instagram page

Friday, March 18, 2022

Guest Post featuring Spellbinders Susan's Garden Favourites Collection


Hello everyone!
I am delighted to be guest designing on the Spellbinders blog highlighting the NEW Susan's Garden Favourites Collection. The breathtaking blooms and unique elements in this Collection inspired me to create three soft and cheery springtime cards featuring some of my favourite flowers.


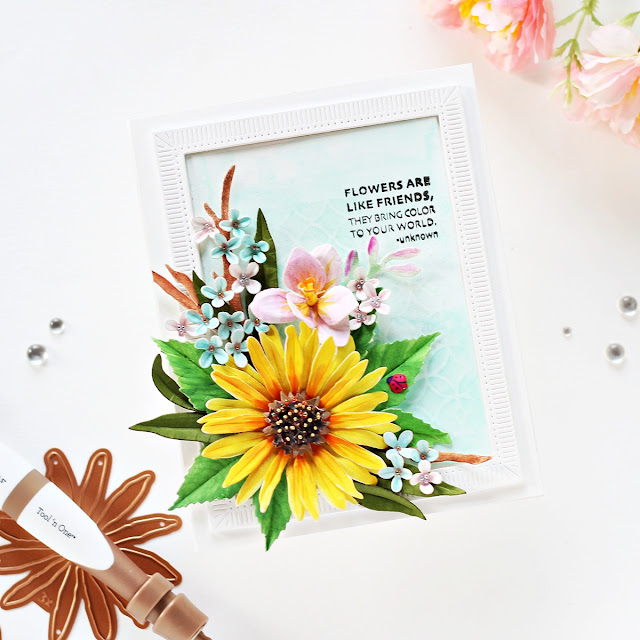
I loved the big bold blooms in the Sunflower and Ladybugs Die Set, so I decided to create with that first. I combined it with different elements from the Sunflower and Ladybugs Etched Dies, Freesia Etched DiesBearded Iris Etched DiesLilac Etched Dies, Dogwood Etched Dies, along with the Fluted Classics Rectangles Etched Dies.

To create my card, I first die-cut Susan's Garden Specialty Cardstock using the sunflower dies in the Sunflower and Ladybugs Die Set. I die cut enough layers to help me create on full sunflower. Next, I blended Orange Gouache in the center of each layer with a paint brush and then applied Yellow Gouache to the tips of each petal. I shaped the petals using the tweezers in Susan’s Garden Ultimate Tool Kit and adhered the layers together with liquid glue. Next, I die-cut Susan's Garden Specialty Cardstock using the flower centre and seed dies in the Sunflower and Ladybugs Die Set. I coloured the pieces using Brown Gouache and cupped the petals using the small ball tip in Susan’s Garden Ultimate Tool Kit and adhere the layers together with liquid glue. Next, I added Gold and Orange Glitter Balls to the centres for a realistic touch. 

Next, I die-cut Susan's Garden Specialty Cardstock using the leaf dies in the Sunflower and Ladybugs Die Set and Fern Cardstock using the curved and straight leaf dies included in the Bearded Iris Etched Dies. I coloured the white leaves using Green Gouache and added a vein to each using the leaf tip tool in the Susan’s Garden Ultimate Tool Kit.  Next, I shaped the tips using the medium ball tip for a more realistic finish. Once that was done, I die-cut Susan's Garden Specialty Cardstock using the branch die in the Freesia Etched Dies and coloured the pieces using Brown Gouache. Then, to create additional filler flowers and foliage for my card, I die-cut Susan's Garden Specialty Cardstock using the petal layers and bud dies in the Freesia Etched Dies. I coloured the die-cuts using Lilac Gouache and then used a dark orange Copic Marker to flick some colour out from the center to add some quick colour to the petals. Then, I embossed each piece using the tweezers in Susan’s Garden Ultimate Tool Kit and adhered the layers together with liquid glue. Next, I die-cut Susan's Garden Specialty Cardstock using the bloom die set in the Lilac Etched Die Set. I coloured the die-cut pieces using Light Pink and Blue Gouache and cupped the petals using  using the small ball tip in Susan’s Garden Ultimate Tool Kit. I added Silver and Orange Glitter Balls to the centre of the lilacs for added interest.

Next, I die-cut Snowdrift Cardstock using the Large Rectangle Outer Rim and Insert Die together from the Fluted Classics Rectangles Etched Dies to create a frame for my card front. Then, I trimmed a panel of White Cardstock to size and wet the panel with water and used Tumbled Glass and Peacock Feathers Distress Inks with a Water Brush in a dabbing motion, allowing the colors to mix slightly. Next, I placed a stencil in the centre of the panel and applied Mint Ink lightly all over with a blending brush to create a soft background. I stamped a sentiment from the Garden Favorites Sentiments Clear Stamp Set on to the panel using Versafine Onyx Black ink. I adhered the flowers, foliage, and frame down on to my panel using the Bearly Art Original Precision Craft Glue for a strong hold. Then, as a finishing touch, I die-cut Snowdrift Cardstock using the four spot ladybug die in the Sunflower and Ladybugs Die Set and coloured the piece using a red Copic Marker and Black Fineliner Pen to add some details to the body. I adhered it down on one of the leaves and then mounted my card front to an A7-sized white card base using tape runner. 


My next card features the Clematis Etched Dies, which is one of the most impressive-looking flowers in the collection. I wanted to make sure I used a canvas large enough to really show off all of the layers and detail, so I created a 6” x 6” Card, which would be perfect to gift someone on their wedding or any other really special occasion.

To create my card, I first die-cut Susan's Garden Specialty Cardstock using the flower dies in the Clematis Etched Dies. I die-cut just enough petals to help me create two large flowers for my card front. Next, I used a Light Pink Copic Marker to create sweeping strokes from the center of the flower stopping before the outer edge of the petal, leaving some white area. Once that was done, I blended Spun Sugar Distress ink to the centre of the flowers with a sponge dauber and around the edges of the die-cuts to add dimension. Next, I shaped the petals using the tweezers and the loop tool from the Susan’s Garden Ultimate Tool Kit. I then die-cut Susan's Garden Specialty Cardstock using the the stamen die included in the set and coloured the pieces using a Yellow Copic Marker and cupped the petals using  using the small ball tip in Susan’s Garden Ultimate Tool Kit

Next, I die-cut Susan's Garden Specialty Cardstock using the leaf dies in the Clematis Die Set and Fern Cardstock using the curved and straight leaf dies included in the Bearded Iris Etched Dies. I coloured the white leaves using Spring Green Gouache and added a vein to each using the leaf tip tool in the Susan’s Garden Ultimate Tool Kit.  Next, I shaped the tips using the medium ball tip for a more realistic finish. 

Once that was done, I die-cut Susan's Garden Specialty Cardstock using the branch die in the Dogwood Etched Die Set and coloured the pieces using Brown Gouache. Then, I die-cut Snowdrift Cardstock using the Large Circle Outer Rim, Insert, and Inner Rim Dies from the Fluted Classics Circle Etched Dies. I die-cut another piece of Snowdrift Cardstock and White Fun Foam using the Large Circle Insert Die to create a window for my card panel. I adhered the circle frame down on to the panel using foam squares for a raised effect and arranged the flowers and foliage down around the frame. Next, I placed a stencil in the centre of the card base and applied Blush Ink lightly all over with a blending brush to create a soft stenciled background. Then, I stamped a sentiment from the Garden Favorites Sentiments Clear Stamp Set on to a strip of Snowdrift Cardstock using Versafine Onyx Black ink. I die-cut the sentiment using a coordinating banner die and adhered the piece onto my panel using foam squares for a raised effect.  

Next, I die-cut Susan's Garden Specialty Cardstock using the bloom die set included in the Lilac Etched Die Set. I coloured the die-cut pieces using Light Blue Gouache and cupped the petals using  using the small ball tip in Susan’s Garden Ultimate Tool Kit. Then, I added Silver Glitter Balls to the centre of the lilacs for added interest and adhered them to my panel using the Bearly Art Original Precision Craft Glue. Then, to finish, I affixed the card front to my 6" X 6" white card base using foam tape for dimension. Then, as a finishing touch, I adhered a few Teal Color Essentials Gems around my floral wreath. I love the beautiful sparkle of the gems! 


My last card for today features the Dogwood Etched Dies, along with the Fluted Classics Rectangles Etched Dies. I thought I'd create a Dogwood floral branch for this card and wanted the die set to be the star of the show for this one. This cheery card would be perfect for sending a happy hello to a friend or to just let them know that you have been thinking about them.

For my card, I first die-cut Susan's Garden Specialty Cardstock using the blossom petal dies in the Dogwood Etched Dies. I cut out a bunch of the blossoms, just enough to help me create a number of Dogwood floral branches. I blended Light Pink Gouache onto about half of each petal and added veins to the petals using the leaf tip tool in the Susan’s Garden Ultimate Tool Kit. I shaped the tips using the medium ball tip and then die-cut the stamens out of Susan's Garden Specialty Cardstock. I coloured the tips of the pieces using an Orange Copic marker and shaped the pieces using the small ball tip in the in the Susan’s Garden Ultimate Tool Kit. Susan’s assembly videos helped me abundantly while creating the flowers and made it a really relaxing and fun process.  

Next, I die-cut Snowdrift Cardstock and White Fun Foam using the branch dies in the Dogwood Etched Dies. I adhered two stems branches together with liquid glue to form sturdier die-cuts. Next, I applied Vintage Photo Distress Ink around the edges of the die-cuts using a blending tool to add depth. Once that was done, I die-cut Susan's Garden Specialty Cardstock using the tiny leaf dies in the set and coloured them using Light Green and Spring Green Gouache  \and added veins to the leaves using the leaf tip tool in the Susan’s Garden Ultimate Tool Kit. I shaped the tips using the small ball tip for dimension and kept them aside to work on my background. 

I die-cut Snowdrift Cardstock and White Fun Foam using the Large Rectangle Outer Rim and Insert dies from the Fluted Classics Rectangles Die Set. Next, I die-cut Snowdrift Cardstock using the Medium Insert Die from the Fluted Classics Ovals Etched Die to create a window for my card panel and ink blended the left one-quarter of the panel using Tumbled Glass Distress ink, concentrating the darker shade towards the top. I then flicked some blue paint on my panel using a paint brush for a fun splatter effect. Once that was done, I trimmed another piece of Snowdrift Cardstock to size and ink blended the centre of the panel using Tumbled Glass Distress ink again, concentrating the darker shade towards the left. Once I was happy with the way it looked, I adhered the layers down on my card base using liquid glue. I adhered down the branches and dogwood flowers on my panel using a combination of liquid adhesive and foam squares for dimension. Then, to complete, I stamped a sentiment from the Garden Favorites Sentiments Clear Stamp Set to the card panel using Versafine Onyx Black ink.

Lastly, I mounted the panel to a top-folding card base using tape runner and embellished the card using a few Teal Color Essentials Gems. I am quite happy with the way this turned out!


 SPELLBINDERS SUPPLIES:
CS-007, CS-010, CS-019, CS-027, SCS-117, SCS-118, SCS-160, SDS-167, S4-1163, S4-1164, S5-491, S5-492, S5-493, S6-177, PCGO4E, PE-100, T-021, AD-0084

OTHER SUPPLIES:
Neenah Solar White Cardstock, Copic Markers, Brustro Goauche Paints, Tumbled Glass and Peacock Feathers Distress inks, Versafine Onyx Black Ink, Heat Tool, MISTI Stamping Tool, Stencils, Flower Soft, Gold and Orange Glitter Balls, Groove Golf Tools, Black Fineliner Pen, Paint Brush, Blue Acrylic Paint, Tape Runner.

I hope you enjoyed this bunch of springtime floral cards and have been inspired to create with these gorgeous dies from the Susan's Garden Favourites Collection. Thank you so much for stopping by!
You can find more inspiration over at my Blog and Instagram page.
Sunday, February 13, 2022

Guest Post using Spellbinders Into The Wilderness Collection

Hello everyone!
I am so thrilled to be guest designing on the Spellbinders blog today highlighting the NEW Into The Wilderness Collection by Sushma Hegde. This beautiful collection features an array of floral and nature-inspired images that can be used in a number of ways.


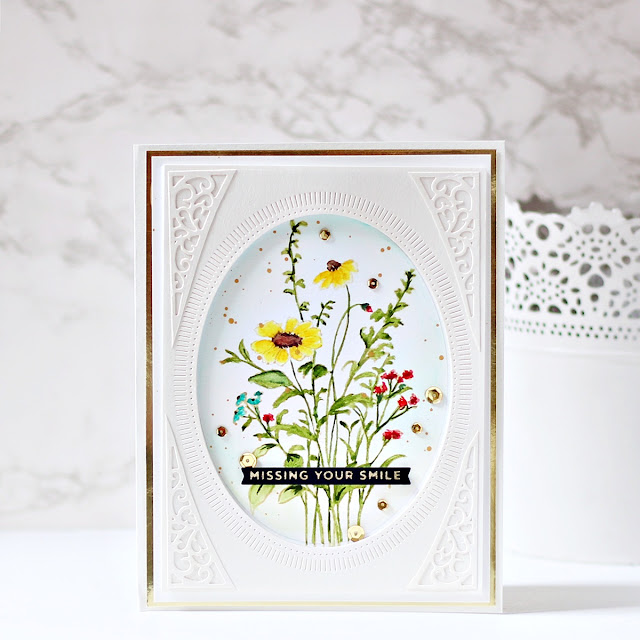
My first card features the Birthday Bouquet Clear Stamp Set along with the Fluted Classics Ovals Etched Dies, and the Mini Sincere Sentiments Glimmer Hot Foil Plate. I wanted to create the look of a loose watercoloured painting on my card front and this set was simply perfect for it. The stamp set has so many beautiful possibilities and I was very excited to play with it!

To create my card, I started by stamping the floral bouquet from the Birthday Bouquet Clear Stamp Set in Antique Linen Distress ink onto a piece of Canson Montval Watercolour Paper. The colouring was quite simple from there - I used my Watercolors Set Neutrals Set to apply the darkest shade in the center of the image, then pulled the color out a bit with the lighter shade, and then pulled the lighter shade out to the edges with a clean water brush. Once the image was completely dry, I went in and added some highlights to the images using Zig Markers. I wanted the flowers and the overall look of the card to be softer, so I avoided stamping with black ink. 

Once my colouring was finished, I applied a thin line of blueberry paint around the entire image and drug the color out loosely with water for a soft, watercolored background. I then flicked some gold metallic paint on my panel using a paint brush for a fun splatter effect. Next, I die cut Alabaster Cardstock using the Large Oval Outer Rim, Insert, and Inner Rim Dies from the Fluted Classics Ovals Etched Dies. Then, I die cut Alabaster Cardstock using the Outer Die from the Enchantment Tall Flip and Gatefold Card Die Set. I snipped-off the four corners of the die cut piece and adhered them down on my panel using the Bearly Art Original Precision Craft Glue

 Next, I used Gold Hot Foil to foil Onyx Cardstock using one of the sentiments from the Mini Sincere Sentiments Glimmer Hot Foil Plate and cut it out using the coordinating die. I adhered the piece onto my panel using foam squares for a raised effect. Then, to complete, I mat my background panel with Mirror Gold Cardstock before adhering it to a side-folding white card base with tape runner. I finished the design with some sparkling gold sequins around the bouquet to embellish.


My next card features the Layered Anemones Clear Stamp Set. I paired it with the Diamond Floral Frame Glimmer Hot Foil Plate & Die Set and one of the sentiments from the Birthday Bouquet Clear Stamp Set to create this soft watercolour card. 

To make my card, I stamped the layered flower images from the Layered Anemones Clear Stamp Set on to Snowdrift Cardstock using Frayed Burlap Distress Oxide ink and Rusty Hinge Distress Oxide ink for the blooms and Frayed Burlap Distress Oxide ink for the flower centres. Next, I stamped the Bud D with stem stamp images on to Snowdrift Cardstock using Worn Lipstick Distress Oxide ink and Frayed Burlap Distress Oxide ink. Then, I die cut Snowdrift Cardstock using the 3 Leaf Frond die from the Diamond Floral Frame Glimmer Hot Foil Plate & Die Set. I watercolored the pieces using Watercolors Set Neutrals Set and added some highlights with Prisamacolor Pencils for depth. Next, I fussy-cut the stamped pieces with a pair of scissors, leaving a small white border around the images.

Once that was done, I trimmed a piece of Snowdrift Cardstock to size and added a light watercolour wash to the panel using the Jane Davenport Watercolour Set - Brights. I applied colours from the Watercolour Set to the wet area using a Waterbrush Pen in a dabbing motion, allowing the colors to mix slightly.  Once dry, I stamped the sentiment from the Birthday Bouquet Clear Stamp Set on top of the watercolor background using Versafine Onyx Black ink. Next, I added some metallic gold paint splatters to the background using the leftover paint from my palette.

I die cut Mirror Gold Cardstock and White Foam using the Outer and Inner Diamond Dies included in the Diamond Floral Frame Glimmer Hot Foil Plate & Die Set to create a frame for my card front. I adhered it down on to the background using the Bearly Art Original Precision Craft Glue and then arranged my flowers and leaves around the frame. Next, I die cut some additional foliage using the sprig die included in the Flourished Fleurit Die Set and tucked them in-between the floral arrangement for interest. The stamped and die-cut images were then adhered down using a combination of foam squares and Bearly Art Original Precision Craft Glue.  Next, I die cut Mirror Gold Cardstock using the Layer 1 Die from the Precision Layering A2 A Etched Dies and adhered it down using liquid adhesive to my background panel. I then matted the card panel with Snowdrift Cardstock and attached it to an top-folding pink card base made out of Pink Sand Cardstock using tape runner. I finished the card with a few sparkling gold sequins for some shimmer and shine.


My last card for today features the Being Around You Wreath Clear Stamp Set, the Fluted Classics Circle Etched Dies, and the Fluted Classics Rectangle Etched Dies. This card would be simply perfect to send to a friend for a sweet springtime hello! 

To create my card, I started by adding a generous amount of water to a piece of Canson Montval Watercolor Paper, which I taped down onto a hard board as I wanted to watercolor the background. Next, I applied a few “shots” of Olive Green Color Burst powder onto it and set it aside to let it dry. I then flicked some gold metallic paint and black acrylic paint on my panel using a paint brush for a fun splatter effect. 

Once the panel had dried, it was time to begin stamping! I wanted the focus to be on the gorgeous Being Around You Wreath Clear Stamp Set, so I stamped the half-circle wreath image and the additional floral motifs in Versafine Onyx Black ink on to a piece of Snowdrift Cardstock to create the centrepiece for my card. Next, I coloured in the images using the Watercolors Set Neutrals Set and a water brush. I let the images dry and then went in and painted the centres of the flowers using Gold Metallic Paint for some shimmer and shine. Once that was done, I fussy-cut the images out with a pair of scissors. 

Next, I die cut Mirror Gold Cardstock and White Foam using the Medium and Small Inner Rim Dies included in the Fluted Classics Circle Etched Dies to create a frame for my card front. I then adhered them down using the Bearly Art Original Precision Craft Glue on my watercolored background. Next, I popped up the stamped images on the card front using foam squares for dimension. Then, I used Gold Hot Foil to foil Onyx Cardstock using one of the sentiments from the Mini Sincere Sentiments Glimmer Hot Foil Plate and cut it out using the coordinating die. I adhered the piece onto my panel using foam squares for a raised effect. Then, to complete, I die cut Alabaster Cardstock using the Large Rectangle Outer Rim and Inner Rim Dies from the Fluted Classics Ovals Etched Dies. Once that was done, I adhered it down on my card panel with Precision Craft Glue, matted the panel with some Mirror Gold Cardstock, and adhered it to a top-folding white card base with tape runner. Then, as a finishing touch, I adhered a few Prism AB Color Essentials Gems around my floral wreath. I love the beautiful iridescent sheen of the gems! 


SPELLBINDERS SUPPLIES:
CS-005, CS-024, CS-027, CS-030, SCS-118, SCS-160, SCS-171, GLF-014, GLP-253, GLP-288, STP-068, STP-075, STP-085, S4-1150, S5-474, S5-487,DOMAPG-FEB19, DOMAPG-OCT21, AD-0084, JD-043, JD-044, PCGO4E, PE-100, T-021, TD055990, TD056164, TD056362

OTHER SUPPLIES:
Neenah Solar White Cardstock, Canson Montval Watercolor Paper, Versafine Onyx Black Ink, Ken Oliver Colour Burst - Olive Green, Heat Tool, MISTI Stamping Tool, Black Acrylic Paint, Heidi Swapp Gold Lame Mist, Tape Runner.

That’s it for today’s post! I hope you enjoyed it and have been inspired to create with these gorgeous stamps from the Into The Wilderness Collection. Thank you so much for stopping by!
You can find more inspiration over at my Instagram page