Showing posts with label Thank You Card. Show all posts

Monday, October 11, 2021

Spellbinders October 2021 Clear Stamp of the Month | Sending You


Hello, crafty friends!
Happy Monday! I am back today with a nature-inspired thank you card made with the Spellbinders Clear Stamp of the Month - Sending You. Check out the exclusive coordinating You - Die Set. Spellbinders now offers a coordinating die set that you can purchase separately as an add-on for the Clear Stamp of the Month Club Sets. I love this option as I can quickly and easily cut my favorite images from the set out and no longer have to fussy cut the images! The Clear Stamp and Coordinating Die of the Month Club kit is already sold out, however the stamp set on it’s own is still available.

The Spellbinders Clear Stamp for October is a 24 piece stamp set containing 3 large sentiment stamps – Sending, For, and You, and 21 different secondary sentiments! The stamp set is super versatile and one that I will reach for often in my stash! The Stamp Set coordinates with this month's Small Die of the Month and Large Die of the Month Sets, so you can mix and match your supplies to create different projects. This “Sending You” stamp set features made in the USA stamps from high-quality photo-polymer for clear, crisp impressions. 

I used some of the sentiments from the kit along with some bright florals from the Hex Tile Stamps for a thank-you card.

I started by stamping the outline images from the Hex Tile Stamps on a piece of Snowdrift Cardstock using Black Licorice ink. Then I stamped the layers for each bloom over top using Vineyard Berry and Sand Dunes inks from Altenew. Once that was done, I fussy cut the images using a pair of scissors.

I die cut Snowdrift Cardstock using the outer diamond die from the Diamond Floral Frame Glimmer Hot Foil Plate & Die Set and stamped a sentiment from the Clear Stamp of the Month Kit onto it using Black Licorice ink. Next, I die cut Gold Mirror Cardstock twice using the inner diamond die from the Diamond Floral Frame Glimmer Hot Foil Plate & Die Set and kept it aside to work on my panel. 

Then, I did some very light "ink smooshing" on a piece of Watercolor Cardstock using Tumbled Glass and Twisted Citron Distress inks. Once my panel was dry, I adhered down the two foiled die cut pieces to the centre of my card front using foam adhesive. Next, I adhered down the white die cut piece using the Bearly Art Precision Craft Glue. The 'Sending' was stamped in Black Licorice ink onto Snowdrift Cardstock and cut out with one of the coordinating dies. I popped in on to my panel using foam adhesive for dimension. 

I tucked in the stamped floral images around the centerpiece and adhered them down using liquid adhesive. I also added some foliage pieces die cut from Snowdrift and Gold Mirror Cardstock using the floral accessory dies from the Flourished Fleurit Die Set. I inked the white die cut leaves using Pine Needles and Shabby Shutters Distress inks and then added them to my floral arrangement using the Bearly Art Precision Craft Glue. I then adhered the card front to an A2-sized top-folding white card base using foam adhesive. To finish off the card, I added Crystal Jewels to the flower centers and to my panel for a bit of sparkle. 


I hope you liked my floral card and thanks so much for stopping by today. You can subscribe to any of the Spellbinders Clubs between the 1st - 24th of each month and never miss a fun kit like this again!  
If you like what you've seen from me, please give me a follow over on my Instagram (@hussena_cal) and/or subscribe to my blog if you haven't already.
Wishing you a great day ahead!

Thursday, November 19, 2020

Pinkfresh Studio | Floral Gratitude Card


Hello crafty friends!
I hope you're having a great week so far! 
I have a gratitude card to share today on the Pinkfresh Studio Blog using an assortment of some old and new products from Pinkfresh. 


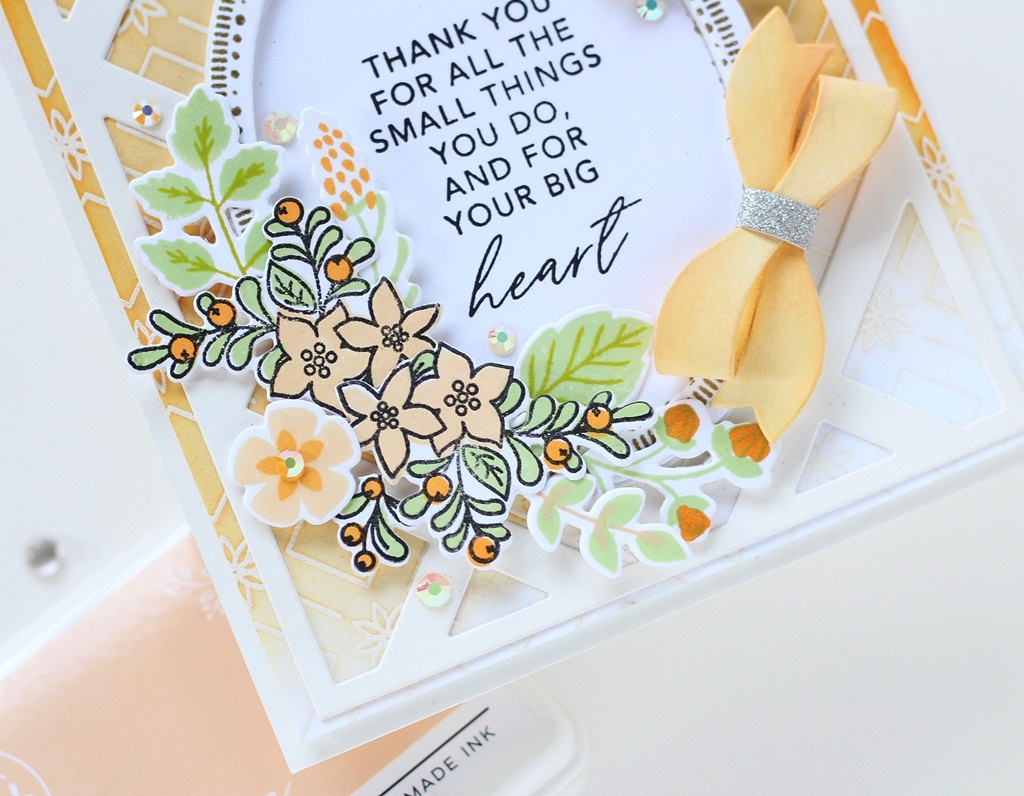
To create my card, I first stamped the layering floral bunch from the Merry and Bright Frame Stamp on Neenah Classic Crest Solar White Cardstock (110 LBS) using my MISTI Stamping Tool. I stamped the bunch a couple of times because I intended to use them to create the focal for my card. The Merry and Bright Stamp set comprises of a blend of outline florals and leaves as well as a layering floral bunch (along with the gorgeous oval frame and holiday sentiments), and so, you have quite a few different options on how you'd like to use the set. I decided to go with the layering bunch as I love the look of layered stamping! I used Peach Fuzz for stamping the flowers, Fresh Pear for the leaves, and Apricot for the little berries. Then, I stamped the last layer of the image using Detail Black Ink. Once my stamping was complete, I die cut everything using the coordinating Die Set and set the images aside to work on the other components of my card. 

I stamped the oval frame from the Merry and Bright Frame Stamp using Versamark Watermark Stamp Pad and then gold heat embossed it using Super Fine Gold Embossing Powder. I die cut the frame using the coordinating Die Set and arranged my florals and foliage around it. Next, I stamped a couple of blossoms and leafy greenery from the Lovely Blossoms Stamp to accentuate my floral spray. I used the same ink colours as before (Peach Fuzz, Apricot, and Fresh Pear) in order to have a cohesive colour palette. I then cut out the images using the coordinating Die Set.

Then, I die cut the oval frame from the Merry and Bright Frame Die Set from White Fun Foam and adhered it to the heat embossed frame for dimension. I used the leftover oval die cut to stamp my sentiment. It is from the Incredibly Grateful Stamp Set and I stamped it using Detail Black Ink

To create my card background, I took a panel of White Cardstock and heat embossed the Floral Diamond Background Cling Stamp in White using Super Fine White Embossing Powder. I ink blended the panel using Peach Fuzz and Apricot in ombré style. Once that was done, I die cut the Simply Diamonds Die from White Cardstock and adhered it over the embossed panel and foam mounted it on a white A2 card base. 

I adhered the stamped flowers, leaves, foliage, and the heat embossed oval frame to my card panel using foam squares. To finish, I added a die cut bow from the Artistic Bows Die Set. I cut it out from a panel of White Cardstock which was coloured using Peach Fuzz and Apricot. I assembled the bow together and added it to my panel using glue dots. I also accented my card with a few scattered White Jewels.


I hope you enjoyed looking at my card today! I would love to hear what you think of it. Thank you so much for stopping by! 
Have a great day ahead!

Friday, July 31, 2020

Flower Play | Pinkfresh Studio

Hello, crafty friends!
I am so excited to to share my projects for my very first post on the Pinkfresh Card Blog! I am showcasing the Embroidered Blossoms Stamp and Die set and the Fancy Blooms Stamp and Die set for my projects today. I have created a total of THREE projects, so let's dive right in! 


My first Card features the Embroidered Blossoms Stamp and coordinating Die Set along with the Diagonal Stitched Rectangles Die Set. To begin, I stamped the various flowers and foliage from the set using a variety of Pinkfresh Inks (Sparkling Rose, Bubble Gum, and Coral Reef for the flowers and Grassy Knoll and Olive for the leaves). I stamped all the images on Neenah Classic Crest Solar White 110 LBS Cardstock and then die cut them using the coordinating Embroidered Blossoms Die Set. I also stamped and die cut some additional filler flowers and foliage pieces for my design.

For the focal of my card, I decided to do something interesting. I used the Diagonal Stitched Rectangles Die Set to de-boss the design on my card using a regular Tan Embossing Mat in my Die Cut Machine. I did this technique using two nesting dies from the set and really loved how it helped frame the card design! At this point, I also went ahead and added a few pink and grey paint splatters to help add interest to the design. Once that was done, I die cut a rectangle frame from the Diagonal Stitched Rectangles Die Set from Silver Glitter Cardstock and adhered it to my panel using foam tape. 

I adhered down all my stamped and die cut images to this panel using foam dots. I wanted the design to look balanced, hence I used a varied mix of colours for my card. 

My sentiment is from the Essentials: Classic Words Die Set and I love the font of the dies in this set. It looks very stylish! I die cut the word from Black Cardstock and adhered it to my panel using fun foam.


My next Card features the Fancy Blooms Stamp and coordinating Die Set. I decided to some quick and simple watercolouring on this card to colour the gorgeous floral images. I stamped the floral clusters using the Detail Black Ink on Canson Montval Watercolor Paper and then die cut them using the coordinating Fancy Blooms Die Set. I coloured the flowers using Clementine Liquid Watercolor, while the leaves and foliage were coloured using a mix of Key Lime and Emerald City. I diluted all the colours with water before colouring, to get a soft, pastel look.

For my card background, I decided to create some broad watercolour stripes. I used the Sunshine Liquid Watercolor and a flat paintbrush to make the stripes on a Canson Montval Watercolor paper panel. I love how it turned out and it contrasted really well with the colours of the floral cluster. Next, I added some black paint splatters to this panel for some interest and then die cut it using the largest rectangle die from the Diagonal Stitched Rectangles Die Set.

Then, I die cut a circle from the centre of this panel to create an aperture. I used one of the dies from the Braided Circles Die Set for it. I adhered this to my card base using foam tape. Once that was done, I adhered all the stamped images using foam dots on my panel. 

For the sentiment, I die cut the outer shadow and the word piece from the Essentials: Classic Words Die Set. I coloured the pieces in contrasting shades for added interest. The finishing touch was adding some glitter to the sentiment piece. 


My last project for today is a Mini Shaped Card which I made using the Embroidered Blossoms Stamp and coordinating Die Set and the Braided Circles Die Set. The idea for this card came when I finished creating the first card and I had some leftover stamped floral pieces. I decided to whip up this quick and simple Card using them.  

I love making Shaped Cards and this one was created using the Braided Circles Die Set. I used two different nesting dies from this set to create the base for my card from Neenah Classic Crest Solar White 110 LBS Cardstock. Once my card base was done, I die cut another circle from the set and popped it to my panel using foam dots. 

 The bloom, leaves, and filler flowers are from the Embroidered Blossoms Stamp and coordinating Die Set. I used the leftover stamped pieces from my first card here, and simply popped them to my panel using foam dots. The sentiment is from the Essentials: Classic Words Die Set. I die cut the outer shadow from Black Cardstock and the main word die from Silver Glitter Cardstock. 

I love how this Card turned out, and it hardly took me time to put together as well, so that was really awesome! I hope this inspires you to use your leftover stamped images or die cuts too to make mini notecards/tags! 

Hope you liked my cards for today and are inspired to pull out your floral stamp sets!
Thanks for stopping by and have a great day!

Sunday, October 14, 2018

Thanks for being Amazing | Card

Hello friends,
Belated World Card making Day to all of you, my fellow crafters. I know, I have been missing in action for a long while here. I have been really busy with commissioned order work and festivals here in India. I do have a couple of cards to share this month which I will be sharing soon on my blog and social media. If you would like to stay updated with all my latest works, please follow me on Instagram. I tend to share all my latest creations there!

I am very excited to be participating in Winnie and Walter's WCMD Celebrations. World Card Making Day, for me, is always associated with the challenges that W & W put up on their blog every year. It's almost like a tradition for me! :) I couldn't create as many cards as I would have liked to this year, however I did manage to create a total of three cards. Here's a look at the first one:

This card took me a while to create! I started by stamping the mini triangles border stamp set from the Scenery: Stripes 2 set. I stamped the border several times so that it would create the background for my card. For my focal, I die cut a white circle and stamped several flowers and leaves from In Bloom: Ashlee's Rosie Posies and In Bloom: Lola's Bouquet stamp sets. I stamped them on Neenah Solar White Classic Crest cardstock and fussy-cut them. I adhered some of the images directly on the circle while I popped few on foam tape for dimension.


To complete my card, I die cut the mini 'Thanks' Cutaway (I got this die as a free gift with my order from Winnie and Walter) several times from black cardstock and fun foam to give it a raised look. I added few clear sequins to finish off my card.


I am entering this card in the following challenges by Winnie and Walter:
Black and White Background Challenge with Crystal
Stamp Images Mash Up Challenge with Jessica
Lucky 7 Limit Challenge with Shay- My lucky 7 goes like this: 3 stamp sets + 3 tools (MISTI, die cutting machine, adhesive) + 1 embellishment (sequins).

That's it for this card! I will be sharing two more cards in the next couple of hours. If you liked this card, please let me know. I'd love to hear from you! :)

Thank you for stopping by!

Wednesday, September 30, 2015

Thank you Card !!

Hi friends,
I have a quick card to share today. A few days ago I was lucky enough to win a spot in the current Online WaterColor Card Class (Exploring Mediums) by the very talented Jennifer McGuire  and friends..They have such awesome teachers and I got to learn tons from this class.
My card is based on the Day 2 Class Homework which was exploring traditional watercolor mediums like Tube paint's, Distress inks and Watercolor cakes...For my card though, I have used the Altenew Dye inks to do my coloring and I have followed the technique that Jennifer Rzasa taught using Distress inks and solid image stamps ...Before I explain further, here's a look at my card :


 To begin with,  I did try out the stamping with Distress inks but found no success .. In the process also managed to spoil one of my  finished card panel's when I got clumsy with water  and brush  :(.... I have used the Altenew Lacey Scrolls stamp set for the solid image stamping ....The inks I used are Altenew Grapevine and Ruby Red for the flowers and the PTI Simply Chateruese ink for the leaves and foliage...Once I stamped the flower, I went in with a wet brush and blended the colors and kept adding a bit more of Grapevine ink which I had smooshed on my acrylic block. Finally ended my card with a few ink splatter's using the Grapevine ink and die cut sequins from the Mama elephant Confetti die..I really missed not having real sequins in gold to add to my card :(
My card colors and design are inspired from this time's Altenew challenge ..Here is a look at the beautiful  inspiration picture :
Also entering my card in the current Lulupu challenge Sparkle and Shine.
Hope you all like my card ...Do leave your views regarding it ...I love to hear from you :)
Have a nice day everyone !!

Thursday, June 11, 2015

Floral Thanks

Hello, hello friends!
So, I'm back again with another card and this time I have played with the Altenew Vintage Flowers set. Totally, totally in love with this set and if my budget did allow me, I could have very nearly bought all of their stamp sets :):)
Anyhow,  here's a look at what I have created :


Because this stamp set is so beautiful, I have kept this card pretty simple just to highlight the stamp itself!
I won't lie. The layered stamping is definitely tricky and it takes a lot of practice before one gets perfect results and mine is nowhere near perfect. :/ After lot of trial and error, what I found is Dye inks work best for the layered stamps. I have used a combination of Memento and Mama Elephant inks for my pink flowers where as for the yellow flower I have used Hero Arts Shadow inks along with Memento inks.
The background is embossed using an embossing folder from Darice. I love the contrast of the woodgrain against the soft flowers. I have lightly inked the panel using Black Soot Distress ink. Some random ink splatters and PPP sequins completes my card. The sentiment is die cut and is my ever favorite SSS die.

Supplies used :
Cardstock- White Iris Cardstock.
Stamps- Altenew Vintage Flowers.
Dies- Simon Says Stamp Thanks Craft die.
Inks- Memento Angel Pink, Mama Elephant Piggy Bank, Avery Elle Raspberry, Hero Arts Soft Blossom, Memento Dandelion, Hero Arts Butter Bar, Hero Arts Orange Soda, Distress ink Black Soot.
Darice Woodgrain embossing folder, Black acrylic paint, Pretty Pink Posh Sequins.

I'm entering this card in the Cardabilities Sketch challenge, Beyond Grey Challenges, A Blog Named Hero- Favorites (I have used my absolutely fave stamp set here), Create Something Catchy -CAS and Inspired by the moodboard. (I have been Inspired by the flowers ), SSS - Love of plants.


Hope you like my attempt at layered stamping.  I would love to hear your comments/suggestions on my card.
Have a nice day everyone!

Monday, November 19, 2012

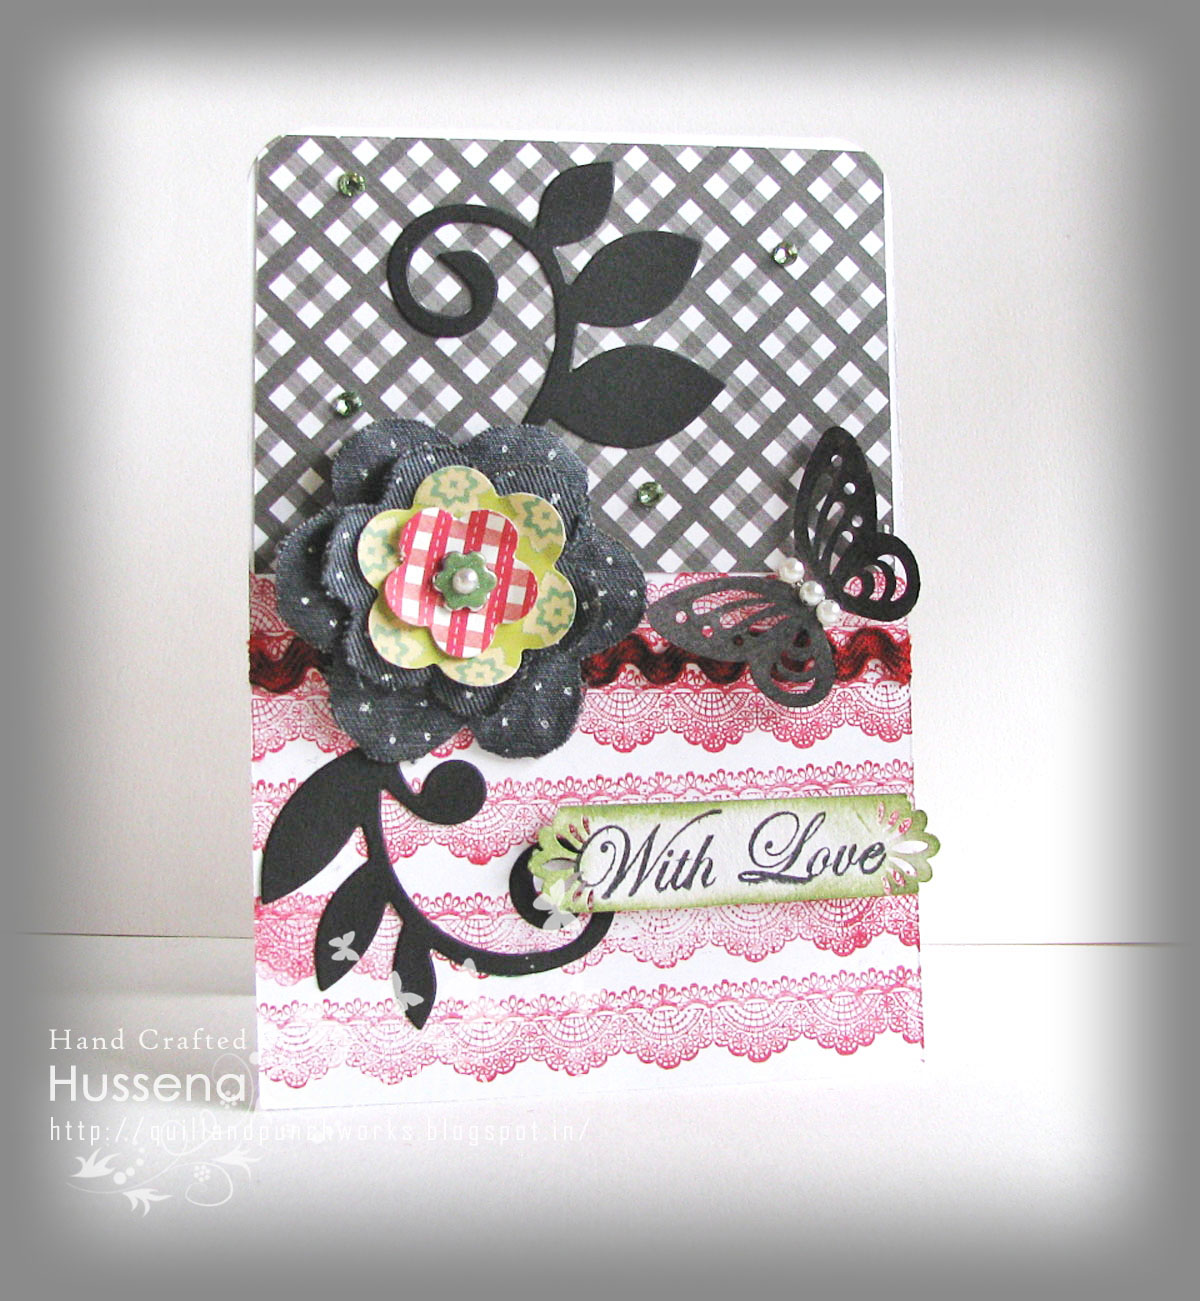
"Thank You" !

Hi friends,
The card I have  made and sharing with you  is  for the inspiration at Crafter's Corner #2 which is "Die cuts /Punches with Stamping" & here's my take on the challenge again :-


And a different view :-

                                                     
I have made this card again in a soft shabby -chic kind of style with lot of layering & have shared the information on the various products that I have used here on the Crafter's Corner blog..So do check it out there ...And please do play along our challenge for a chance to win some fabulous prizes sponsered by the Crafter's Corner shop...Check out the Link HERE

Supplies used :-
Base CS- Campap
PP's Bo Bunny Alora Collection (Crafter's Corner) & Cosmo Cricket (Bought from Piali's Store)
Spellbinders Label 3 -Bought from Kavitha's Store ,Cheery Lynn Flourish Die- Bought from Priya Sivaraj's Store.
Fiskars Lacy days of Summer Border punch
Butterfly -Paper pieced from DCWV PP (Itsy Bitsy)
Glossy Accents used on flowers- Crafter's Corner
Flowers -Big peach Flower & Light Peach Flower (on the bottom half) -Crafter's Corner
Small Mulberry Flowers (Pink) & Leaves- RAK from Snehal :)
Stamp -TPC Studio , Ink -Memento Rich Cocoa
Pearls & Lace -Local Buys

Challenges Entered :
Simon says stamp and Show: Thank you
Catered Crop : Lace
Creative Inspiration :Thankful For You
Ellectic Ellapu :Layering or openable or interactive(i have done layering )
Glitter and Sparkle :Lots Layer's
Penny black and more : Any Die will do .
Hybrid Chick :Thankful
Sunshine Creation's :Fall /Thanks giving

Hope you all like my card...Do leave me your comment/ Suggestions :)
Have a nice day everyone!
                                                          

Tuesday, October 9, 2012

Two Cards and a Tag !

Hi friends,
How's everyone been. With the WCMD just gone, I am sure many of you must have created a lot of lovely stuff :) So today I am sharing with you 2 cards. I have made one card for the WCMD Challenge which I have shared on FB as well and another recent card and a tag too. So here's a picture of each of them :-


Well, this card I have already shared on Facebook and I have made it to play along with Let's Get Trendy Now - 2. This is entered for the Day Four- Die Cuts /Punches Challenge      


The second card :-

And this card is also entered for the Let's Get Trendy Now - Day 2- Household Supplies - I have used tissue paper to make this rosette and what's more, I am sharing a short tutorial on how I made it...But as you know, tutorials are picture heavy so here goes...Please bear with me :)                              
For the supplies, I have taken a tissue paper with a nice background design, a masking tape, a piece of white cardstock and the usual scissors, glue and a Scoring Board.

Step 1 : Stick the masking tape over the tissue paper on an entire length. Mine came approximately 12 inches and I then cut out the masking tape on the both sides keeping the tissue paper below. You will notice a nice design will emerge through the transparency of the tape.
     
Step 2 : After cutting out the tape, take a long white cardstock and glue the masking tape to it with the tissue side facing down.

Step 3 :  It will look like this after it's glued and cut.  
 
Step 4 : Using a Scoring Board, start scoring lines every quarter inch along the tape.

This is how it will look after its done. And for those of you who want to know the complete instructions on how to make this flower, you can check it out on YouTube HERE
                                               

And now the tag :-
I am entering this tag for the Lets Get Trendy Now 2 - Day One Washi Tape. I have used faux washi. That is, I have stamped on the masking tape to create this look

Hope you all like my work. But as you can see, this is a long post so I am not listing the supplies used here. But if you have any queries regarding any products, just leave me a comment and I will definitely get back to you :)          

Challenges entered :
1. Sir Stampalot Challenge : Punch away.
2. Unstampabelles : Recycling or Repurposing : Made flower with tissue paper on my second card.
3. The Craft Place : Make your own background (stamped lace background on the first card)
4. Sentimental Sunday's : Anything Goes

Take care and have a nice day everyone :)