Showing posts with label Pollens. Show all posts

Saturday, September 12, 2020

Spellbinders Guest Design Post | Christmas Cascade by Amazing Paper Grace

Hello, crafty friends!
I am so excited and honoured to be guesting on the Spellbinders blog today, sharing two card projects I created using the exquisite Christmas Cascade Collection by Becca Feeken. This collection is so versatile and I love that there's an interactive card die included in it to help create some beautiful, one-of-a-kind projects!

I am not someone who makes a lot of interactive cards, so I was really thrilled to work with the Christmas Cascade Card Base Die Set. This die set enables you to create a Cascading Card and is super easy and fun to make. There are so many ways to use this die set, but I decided to use it to create a Christmas Cascading Card. Here's a look at my project:

To assemble the basic framework of the card, I followed the video tutorial shared by the Spellbinders team. I die cut the main base and the rest of the decorative squares from Buttercream Cardstock and adhered them using White Liner Tape. The die set is really well-thought-out and I love how there are different coordinating elements included in the collection to help you accentuate your design.

Once I created the basic framework for my card, I started working on the various embellishments for the card layers. 
For the first layer, I die cut the word 'Joy' from the Holiday Word Blocks Etched Dies from Brush Gold Cardstock.  I also die cut it from white craft foam and adhered it to my panel for dimension. The poinsettias and leaves were die cut using the dies from the Holly Frame Gala Die Set. I die cut them from Whip Cream Cardstock and coloured them with Candy Apple and Lemongrass True Colour Fusion inks. I added some berries die cut from Brush Gold Cardstock for the centres.

For the second layer, I used the word 'Noel' and die cut it from the Holiday Word Blocks Etched Dies from Brush Gold Cardstock and white craft foam. The bauble was die cut from Candy Apple Cardstock and Brush Gold Cardstock and then adhered to the panel using white foam.

Then, for my third, layer, I decided to use a decorative frame die from the Holly Frame Gala Die Set. I die cut the frame from Brush Gold Cardstock and adhered it down using Craft Glue. The birds were die cut from Whip Cream Cardstock and coloured using the Candy Apple True Colour Fusion ink. I also added some holly leaves and berries for added interest. They were die cut using the dies from the same set and I adhered them using foam dots for dimension. 

Finally, for the last year, I die cut the octagonal frame, snowflake, and the sentiment piece using the dies from the Snowflake Splendor Die Set. I die cut the frame from Whip Cream Cardstock and Brush Gold Cardstock, and adhered them down using Craft Glue, while the snowflake was die cut from Brush Gold Cardstock. The sentiment was die cut from Whip Cream Cardstock and later coloured using the Candy Apple True Colour Fusion ink. I also die cut it from white craft foam to add dimension to it. Then, I adhered a couple of holly leaves and red berries to add some interest to the design. They were die cut from the dies included in the Holly Frame Gala Die Set.

I adhered my Cascading Card to a decorative card panel which was die cut using a die from one of the past Amazing Paper Grace Die of the Month sets, called Nostalgic Serenade Card Frame Die Set.  It is s really regal and beautiful frame and worked perfectly with my cascade design. I die cut it from Whip Cream Cardstock and Brush Gold Cardstock, and off-set them a little while adhering for added interest. Then, I mounted my panel to a side folding 5" X 7" card base.


For this card, I decided to use pastel tones in order to offer some variation from my previous Card. I started by die cutting a decorative square frame piece using one of the dies from the Christmas Cascade Card Base Die Set from Buttercream Cardstock. Next, using my Glimmer System, I hot foiled the gorgeous wreath from the Filigree Glimmer Wreaths Hot Foil Plates Set on the square piece using Glimmer Hot Foil Roll - Gold.

Then, I hot foiled the sentiment for my card using one of the sentiment glimmer plates again from the Filigree Glimmer Wreaths Hot Foil Plates Set. This time I used the Glimmer Hot Foil Roll in Rose Gold to create some contrast in colours. I then die cut this frame and kept it aside. 

Next, I decided to foil some bells to put inside the circle frame. I hot foiled it using my Glimmer System and the Glimmer Hot Foil Roll - Gold and then fussy-cut it out. To embellish my card, I decided to create a small floral spray. I die cut the flowers and leaves from Baby Pink Textured Cardstock and Brush Gold Cardstock. I embossed the flowers using the Ball Tool stylus from the Stylus Tips for Tool n' One and arranged them around the foiled wreath. I also die cut some ribbon ends from the Holly Frame Gala Die Set to use as swirls for my spray. Then, I tucked in some bits of seam binding ribbon and pollens for added interest.

Once my card panel was ready, I adhered it down to another card panel which was die cut from the Vintage Stitched Sqaures Etched Dies. I just looked up the Spellbinders website and, unfortunately, this die set is no longer available, however, you can use something similar from your stash for your projects. I die cut three layers using three different dies from Baby Pink Textured Cardstock and Whip Cream Cardstock and used a plain mat layer of Brush Gold Cardstock in between to add some interest to the design. I then adhered these down to my card base which was created again from Baby Pink Textured Cardstock, measuring 5.5" X 5.5". I like how this card came together! 


OTHER SUPPLIES​​:
Neenah Solar White 110 LB Cardstock, Baby Pink Textured Textured 12 x 12 Cardstock, White Fun Foam; Adhesive: Scrapbook Adhesives 3D Foam Squares, Tombow Mono Multi Liquid Glue, Double Sided Foam Tape, Mini Glue Gun; Tools and Accesories: McGill Inc. Paper Blossoms Tool Kit, White Pearl Pollens, Seam Binding Ribbon

Thank you so much for letting me help inspire you today! I hope you liked my creations! If you did, please let me know which card is your favourite and why! :) 
To see more of my work with Spellbinders products, do visit my Instagram page and subscribe to my Blog

Stay safe and have a wonderful day!

Saturday, July 4, 2020

Spellbinders + Amazing Paper Grace Die of the Month | July 2020


Hello, crafty friends!
Hope you are doing well and are safe and healthy!
Wishing a very happy fourth of July to my US friends. 💛
I have a Card to share today featuring the Spellbinders + Amazing Paper Grace July Die of the Month. This month's "Fanfare" Set is perfect for making exquisite cards, boxes, bags, envelopes, and more.
Amazing Paper Grace Die of the Month Membership
If you want to find out more about the Club – prices, how you sign up and what’s included, please look ——–> HERE. These dies are only available through the Club and are limited to the month of July, so hurry before they are sold out. If there are any leftovers, they are added to the Spellbinders store for sale at full price. You can see all of the past Dies of the Month HERE.

The 'Fanfare' set is so exquisite and I decided to create a Shaped Card to showcase the design in its full glory. I know, I say this every month, but Becca's dies always leave me spellbound. She keeps outdoing herself each time and I LOVE each and every design of hers. Here's a look at my Card:

To create my card, I first took a sheet of Buttercream Cardstock and die cut the main Card frame die using my Spellbinders Platinum Die Cutting & Embossing Machine.  I used the partial die-cutting technique here to create a hinged card base. If you don't know how to create one, you can check out Becca Feeken's tutorial HERE where she shows you how to create one.

Once my card base was ready, I started working on the main focal for my card. I die cut the decorative inlay piece from the Fanfare Set from Buttercream Cardstock and Gold Mirror Cardstock. I also die cut it from Fun Foam and adhered it to my card base for dimension. Then, I adhered the other two layers over this foam layer, albeit I off-set them a little, so that the gold would peek through.

The filigree oval is super beautiful and I did not want to take the focus away from it, so I kept my embellishments minimal. I die cut a circle from the Nestabilities Hemstitch Circles Etched Die Set and stamped my sentiment on it. I used the Studio Katia Birthday Greetings Stamp Set for my sentiment and stamped it using Black Licorice True Fusion ink. Next, I die cut the fanfare motif die from Whipped Cream Cardstock. I die cut two pieces of them and tucked them in beside the circle on both sides.

For my floral spray, I used the flower dies included in the Fanfare Set. I die cut them from White Deckled Edged Paper and coloured them using Distress Spray Stains in Abandoned Coral and Wild Honey. I also lightly shaped the centres using an Embossing Ball Tool tip from the Stylus Tips for Tool N' One and added pollens to the centres for a more natural look. I also tucked in some leaves and foliage to complete the look. And that's about it! This card was such a joy to create!

If you haven't had a chance to look at the Spellbinders Club Kits yet, do check them out. You can find more information about them HERE.

If you would like to see more project inspiration using the Amazing Paper Grace Die of the Month, visit the Spellbinders blog to see the project samples created using it. There is also a super helpful YouTube video which you can see HERE which shows you how to use the die set in a creative way!
The Club dies are absolutely great value for money and the cost of the kit includes shipping cost within USA. So, what are you waiting for? Sign up as soon as possible!
Amazing Paper Grace Die of the Month Membership
That's it from me for today! I hope you liked my card.
If you would like to see more of my work using Spellbinders, do follow my Instagram page @hussena_cal
Thank you so much for your visit to my blog today!

Wednesday, June 3, 2020

Spellbinders + Amazing Paper Grace Die of the Month | June 2020


Hello, crafty friends!
Hope you are doing well and are safe and healthy!
I have a Card to share today featuring the Spellbinders + Amazing Paper Grace June Die of the Month. This month's "A2 Snip It Grid and Calendar Creator" Set is perfect for making exquisite cards, boxes, envelopes, and more. 
Amazing Paper Grace Die of the Month Membership
If you want to find out more about the Club – prices, how you sign up and what’s included, please look ——–> HERE. These dies are only available through the Club and are limited to the month of June, so hurry before they are sold out. If there are any leftovers, they are added to the Spellbinders store for sale at full price. You can see all of the past Dies of the Month HERE.

When I received this die set in the mail, I was just amazed by the amazing concept behind this die set. The entire set comprises of 41 dies and is so versatile. I decided to create an Anniversary Easel Card and I do love how this one turned out, even if I may say so myself. :)

This is also only the second time that I have created an Easel Card, so I was quite thrilled to revisit it. My Card features some additional Amazing Paper Grace dies from previous collections as well as this month's dies. I love how Becca's range of dies complement each other so well. Her dies always offer innumerable possibilities which is why I adore them so much!

For this Easel Card, I began with a piece of 6" X 6" Pearlescent White Cardstock from Papericious. Next, I adhered a layer of Gold Mirror Cardstock over my base.

I took a piece of Whip Cream Cardstock and die cut borders from both the top and bottom of the paper using the Delicate Tendril Border Etched Dies. I first adhered a piece of Pearlesecent White Cardstock and then added this panel to my card.

It was time now to work on the main focal of the card - which is the calendar. I die cut the grid from Pearlesecent White Cardstock and the numbers from Gold Mirror Cardstock. I admit, it took me a while to get all the numbers lined up and adhered to my card, but I think it was well worth the effort. I matted this panel too with Gold Mirror Cardstock for an elegant touch. Next, I die cut a plaque from Pink Cardstock and adhered the die cut letters on it which are again from the A2 Snip It Grid and Calendar Creator Set.

To embellish my card, I created some handmade flowers and fillers. I die cut the flowers using the flower dies from the A2 Snip It Grid and Calendar Creator Set. I love how Becca always coordinates everything so well. You get so many amazing dies in one set! I die cut them from White Cardstock, inked them using Mermaid Markers by Jane Davenport, and then shaped/embossed them using Embossing Ball Tools & Groove Golf Tools. I added clay pollens to the centres for a more realistic finish.

The additional foliage for my flowers are die cut from the dies included in this month's Life is a Party Card Kit. If you haven't seen the dies in the Card Kit for this month, you must check them out. They are incredible!

To create the easel for my card, I scored and attached another piece of Whip Cream Cardstock to my Card. I matted another layer of Cardstock over this panel from which I had die cut borders using the Delicate Tendril Border Etched Dies.

 I also die cut the sentiment banner from Pearlesecent White Cardstock and Gold Mirror Cardstock and inlay the sentiment piece for added interest. I popped this on my panel using foam tape. I also added some die cut hearts next to the sentiment. This pretty much completed my card. This was truly a labor of love!

If you haven't had a chance to look at the Spellbinders Club Kits yet, do check them out. You can find more information about them HERE.

If you would like to see more project inspiration using the Amazing Paper Grace Die of the Month, visit the Spellbinders blog to see the project samples created using it. There is also a super helpful YouTube video that you can see HERE which shows you how to use the die set.
The Club dies are absolutely great value for money and the cost of the kit covers shipping cost within USA. So, what are you waiting for? Sign up as soon as possible!

That's it from me for today! I hope you liked my card.
If you would like to see more of my work using Spellbinders, do follow my Instagram page - @hussena_cal
Thank you so much for your visit to my blog today!

Monday, March 16, 2020

Spellbinders March 2020 Clubs Inspiration Blog Hop


Hello, crafty friends!
I'm happy and honoured to be joining Spellbinders for the March 2020 Clubs Inspiration Blog Hop today. If you arrived here from the lovely, Varada Sharma's Blog, then you are on the right track. If this is your first stop, then you will want to start at the beginning, the Spellbinders Blog. We've got tons of inspiration and giveaways for you on the hop today, so keep reading till the end of this post for more information.

For my card today, I have used the Amazing Paper Grace 'Elegant Infinity' Die Set.

I love stretching my supplies for various projects, which is why, I decided to try something new this time and create a 'Slimline Card'. These are quite in trend now, and what better than combining it with the exquisite dies from Amazing Paper Grace? I am really happy I gave this a shot!

To create my card, I first die cut a few different die designs from the Elegant Infinity Set from White Cardstock using my Spellbinders Platinum 6" Machine. I also die cut the two corner dies from White Cardstock and Gold Mirror Cardstock. I adhered the die cut pieces on my Card Panel and started working on my main floral composition.

Did you notice how I offset the corner die cut pieces cut from White & Gold Mirror Cardstock? It's a technique I love doing on my cards, specially for such layered card designs. It adds a very pretty touch!

For my focal, I created a floral cluster using both handmade as well as store bought fillers and flowers. The little pink roses on the bottom are created using the flower dies included in the Die Set.
I stamped my sentiment on different strips of White Cardstock and tucked them to the side of the floral cluster. I also added some ribbon along the left side of the card to balance the design. Finally, I adhered my panel to a sturdy Card Base and my card was done!
Affiliate Disclosure
All products in today's post are linked throughout the post.  These are my personal affiliate links which you can shop from at no cost to you! Thank you for your support!

Giveaway:
To celebrate this release, Spellbinder is giving away a $50 gift certificate to 5 lucky blog readers – selected from the comments on our blog. Hop along for additional chances to win. Giveaway closes on Sunday, March 22nd, 11:59 pm EDT. The winner will be announced in the blog hop post the following Tuesday. The winner is responsible for shipping cost, duties and taxes.

Additional Giveaway:
The generous folks at Spellbinders have allowed me to giveaway a $25 gift certificate to ONE lucky winner! For your chance to win, leave a comment on this post by 22nd March, 2020. Winner is responsible for shipping cost, duties and taxes.
Please note, store credit (gift certificate) cannot be applied to Club Subscriptions. Store credit can be applied to shop past Club products, Club extras and regular releases.

Blog Hop Order:
Next Stop on this Blog Hop is, Jeanne Jachna's blog.
Just in case you lose your place along the way, here is the complete list of participants so that you can find your way back:
Thank you so much for your stopping by and reading this blog post. I hope you liked my card! If you would like to see more of my work using Spellbinders, do follow my Instagram page.
Wishing you a wonderful day ahead!

Saturday, March 16, 2019

Amazing Paper Grace Die of the Month | March 2019

Hello, everyone!
I have a card to share today I made using the Amazing Paper Grace March Die of the Month Kit. If you missed seeing my projects using last month's kit, you can check them out HERE.

This month's Spun Blessing Oval Die Set is very detailed and gorgeous, as always, and has some spectacular elements to help you make ornate cards, bags, boxes, and more. Here's a look at the kit itself:
What I really loved about the die set is , that you can use them all together to create a gorgeous panel or use all the elements separately to add different accents to your projects like an oval, a circle frame, and more. Another plus point about this set is that it is designed to fit regular A2 cards too, which makes it really versatile and can be used on a number of projects. 

I made a layered card using this set and here is a look at my card:

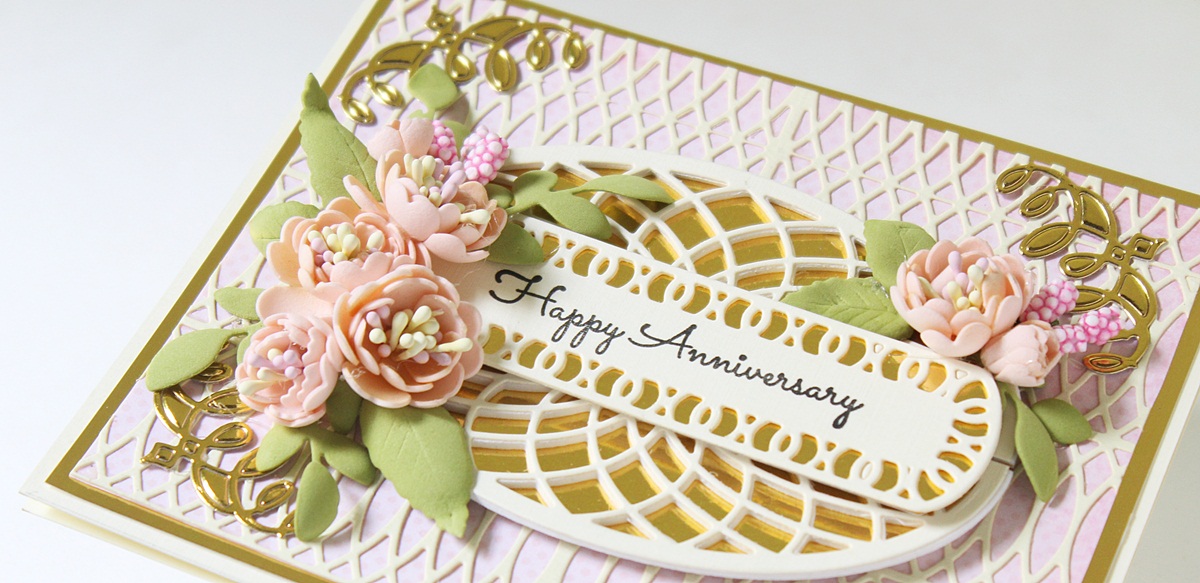
To create my card, I first started by die cutting the lattice square pieces from cream cardstock. I die cut it six times so that I could adhere them together to create a full background for my card panel. Once the background was in place, I started working on the focal of my card. I die cut the intricate oval frames and then added gold foil cardstock behind them, so that it could help highlight the gorgeous design. 

The pretty floral bunches that you see on either side of the card are handmade using peach Foamiran. I really love making my own Foamiran flowers as embellishments for all my projects. I used the Cinch and Go Flowers III Etched Dies to create them and added cream thread pollens to give them some structure and shape. The leaves were die cut from green Foamiran and I added some foliage to complete the look.

Next, I die cut the sentiment tab using the dies included in this kit to create my sentiment banner. Then, I stamped a sentiment from the Vintage Elegance Giving Occasions Stamp and Die Set to finish off my card. I also added four corners die cut from the Swirl Tags Etched Dies using gold foil cardstock as the finishing accents. 

If you would like to get your hands on this die set, please go over to the Spellbinders website and subscribe to the APG Die of the Month Club. These dies are exclusively for Club members and are a definite value for money!

 If you liked my card, please do leave me a comment below. I always look forward to hearing from you. 
Thank you for stopping by!
Have a great day.

Saturday, November 3, 2018

Guest Post using CrafTreat Stencils | Part Two


Hello everyone!
I am back to share some projects I made using the amazing stencils from CrafTreat's September 2018 Release. I am in love with their layered florals and amazing background stencils. So much variety to work with here! I have a total of SIX projects to share today, so let's dive right into it!


I have used the Tropical Leaves stencil for my first card. This is such a fun stencil and is so versatile to work with!


To create this card, I began by die cutting a scalloped circle frame from Neenah Classic Crest Solar White cardstock. Once the frame was die cut, I used two inks from Altenew's Tropical Forest Mini Dye inks to color the background using the Tropical Leaves stencil.


Next, I stamped, coloured, and fussy cut some animals and placed them on my card base where I had cut out the circle frame. I also fussy cut some leaves and popped them on foam dots to add some dimension to my card. I added a stamped and die cut sentiment to finish off my card.


Card Two - CrafTreat Stencils - 2 Step Peony & Tropical Leaves


I love combining my craft supplies to give them a new look and that's what I did for this card as well. I used two stencils - 2 Step Peony & Tropical Leaves to create this card. 


The peonies were coloured using Altenew's Rose Petal inks. I coloured, fussy cut them, and placed them on my light blue ink blended background to create the focal for my card. I used the Tropical Leaves stencil for creating the leaves on my card. I coloured them using Altenew's Tropical Forest Mini Dye inks and then fussy cut them to place on my card panel. 


I also added a mix of some Altenew filler flowers (from the Beautiful Day stamp set) to give a fuller look to the arrangement. I added a piece of black and white patterned paper on the bottom of my card which is from Papericious' Monochrome paper pack. Finally, I stamped a sentiment on my card panel and that's about it! I love how this card came together!


Next up, I am sharing a set of two bookmarks I made using the CrafTreat Stencil - Lily and Iris.

I really loved how these turned out! They make for such pretty gifts to be given to any bookworm! To create these bookmarks, I used the Lily and Iris stencil with the Tombow Colorless Blending Pen and dye inks to stencil the designs on the bookmarks. I used a colorless blending pen here so that it would add a soft look to the design. If you don't have dye inks in your stash, you can work with Distress inks as well. Distress inks are very vibrant in nature, but when used with a colorless blending pen give you very beautiful results.


I used Altenew's Shades of Purple Mini Dye inks + Distress ink - Twisted Citron + Tombow Colorless Blending Pen to create the bookmark on the left, while I used Distress inks: Peacock Feathers & Twisted Citron + Tombow Colorless Blending Pen to create the bookmark on the right. I wanted to leave them as is, but then decided to add some black paint splatters and a stamped sentiment to complete the look. 


Lastly, I have two money envelopes to share I made using stencils. These stencils can be used to create a lot of interesting designs on the background of envies. Here's how I used them!

Money Envelope One - CrafTreat Stencils - Leaf Pattern Background & 2 Step Peony.

I have to admit, this envelope isn't one of my favourites, because I ended up making a major mistake in the background. I wanted the coral flowers to have a grey backdrop, but unfortunately the grey ink I used turned out to be a dark grey which almost looks like black. But I still wanted to share it with you all to give you an idea on how to creatively stretch your stencils. I used the 2 Step Peony stencil to create the flowers on my envelope. I coloured and fussy cut them and placed it on a oval lace die cut. The background for the envelope was made using the Leaf Pattern Background stencil.


This is how the flap of the envelope looks. I extended the design to the back as well to give it a more finished look. The small rose bunch is made using the Mini Rose Background stencil.


This envelope is more of my usual style and I am happy with the way it turned out! I used Sakura Modelling Paste mixed with Papericious Rajni Chawla's - Crystal Clear Glitter to create a white sparkly paste, and used this paste with the Daisy Background stencil to create the background. Once it dried, I used Distress inks - Squeezed Lemonade and Spun Sugar to create a watercolour splash on the background.


Here's how the background looks. The Papericious Crystal Clear Glitter adds a subtle shimmer to the background.


And here's how the flap of this envelope looks. I followed the same method to create the background even here. Doesn't it look pretty? 


I hope you liked my projects and found them inspirational. If you liked them, please do leave a comment below. I would love to hear from you! If you have any queries regarding any of the products or techniques used on my prooejcts, please feel free to ask me.

Thank you so much for stopping by!