Showing posts with label Slimline Cards. Show all posts

Friday, March 18, 2022

Spellbinders Large Die of the Month | March 2022


Hello, crafty friends!
I hope you're having a great week so far! I have a spring-time Slimline Card to share today featuring the Spellbinders Large Die of the Month Kit. This month’s Large Die of the Month Kit, “Kaleidoscope Floral Slimline“, is a huge set of 6 dies that includes a beautiful background floral slimline piece, larger floral dies which layer up with the smaller flowers, and some leaves too, so if you didn't want to use the slimline part, you can still use the flowers.  

You can join the Spellbinders Large Die of the Month Kit and receive an expertly designed die set each month along with membership-only savings! If you join between now and February 24th, you will receive this “Kaleidoscope Floral Slimline” Die Set.  There is no commitment and you can cancel at any time. Click HERE for more information.
I used all of the dies included in the kit to create this Slimline Card perfect for sending to a friend or a coworker.

To make my card, I first die-cut Snowdrift CardstockMirror Gold Cardstock, and White Fun Foam using the large background die in the Kaleidoscope Floral Slimline Die Set. I adhered the pieces together using Craft Glue, offsetting the gold mirror die cut to create a shadow, before adding it to my card front. Next, I die-cut the kaleidoscope flower and other layers out of Snowdrift CardstockMirror Gold Cardstock, and White Fun Foam to adhere on my card panel. I blended three different shades of inks from the Tea Party Dye Ink SetVineyard Berry, Pink Pearl, and Coral Bliss over the white floral die-cut pieces with blending brushes to colour the different flower layers. The leaves were coloured with Olive and Parrot inks using ink blending tools. I adhered the colored die-cuts to the cardstock backer die-cuts with liquid glue and popped some of my flowers up with some 3D Foam Adhesive pieces for extra dimension.

The sentiment was foiled in gold using one of the plates from the Be Bold Glimmer Sentiments Glimmer Hot Foil Plate & Die Set on Snowdrift Cardstock and popped up on top with foam adhesive. To finish the card off, I watercolored a piece of Canson Montval Waercolour Paper using Carribean Sky and drug the color out loosely with water for a soft, watercolored background. I matted the panel with layers of Mirror Gold Cardstock and Dahlia Cardstock and adhered the panel down to a 4" x 9" White Slimline card base.  


If you'd like to see some more project inspiration using the Large Die of the Month Kit, check out the Spellbinders Blog where you can find some stunning project samples using it.  
 

Limited Period Offer
Get a FREE Cardmaking Kit (valued at $55) with any $100+ purchase on the Spellbinders website. Hurry, offer valid only while supplies last!
!

 That’s it for me today! I hope you liked my take on the die set! If you like what you've seen from me, please give me a follow over on my Instagram (@hussena_cal) and/or subscribe to my blog if you haven't already.
Have a wonderful day ahead!

Friday, March 4, 2022

Altenew March 2022 Folktales & Stories Collection Release Blog Hop + Giveaway ($300 in total prizes)


Hello, crafty friends!
I'm ecstatic and honoured to be joining Altenew for the March 2022 Folktales & Stories Collection Release Blog Hop today showcasing new stamps, dies and more!

If you arrived here from Norine Borys's Blog, then you are on the right track. If this is your first stop, then you will want to start at the beginning, the Altenew Card Blog. We've got tons of inspiration and giveaways for you on the hop today, so keep reading till the end of this post for more information.


I loved the details in the beautiful floral stamp from the Endless Florescence Stamp & Die Set. and thought it would look wonderful embossed in white with just a touch of color added.  To keep the focus on the s embossed images, I added just a simple ink blended background to complete the card.


I started off by stamping the floral image from the Endless Florescence Stamp Set in Versamark Ink onto Neenah Classic Crest Solar White Cardstock, sprinkled White Embossing Powder over the image, and melted it with a Heat Tool. Next, I coloured the image using Zig Clean Color Real Brush Markers and cut it out with the coordinating die.

Once that was done, I die-cut Neenah Classic Crest Solar White Cardstock using the Layer 3 Die from the Precision Layering Mini Slimline B Etched Dies. Next, I adhered thin strips of Masking Tape all around the panel and blended Firefely ink (Green Valley Ink Set) around the edges and in the centre of the cardstock to give the panel a little depth. I let the panel dry and then added some black and green  paint splatters for interest. Next, I stamped a sentiment from the Endless Florescence Stamp Set onto the bottom left of the panel using Obsidian Ink and adhered the embossed images on the panel using foam squares for dimension.

Once that was done, I die-cut Pink Sand Cardstock using the Layer 2 Die from the Precision Layering Mini Slimline A Etched Dies to create a mat for my card front and then attached it to an top-folding white card base using tape runner. Then, to finish, I adhered some Antique Gold - Sequins to embellish my panel.


My second card features the new Botanical Bookmark Stamp Set and coordinating Dies (also available as a bundle) against a heat-embossed background made using the new Rosy Blooms Stamp Set.


To make this card, I started off by stamping the leaves from the Rosy Blooms Stamp Set in Versamark Ink onto Neenah Classic Crest Solar White Cardstock, then sprinkled some White Embossing Powder over the images, and melted the powder with a Heat Tool. Next, I applied Sweet Leaf and Minty Mint inks on the top two-thirds of the panel using an ink blending tool to highlight and bring out the embossed areas more.  

Next, I stamped the sentiment layers from the Botanical Bookmark Stamp Set in Parrot, Razzleberry, and Mangrove Root inks onto Neenah Classic Crest Solar White Cardstock. Then, I die-cut the image using the coordinating die and adhered the pieces on the panel using foam squares for dimension.  Next, I stamped the accompanying sentiment from the Botanical Bookmark Stamp Set onto Rubellite Cardstock in Versamark Ink, then covered some White Embossing Powder over the image, and melted the powder with a Heat Tool and added to the card with two layers of foam tape for more dimension. Once that was done, I added some pink and blue paint splatters using the Altenew Watercolor 36 Pan Set for interest.

Then, to complete, I mat my card panel with layers of Dazzling Diamond and Rubellite Cardstock before adhering it down to a side-folding A2-size white card base using tape runner.  I finished the design with some sparkling silver sequins around the sentiment to embellish.


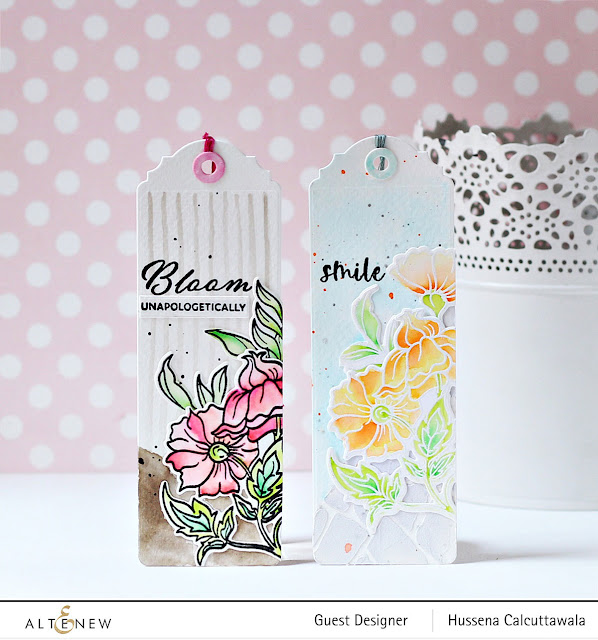
Next up, I have two bookmark designs to share which I made using the new Rosy Blooms Stamp Set, coordinating diesBotanical Bookmark Die Setand the Altenew Watercolor 36 Pan Set. The blooms in this set are so gorgeous and they’re the perfect size to scatter across a card panel.


I started by trimming a piece of Neenah Classic Crest Solar White Cardstock (110 LBS) to about 7″ x 2″.  (I like this cardstock for projects like these because it’s bright white and works with so many different techniques.)  Then, I die-cut the strip with the Botanical Bookmark Die Set to form my basic bookmark shape.

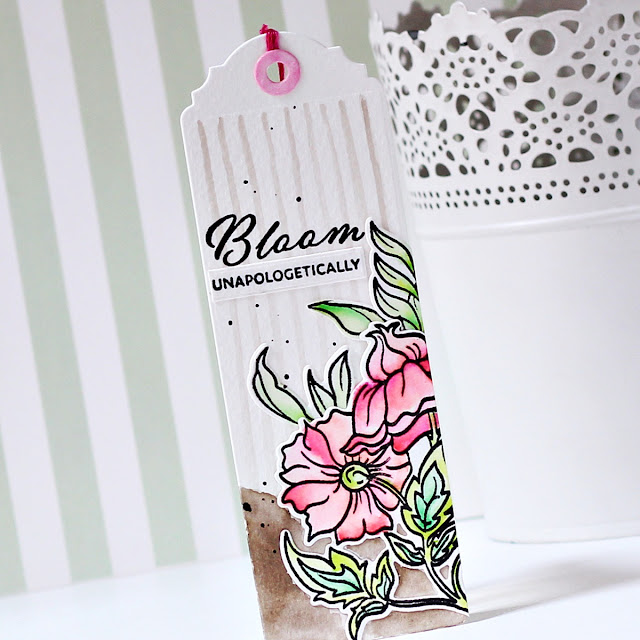
Next, I used a very fine paint brush to paint some loose pale grey stripes on the bookmark using Industrial Diamond paint. After this dried, I sprinkled some black paint splatters around by tapping my brush onto my paper. I also added some sketchy sand to the bottom with the Watercolor 36 Pan Set and blended it out a bit with water.  Next, I  stamped the floral images from the Rosy Blooms Stamp Set using Obsidian Ink onto Neenah Classic Crest Solar White Cardstock. I then coloured the images using the Watercolor 36 Pan Set and cut them out with the coordinating dies.

I adhered the images to the bookmark using liquid adhesive and then stamped the word 'Bloom' from the Rosy Blooms Stamp Set using Obsidian Ink. Next, I stamped the accompanying sentiment from the Rosy Blooms Stamp Set onto a strip of Neenah Classic Crest Solar White Cardstock using Obsidian Ink and adhered it to the bookmark. I added a reinforcer and a handmade tassel with some beads to finish off the bookmark. 


For my next bookmark, I started by trimming a piece of Neenah Classic Crest Solar White Cardstock (110 LBS) to about 7″ x 2″ and then die-cut the strip with the Botanical Bookmark Die Set to form my basic bookmark shape. I thought it would be fun to add a stenciled design on the bookmark, so I secured my Stone Wall Stencil on top of the bookmark using Washi Tape and added Embossing Paste mixed with Lava Rock Re-inker to the bottom right-hand side of the bookmark with a spatula. Next, to create the blue background, To create the blue background, I simply did a wash of “Caribbean Sky” by mixing in some water with the paint and spreading it over my paper using a wide brush.

I stamped the floral images from the Rosy Blooms Stamp Set in Versamark Ink onto Neenah Classic Crest Solar White Cardstock, then covered it with some White Embossing Powder, and melted the powder with a Heat Tool. Next, I coloured the images using Zig Clean Color Real Brush Markers and cut them out with the coordinating dies. I adhered the images to the bookmark using liquid adhesive and then stamped the word 'Smile' from the Rosy Blooms Stamp Set using Obsidian Ink. Then, to finish, I added some orange and grey paint splatters around by tapping my brush onto my paper. Just like the previous bookmark, I added a reinforcer and a handmade tassel with some beads to complete the bookmark. 


Giveaway Prizes:
$200 in total prizes! To celebrate this release, Altenew is giving away a $50 gift certificate to 2 lucky winners and a $25 gift certificate to 8 winners! Please leave a comment on the Altenew Card Blog and/or each designer’s blog post on the blog hop list below by 02/23/2022 for a chance to win. Altenew will draw 7 random winners from the comments left on each stop of this blog hop and announce the winners on the Altenew Winners Page on 03/12/2022.

 Free Gift: 

  • Get a FREE brand new Folktales & Stories Mini Inspiration Guide with every order from 03/04/2022 through 03/06/2022. Shop HERE!
  • Get a FREE brand new Folktales & Stories Stamp & Die Release Inspiration Guide Ebook  (worth $5.99) with every order of high-value Sweet Moments Bundles. Shop HERE! *Exclusions apply.
  • Get a FREE brand new Online Cardmaking Class with every order from the new Folktales & Stories Stamp & Die Release Collection from 03/04/2022 through 03/10/2022. Shop HERE!


 Blog Hop Order:
Next Stop on this Blog Hop is the incredibly talented, Emily Midgett's blog. Just in case you lose your place along the way, here is the complete list of participants so that you can find your way back:

Altenew Blog

Jennifer McGuire

Jenny Colacicco

Vicky Papaioannou

Norine Borys

                            Hussena Calcuttawala (You are HERE)

Emily Midgett

Colleen Balija

Nathalie DeSousa

Mindy Eggen

Erum Tasneem

Jaycee Gaspar

LauraJane

Michelle Short

Cheryl Espie

Terri Koszler

Nichol Spohr

Lilith Eeckels

Nenette S. Madero

Laurie Willison

Preeti Chandran

Tenia Nelson

Therese Calvird

Virginia Lu

Nandini Karmarkar

Maryam Perez

Bridget Casey

Reiko Tsuchida

Natasha Davies

Svitlana Shayevich

Katrina Howe

Agnieszka Małyszek

Teresa Litchfield

Rosie Neustaedter

Linda Westfall

SathyaKala Sankaran

Arjita Singh

Sande Woodson

Daniel Diaz 


I really appreciate you stopping by and participating in this blog hop! If you like what you've seen from me, please give me a follow over on my Instagram (@hussena_cal) and/or subscribe to my blog if you haven't already.

Saturday, February 5, 2022

Guest Post using Spellbinders Classically Becca Collection


Hello everyone!
I am so thrilled to share that I am guest designing on the Spellbinders blog today. I have three projects to share, highlighting the NEW Classically Becca Collection by Becca Feeken of Amazing Paper Grace. This STUNNING Collection features an array of intricate and elegant motifs that Amazing Paper Grace by Becca Feeken is known for.


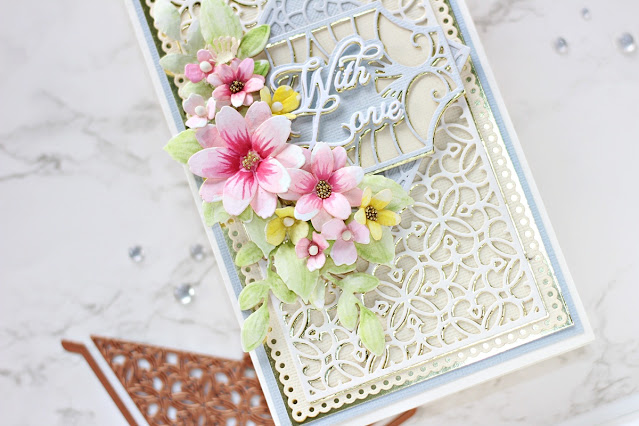
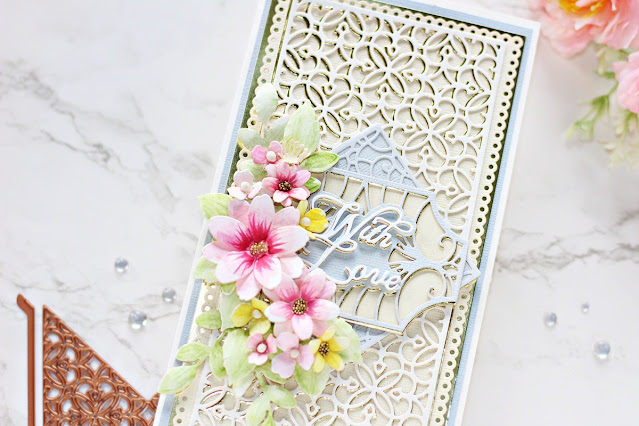
My first card features the With Love Regalia Card Builder Etched Dies, along with the Cinch and Go Blossoms Etched Dies, Circle Meets Square Etched Dies, and Scalloped Symphony Notecard Etched Dies. I simply love the intricate Card Builder Inserts included in the With Love Regalia Card Builder Etched Dies and had to create a tall Slimline Card using it. It looks so rich and elegant! 

To create my card, I first die cut Barely Peach Cardstock using the Scalloped Notecard Die included in the Scalloped Symphony Notecard Etched Dies. Next, I die cut Snowdrift Cardstock and Mirror Gold Cardstock using the Card Builder Card Builder Rims and Insert Die from the With Love Regalia Card Builder Etched Dies.  I cut the die twice, on either edge of the panel, to create a continuous slimline background. Then, I adhered them together with the Bearly Art Original Precision Craft Glue, allowing the gold layer to peek out from behind the ivory layer a bit. 

Next, I die cut Brushed Silver Cardstock using the Square Rim and Insert Die in the Circle Meets Square Etched Dies. I  layered them together with Craft Glue, and then attached it to my panel using foam squares for a raised effect. Next, I die cut Brushed Silver and Mirror Gold Cardstock using the Sentiment Rim and Insert Die included in the With Love Regalia Card Builder Etched Die Set and adhered it to the die-cut card panel with Craft Glue, slightly offsetting the die-cuts so that a gold shadow forms. Once that was done, I die cut Snowdrift Cardstock, Mirror Gold Cardstock, and White Foam using the 'With Love' die from the same die set. I adhered them together with liquid glue, allowing the gold layer to peek out from behind the white layer a bit. 

I die cut Snowdrift Cardstock using the flower and leaf dies in the Cinch and Go Blossoms Etched Die Set and Cinch and Go - III Die Set. I used Watercolor Pans to colour the flowers and leaves and then used a dark pink Copic Marker to flick some colour out from the center to add some quick colour to the petals. Then, I embossed each petal and leaf with a Ball Stylus and added micro-fine gold glitter balls and white wire pollens to the flower centres for a bit of pizzazz. 

I then adhered the layers together with Craft Glue before arranging them around the sentiment panel. To finish, I matted the background panel with layers of with Mirror Gold Cardstock and Brushed Silver Cardstock before adhering it a side-folding 3.5” x 8.5” ivory card base. This was such a labour of love, but I truly enjoyed working on every bit of it!


As you can tell, I am a fan of Slimline Cards and just can't create enough of them. I used the Adoring Fleurette Card Builder Etched Dies for this card and paired it with the Scalloped Symphony Notecard Etched Dies to create a soft springtime card.

I started by die-cutting Raindrop Cardstock using the  Scalloped Notecard Die included in the Scalloped Symphony Notecard Etched Dies. Next, I die cut Snowdrift Cardstock and White Foam using the Card Builder Rims and Insert Dies from the Adoring Fleurette Card Builder Etched Dies.  I cut the die twice, on either edge of the panel, to create a continuous slimline background. Then, I adhered them together with the Bearly Art Original Precision Craft Glue on my background panel. 

Next, I die cut Snowdrift Cardstock and White Foam using the Square Rim Die included in the Circle Meets Square Etched Dies and adhered it down on my panel using Craft Glue. Then, I die cut Raindrop, Snowdrift Cardstock and White Foam using the Sentiment Rim and Insert Dies included in the Adoring Fleurette Card Builder Etched Dies and layered them together using liquid glue. Next, I die cut Mirror Gold Cardstock using the 'Adoring You' die from the set and adhered it down on my panel using Craft Glue

Once that was done, I die cut Snowdrift Cardstock using the flower and stem dies in the Adoring Fleurette Card Builder Etched Die Set. I did some quick colouring on the die cut pieces using Copic Markers and then arranged them around my sentiment panel using Craft Glue. I also flicked some colour with a medium pink Copic marker out from the center to add some highlights to the flower die-cuts. 

Then, to complete, I adhered the background panel to a top-folding 3.5” x 8.5” white card base made out of Snowdrift Cardstock using tape runner. I love how simple and easy this card was to put together. The elegant die cut pieces did all the work for me!


I loved the large Corner Frame in the A2 Filigree Marquis Etched Dies and thought it would be the perfect background to pair with the flowers in the Cinch and Go Blossoms Etched Die Set  and Adoring Fleurette Card Builder Etched Dies for this A2-sized friendship card.

To create my card, I started by die-cutting Beeswax Cardstock and White Foam using the Large Corner Frame Insert and Insert Rim Dies in theA2 Filigree Marquis Etched Dies. Next, I die cut Barely Peach Cardstock using the the Filigree Oval Outline Die from the same set. Once that was done, I die cut Snowdrift Cardstock and Mirror Gold Cardstock using the Filigree Oval Insert Die and layered the pieces together using liquid glueslightly offsetting the die-cuts so that a gold shadow forms. Then, I die cut Snowdrift Cardstock and Mirror Gold Cardstock using the Oval Inner Rim Die from the same set. I stamped a sentiment from the I'm Here for You Sentiments Clear Stamp in the centre of the die-cut piece using Versafine Onyx Black ink iand adhered the layers together using liquid glue, allowing a bit of the gold to show as a shadow. I then popped it on the die-cut panel using foam adhesive for dimension. 

I die cut Snowdrift Cardstock using the flower and vine dies from the Cinch and Go Blossoms Etched Die Set  and Adoring Fleurette Card Builder Etched Dies and coloured the pieces using Watercolor half-pans. Once the flower die cuts had dried, I used a Red Copic Marker to add some highlights to the pieces. Then, I embossed each petal and leaf with a Ball Stylus and added ivory thread pollens to the flower centres for interest. I then adhered the layers together with Craft Glue before arranging them around the sentiment panel. To finish, I matted the background panel with layers of with  Snowdrift Cardstock and Mirror Gold Cardstock before adhering it a top-folding A2 white card base with tape runner. I love how each die set contains all the elements and layers required to complete a design from start to finish. 


 SPELLBINDERS SUPPLIES:
CS-007, CS-010, CS-019, CS-027, SCS-117, SCS-118, SCS-160, SDS-167, S4-1163, S4-1164, S5-491, S5-492, S5-493, S6-177, PCGO4E, PE-100, T-021, AD-0084

OTHER SUPPLIES:
Neenah Solar White Cardstock, Copic Markers, Versafine Onyx Black Ink, Heat Tool, MISTI Stamping Tool, Gold Glitter Balls, Ivory Thread Pollens, Groove Golf Tools, Tape Runner.

I hope you enjoyed this set of layered floral cards and have been inspired to create with these gorgeous dies from the Classically Becca Collection. Thank you so much for stopping by!
You can find more inspiration over at my Instagram page.