Showing posts with label Hero Arts stamps. Show all posts

Tuesday, September 13, 2016

Gift Bag & Notecards | Photo Tutorial

Hi, crafty friends!
I'm posting after a short hiatus on my blog :D
Today, I have a very quick and easy tutorial to share for making a beautiful card pouch. I really had a lot of fun creating this. My son has a male class teacher & coming up with a gift for him for Teachers' Day was quite a challenge as I usually tend to create quite feminine project, so I was pretty happy to work with the newest collections from Papericious which has some really good masculine tones. 
Warning - It's a picture heavy post.

Here's a look at the card pouch :


Here's how it looks when opened up :

I have embellished the insides using pattern papers from the Mi Estilo collection. The bow-tie & sentiment have been fussy-cut from the Gentleman pack. (The papers used here are all from Papericious)

As you can see, it has two pockets and can hold 4 X 4 inch notecards with coordinating envelopes and also there is enough space to hold a candy bar of your choice.

The note-card & coordinating envelope :


The trio together!


The back side of the pouch :


- - - - - - - - - - - - - - - - - - - - - - - - - - - - - - - - - - - - - - - - - - - - - - - - -
Here's the tutorial on how to create this :

TUTORIAL

Step 1 - Take a 12 X 5" piece of cardstock and score at 5 1/2 and 6 1/2 inches.

Step 2 - To create the inside pockets, take TWO pieces of 2 3/4 inches X 5 3/4 inches piece of cardstock.

Step 3 - Score at 1/4 inch TWICE on three sides of this cardstock and fold it to form the pocket. Cut out the two squares on the sides to help create a crisp pocket-fold.

Step 4 - To create handles of the card pouch, you can either use any punch of your choice or a die, I have used Spellbinders Label 4 to create my handles.

After die-cutting the handle looks like this :

Step 5 - To further embellish the handles, create a frame using the same die set. I have distressed it using Hickory Smoke Distress ink. ( I have used the Papericious Craft Sheet & Ink Blending Tool )

Step 6 - To embellish the front & back of the pouch, I have used different pattern papers from Mi Estilo and the Gentleman pack.

The Note card and the co-ordinating envelope were also made using these papers.

For the pouch, I die-cut a scalloped border panel using papers from the Mi Estilo collection and layered it with another paper from the same collection. I then made a handmade flower again die-cut using papers from the Mi Estilo pack. Added few leaves, filler flowers and the sentiment, and my bag was ready :)

For the note-card, I have used die-cuts from the Infinity Collection. I have used three different pattern papers from the Mi Estilo collection.

For the envelope, I have again used a die-cut from the Infinity pack.


Hope you liked the tutorial and give it a try. I would love to hear your views on it :)

Linking this to Eclectic Ellapu- Gifts, Challenge up your life- Lace (Have used paper lace on both the gift bag & envelope), Crafty Catz- Anything but square (entering my bag only), Jo's Scrap Shack - 3 colors (Red, Gray and Green), 2 embellishments (2 kinds of filler flowers and enamel dots), 1 technique- Die-cutting, Just add ink - Just add P (Pattern papers).

Have a nice day everyone!

Wednesday, July 13, 2016

Happy Birthday | Photo Tutorial

Hello friends!
I'm back to blogging finally and I have lots of cards to share. Today I'm sharing one of the two cards I made for my DT post at Pretty Paper Studio. The July challenge at PPS is- Black, White & a splash of Colour. Here is my card based on this theme. I have a tutorial to share as well on how I made each of them!


Monday, March 7, 2016

Hello Friend

Hello friends,
Today I have a card to share based on the current challenge at Altenew and this is also my Guest Design Post for the Tic Tac Toe challenge. Here's a look at my card :

Here's a side view which shows the layers of my card pretty well.

To create my card I first die cut a card panel using the largest of my Stitched Rectangles die from a Kraft paper, then I die cut some square frames using various sizes of the Spellbinders Square Nesting dies and I slightly colored them using Red Cosmos ink cubes set from Altenew. 
I glued these squares on my card base creating a geometric grid like pattern. Then I stamped my flowers, leaves and foliage from two different Altenew stamps- Peony Bouquet & Vintage Flowers and gold heat embossed them. The flowers and leaves are all colored by using various Altenew Crisp inks - Red Cosmos & Green Fields ink cubes set using a Inkessentials foam applicator to give them two- tone shading. The sentiment is from a Hero Arts set - All Occasion Messages set and I stamped it on a piece of card stock using Versafine Onyx Black ink and cut it in a banner shape and colored it lightly using Altenew- Forest Glades ink and  a Inkessentails foam applicator. It was then foam mounted on the square frame.

The colors and the design of my card is inspired from the current challenge at Altenew. I tried to incorporate the maze garden in my card by creating a geometric background and have shaded my flowers using two shades of pink to incorporate the colors too.

The stamped and embossed flowers and leaves are also foam mounted on my card panel and they give quite a nice dimension in real life. I matted my card panel on a light pink cardstock and attached it to a Kraft card base. I have used a few Pretty Pink Posh sequins to finish off my card.

Also entering my card in the NBUS challenge by Darnell- I have used my Altenew Peony Bouquet stamp & Gina Marie die for the first time, Stamping Sensations- Flower Power & SSS- Touchy Feel ( I have used embossing and layers for the texture).
PhotoInspiration_March


I hope you like my card. I would love to hear your views on it. Thanks for visiting!


Sunday, February 1, 2015

Winnie & Walter Birthday Celebrations- Part 2

Hello friends.
This is the part 2 of the Winnie and Walter Birthday Celebrations challenge. I have two more cards to share. The linky closes in just an hour, so this is going to be a very quick post.
My first card is based on the Gradient Challenge by Vanessa. Here's a look at what I have created :


To create my gradient, I have used different shades of yellow and orange Distress inks and stenciled the background using the MFT Moroccan Tile stencil. After I stenciled it, I sprayed the background with plain water to create the watercolor effect. I have done two-toned stamping on my flowers which are from the Winnie & Walter- The Big, the Bold and Extras set. The sentiment is from the Winnie & Walter- The Big, the Bold and You stamp set. The leaves have been colored using Inka gold after I stamped it with Versafine Onyx Black ink pad. Everything has been popped on foam dots to give dimension to my card.

Supplies used :
Cardstock base- Campap
Die- Paper Smooches Dots and Dashes Borders.
Inks- Versafine Onyx Black ink pad, Distress inks- Squeezed lemonade, Mustard Seed, Spiced Marmalade and Dried Marigold.
MFT Moroccan Tile Stencil, Inka Gold, Prima Epiphany Ephemera Pack, Sequins.


Challenges entered :
 Just us Girls challenge- Sentiment as the focal point.
 Crafts 4 Eternity- No pattern paper.
The Crafters cafe challenge- Make your own background.
SSS- Anything Goes


My second card is based on Lea's Mood Board challenge :

My take on the mood board :


I was inspired by the various elements of the mood board -The polka dot tissue, the scattered glitter and the soft pink gloves. To create the polka dot banner, I stenciled Inka Gold onto a vellum paper using a Heidi Swapp stencil. The woodgrain circle, I have die-cut and embossed using a woodgrain embossing folder. The doily behind, I have watercolored using Spun Sugar Distress re-inker, scattered some punched out glittered hearts and have placed a scalloped border behind the circle. The sentiment has been stamped and fussy-cut from the Winnie and Walter- The Big, the Bold and You stamp set which has been gold heat embossed and adhered to the card. I have coated the flowers and the background with Stickles Platinum, but unfortunately it doesn't show through the picture. The background has been stamped using a Hero Arts/Basic Grey background stamp using Spun Sugar Distress ink which is also not showing through. :(
I'm also entering this in Gayatri's CAS + Freestyle/ Collage challenge

Supplies used :
Cardstock base- Campap, Paper Accents Vellum Sheets.
Dies- Cheery Lynn French Pastry Doily die, Paper Smooches Dots and Dashes Borders.
Punches- EK Success Scalloped Scallop Slim Edger, Jef 3 in 1 Hearts punch.
StampsWinnie and Walter- The Big, the Bold and You stamp set, Winnie and Walter The Big, the Bold and You stamp set, Hero Arts/Basic Grey Herbs and Honey tile background stamp.
Inks- Versafine Onyx black in pad, Distress re-inker - Spun Sugar, WPlus9 Flamingo Dye ink pad, Versamark Dazzle embossing ink pad.
Ranger Super fine Gold embossing powder. Heidi Swapp Medium Dots Stencil, Inka Gold, Gold Glitter Washi tape, Golden thread, Ranger Platinum Stickles.

Challenges entered :
Cut it up -Embossing ( I have done both dry and heat embossing )
Crafty Gals corner- I have tried this collage style for the first time and the W & W stamp set is being used for the first time.

I hope you like my cards. I would love to know your views on it.

Monday, August 25, 2014

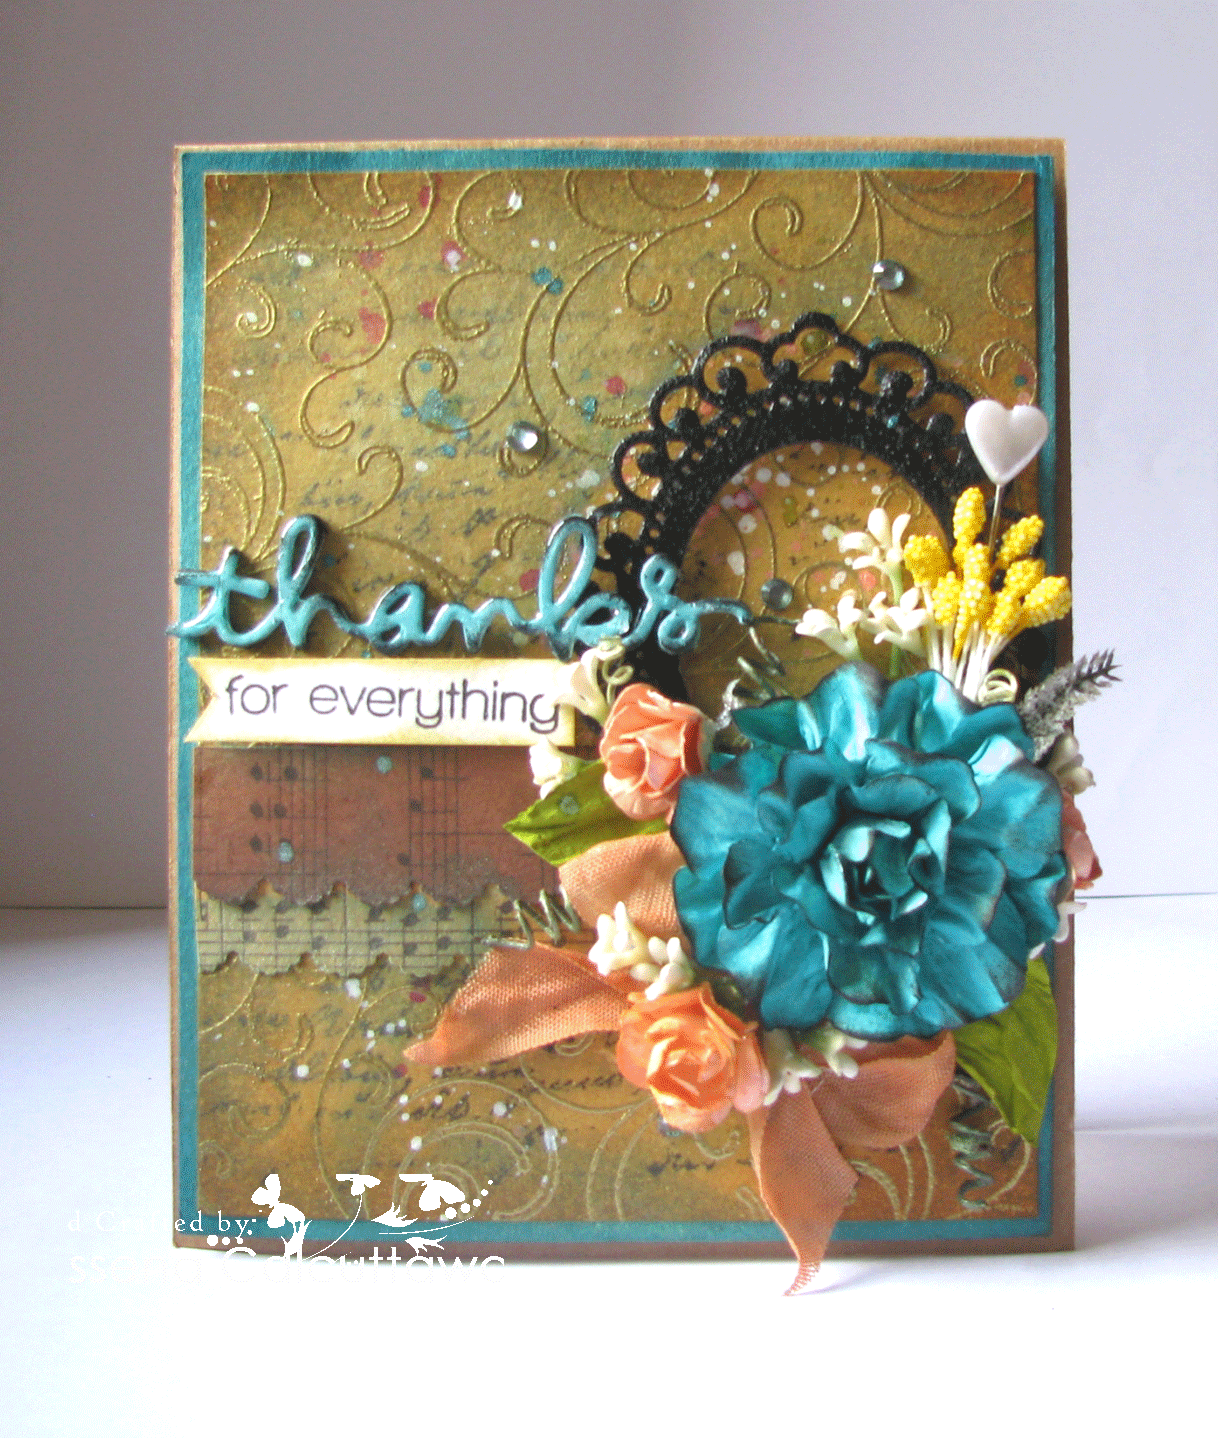
Thanks for everything

Hi Friends,
I am back again sharing a card I have made for my inspiration post at Lulupu. Our theme this time is "Background stamping plus use mist or sprays on your project' and here's what I have created :

I have done the background stamping using Hero Arts Flourish Background Cling stamp  .I first heat-embossed my background using Ranger Super Fine Gold Embossing powder and used Distress inks -Scattered Straw, Antique Linen, Black Soot and a little bit of Peacock Feathers to create my background. Then, I misted my background using the new Hedi Swapp Color Shine mists from the Lulupu store. These mists are really beautiful colours and when you spray them, they give this added shine which when you see in real life, is really beautiful. I have used Tropicana Teal, Coral and Gold on my card.

The small peach coloured flowers and the ribbon have been coloured using the Coral mist and the die-cut word 'Thanks' was sprayed with Tropicana Teal Mist and distressed around the edges with Black Soot I have die cut it 5 times using the Simon says die and the sentiment below it is also from the same set.. I have used the Gold mist to just fleck around the entire background. If you look closely, you will see it gives a gorgeous shine and I am using it almost on all my recent projects. The leaves were sprayed with Lindy's Stamp Gang Curiouser Chartreuse Flat Fabio mist. I love the intensity of it's colour !

The large blue flower is handmade using Spellbinder's Rose creation die and the black frame behind my flowers is also die cut using Spellbinder's Die- D-lites Frame Two dies and then heat embossed using Zing! Glitter Black embossing powder.
Supplies used :
Pattern papers- Graphic 45 Kraft Collection
Punches : EK Success Scalloped Scallop Border punch.
Dies-  Spellbinder's Rose creation die, Spellbinder's Die- D-lites Frame Two dies, Simon Says Stamp' Thanks' die and stamp set.
Stamps -Hero Arts Flourish Background Cling stamp, Simon Says Stamp 'Thanks' stamp set, Fiskars/Teresa Collins Girly Chic stamp set.
Inks- Versamark embossing ink pad, Distress inks -Scattered StrawAntique LinenBlack Soot and Peacock Feathers, Versafine Onyx Black ink pad.
Ranger Super Fine Gold Embossing powder, Zing! Glitter Black embossing powder, Mulberry flowers, Pollens, Heart stick-pin,  filler flowers and Seam binding ribbon.

I'm participating along with Pretty Pink Posh Cutting Edge blog hop. I have  used a couple of dies on my card and I have listed them above.

Challenges entered :
Paper Creators Craft  -Blings and Blooms
As you like it challenge : Favorite 2 embellishment and why (Mine is always flowers, fillers and gem stones  because they are the main focus of all my creations.)

That's it from me hope you like my card. Do let me know your reviews about it :)

Tuesday, August 19, 2014

My first take on Watercoloring

Hi friends!
After a quite long time, I am just blogging for 'just me.' No DT commitments and just for the fun of trying out something new. Well, in my case it's watercoloring. This trend is really very happening right now in all of the blogland and I have been  SO inspired by my fellow crafter's and bloggers to give this trend a try. This is very addictive and I have another card on which I am working as well based on watercoloring which I'll share later. Here I'll have to mention my friend and fellow blogger,Pallavi, she was the one who pushed me into giving this a try. Thanks , Pallavi :) Here's a look at my first try :


I have not gone full-fledged into watercoloring rather what I did was I stamped and clear embossed the flowers and the leaves on watercolor paper and colored them using my distress inks and then I fussy-cut all those images and popped them on foam dimensions.
Then, stamped my background using Hero Arts/Basic Grey Square Pattern background stamp, cut it diagonally, stamped my sentiment on a white piece of cardstock and adhered with my diagonal pieces. Then for the final touch I heat embossed  my base cardstock on all four sides using Ranger Super Fine Gold embossing powder and mounted my panel onto it.
If you notice closely, I have adhered very small gem stones to my flower centres, I mean those little flowers which I have scattered around.

Supplies used :
Watercolor paper - Fabriano Elle Erre white, 
Stamps -  Hero Arts/Basic Grey Square Pattern background stamp, Lawn Fawn Flutter by and Blissful Botanicals, Winnie & Walter The Big, Bold and You stamp set. 
Inks - Versafine Onys Black, Distress inks- Peacock Feathers, Tumbled Glass, Crushed Olive and Festive Berries, Versamark Dazzle embossing ink pad.
 Embossing powders - Ranger Super Fine Clear embossing powder, Ranger Super Fine Gold embossing powder.


Challenges entered :
Lawn Fawn - Texture (I have used embossing powders and gem stones to add texture to my card)
BGC -Watercolor ( Honourable mention )
Addicted to CAS #45 -Geometric

Hope you like my attempt at watercoloring. If you have any suggestions/feedback regarding my card, would love to hear from you. :)
Have a nice day everyone!

Monday, February 4, 2013

A Valentine Card! :)

Hi Friends,
Hope you all are doing fine ..I am back again to share with you a valentine card made for my inspiration at Crafter's Corner blog where our Theme this time is "Expression's of Love "and also our focus this time is on embossing and so keeping this in mind here's my card which has loads of embossing in it ...Here's a look first :-
  And here's a quick look at my gorgeous butterfly where I have done clear embossing with Versafine Black Ink and Ranger Super Fine Clear Embossing Powder ...Trust me this looks gorgeous in real life ..Wish I could have captured the essesnce in my picture though !!


  Okay gonna show you all an another view just to make sure you get how beautiful the embossing looks :)

                                       
There you have it !! ...I have done stamping and embossing on the heart 's as well they were hand-drawn and cut then embossed using  Ranger Super Fine Clear Embossing Powder with the Versafine Embossing Ink and then colored with two shades of the distress inks !  

Supplies used :
Base CS : Campap
Pattern Paper : Papermania,Graphic 45
Stamps :
Hero Arts :Flourish Background,Antique Engravings & Antique Brocade.
Lace stamp: My minds eye Miss Caroline collection
Dies:-
Cheery Lynn Olive Branches 
Inks :-
Tim Holtz Distress inks : Shabby Shutters ,Antique Photo ,Festive Berries ,Mustard seed & Tumbled Glass
Black ink -Versafine Onyx Black
For Embossing :-
Veramark Embossing Ink pad
American Crafts Zing! -Black
Ranger Super Fine Clear Embossing Powder
Sentiment -Simple Stories.(Sticker)
Mulberry Flowers These are part of the Candy I won at Shraddha's blog ...Lucky me :)
Laminated Jute -Itsy Bitsy
Leaves,Hat-pins ,Mesh ribbon ,Pearls & Key charm -Stash

Challenges Entered :
Glitter n Sparkle : Valentine/love          
Corrosive Challenge : Hearts and flower
My sheri crafts :Valentine (Honourable Mention)
Frosted Design :Love + Heart  
Simply Create Too : Valentine's day or include a heart
Flutter By Wednesday : must have a Butterfly.  

Hope you all like my work ...Please do leave me your Comments/ Suggestion.. It helps me grow :)
Have a nice day everyone! :)                                                         

Friday, February 1, 2013

Shabby chic Valentine Card! :)

Hi Friends,
Today being the first of the month its time again for a new Challenge  at Crafter's Corner blog and our theme this time is "Expression's of Love "...What could be better than this as this is the month of Love :)....So for my inspiration this time I decided to do a shabby chic Valentine card with lot of layering and details ...Here's a look at what I have created :


The two small flowers are handmade and the butterfly is embossed using   Ranger Super Fine Clear Embossing Powder and colored using Distress inks ...Here's a close up of both the pics :)


And a look at the butterfly now :

The Background multi dots paper and the sentiment  are all Digital freebie's from Papercraft Inspiration site ...You can check them out Here ...:)   And the corrugated heart is recycled from an old packaging box :). For the first time I have even done paper distressing on the top panel of my card using a serrated scissors I have and I am loving the look of it :).I have chosen very soft colors for my card as for me Valentine is synonymous with soft dreamy colors !!
I was also inspired by the colors from IBSIC :
                                                     

Supplies Used :
Base CS :Campap
PP's :W & M Company (Light pink dots paper on the top half )& Digital paper's
Die :Cheery Lynn Olive Branches (Crafter's Corner)              
Red flower in the center -Crafter's Corner
Punches - Flowers (Jef Retro flower ),and MS Lace Doily punch
Stamp :Hero Arts Antique Engraving (Butterfly )  
Inks :Tim Holtz Festive Berries and Fired Brick Distress Inks ...For the flowers I have used Festive Berries and Antique Photo (Crafter's Corner).
Corner Rub -Ons -RAK from Snehal! :)
Pearls,Gems,Lace ,Hat Pins are from stash.        
Used #GlossyAccent on the cupid which I have fussy cut & also on the flowers.(Crafter's Corner)

Challenges Entered :-
Itsy Bitsy -Pattern Papers
Beyond Grey Challenges -Shabby -Chic Love
Inspired by Stamping Inspiration Challenge # 44
In the Pink -Lots of pink +Distressing (Flowers are distressed as well as the pattern paper)
Moving along with the times -Punch it out (Used the Retro flower punch for the flowers & the MS Doily Lace punch)

Hope you all like my card..Do leave me your comments/suggestions..Love to hear from you all :)
Have a nice day everyone!                                                                                            

Friday, December 28, 2012

A Set Again :)

Hi friends,
      I am back again to share with you all a Gift set which I  have made for the inspiration at Crafter's Corner blog where our #3 is ' Make a Set ' !!.....So here's a look at what I have made :

..I have made a small gift bag and a matching Gift tag set and have used the beautiful paper's from DCWV Garden Party stack to embellish this both !!..And have created  the background by stamping using Distress inks !! These inks are just 'Wao' ..! I am totally in love with the versatility of these inks not only they stamp beautifully but are so good for distressing,creating multi- hued backgrounds and also to color your die-cuts as well as punched elements !! ...Ok so without rambling further let me just show you  indiviual pics of the bag and tag......The bag first :


 And a look at the tag :-

Supplies used for the BAG :

Base CS -Fabriano Elle Erre!
Pattern Papers- DCWV Garden Party Stack (Crafter's Corner)
Border Punch -Martha Stewart Daisy (Available at Crafter's Corner)
Dies :-
=>Spellbinders Label 3 -(Bought from Kavitha's Store)
=>Cheery Lynn Exotic Butterflies (Small) -Crafter's Corner
=>Cheery Lynn Tropical Flourish -Crafter's Corner
=>Cheery Lynn Olive Branches -Crafter's Corner
Big Mulberry rose & leaves -Crafter's Corner ,Small Mulberry flowers- RAK from Varshitha
Background Stamp -Hero Arts Flourishes (Available at Crafter's Corner),Sentiment -Krafter's Kart
Distress inks :Vintage Photo ,for stamping as well as distressing..!! (Crafter's Corner)
 Lace ,Ribbon & Pearls- Stash

For the TAG :
Base CS- Fabriano Elle Erre!
Pattern Papers- DCWV Garden Party Stack (Crafter's Corner)
Border Punch Martha Stewart Doily Lace Punch & Daisy Punch - Crafter's Corner
Dies :-
=>Cheery Lynn Tropical Flourish -Crafter's Corner
Flower made using Punch Bunch Scallop Punch -Crafter's Corner.You can check out the tutorial for it HERE
Big Butterfly Paper -Pieced from DCWV Garden Party Stack (Crafter's Corner)
Small Butterfly -Hero Arts Antique Engravings (Available at Crafter's Corner)
Background Stamp -Hero Arts Flourishes (Available at Crafter's Corner),Sentiment -Lawn Fawn Blissful Botanicals Set (Lulupu Store)
Inks :Disstress inks (Vintage Photo) -Crafter's Corner
Mulberry Leaves- Crafter's Corner
Lace ,Ribbon & Pearls- Stash

Challenges Entered :-

Cheery Lynn -Lace 
C .R.A.F.T -Not a card
Try it on Tuesday -Lucky dip -(Die Cuts ,Ribbon ,Pearls & Distressing) ( Top 5! )
Twisted Tuesday -Tags & Smile (entering my Tag ) ( Top 3! )
Cut create have fun :"Gift Wrap "

Hope you all like my projects please do leave me your comments/suggestions I really appreciate it :)
Have a Nice day everyone :)


Sunday, December 16, 2012

Guest Designing at Sunshine Creations :)

Hi Friends,
Today I am very happy to share with  you a card I have made for my GD spot at Sunshine Creations blog  run by a very talented young  Crafter Anushka ...She is only 11 years old and  her work is simply amazing ...I have come to admire  her so much for her ability to multi task so well at such an young age.... She seems to so effortlessly manage school ,crafting ,blogging and now even running her own challenges!! And I am quite proud to be selected as a guest designer at her blog  for this time's challenge which is Season's Greetings..And here's my take on this challenge :

         I have to add here that I am not very good at making cards without floral embellishments in any form and this theme  was a challenge for me ...But luckily the beautiful Pattern papers from the Webster's- A Botanical christmas  came to my rescue:)...Love the beautiful designs and die cuts in this collection....I just cut out the door and added a few pearls on the wreath plus some on the cream lace below to jazz it up ...And for the first time got to play with some Hero Arts stamp and Distress inks with which I have created the background design !!
Oh and I have to tell you guys that since I was also selected the random winner along with GD for Anushka's last challenge(fall /Thanksgiving ) ...I won some cute & lovely Inkadinkadoo stamps for it ...But the ever generous Piali also sent me some utterly gorgeous paper's,  ribbons & alphas too ...Thank you so much Anushka and Piali for your Generosity.. ...I simply Loved it :)
And I wanted to link up my this card  to Annette's My  Clever Creation Blog where she has a celebration on with a link up party ..Annette is a dear blogger friend and I Love her cute, adorable and of course clever work very much  :)

Supplies Used
Base CS : Campap
Design paper :Rak from Piali
Stamp :Hero Arts Swirls
Ink : Distress ink - Fired Brick
Pattern paper : Webster's - A botanical christmas
Sentiment : Webster's botanical collection
Small red pearls :Webster's
Lace :Red :Crafter's Corner,Creame : Stash
 Uniball Signo Golden gel pen  used to color the door knob.

Challenges Entered :
Really Reasonable Ribbon: Anything goes with ribbon .
Charisma Challenge :Christmas Makes
Craft Us Crazy :Christmas
The Sister hood of Crafter's :christmas +stamped Background
Perfect Sentiment :Anything goes with christmas
Do you stack up :christmas
Addicted to stamp :bingo (Pearls ,Ribbon ,Red )
Papelitos Challenge :A touch of Red