Showing posts with label Heidi Swapp Mists. Show all posts

Monday, September 19, 2016

Sneak Peek | Cards

Hi, crafty friends!
I'm sharing some cards today at the MUDRA blog using their newest stamps from the September Release. Here's a sneak peek for you :


I am sharing a total of 4 cards. Do visit the blog for the complete reveal and don't forget to leave me a comment there. I would love to hear your views regarding it :)


Have a nice day everyone!

Wednesday, August 24, 2016

Fuschias | Card

 Hi, bloggy friends!
I am sharing a card today that I made some days back for my inspiration post at Mudra Craft Stamps. Here's a look at my card :


It's a fairly simple card to make. I have used the Mudra Hummingbird stamp set designed by Suchi of Suchi's Cardstock. You should definitely visit her blog to see her amazing CAS cards :)

I stamped and clear heat-embossed the fuschias on a watercolor card panel and did some simple watercolouring using Distress inks. I then stamped the sentiment which is also from the same set and added few die-cut butterflies from an Impression Obsession die. Added few gold splatters and did some light blue watercolouring on the background.
I added a patterned paper from the Papericious Ephemera collection and mounted my panel to an A2 white card base and it was done :)

Linking this card to Cards und more- Pink & Green, Craftin' Desert Divas- Watercoloring, Allsorts- Fabulous florals


Monday, August 8, 2016

Best Wishes | Card

Hi everyone!
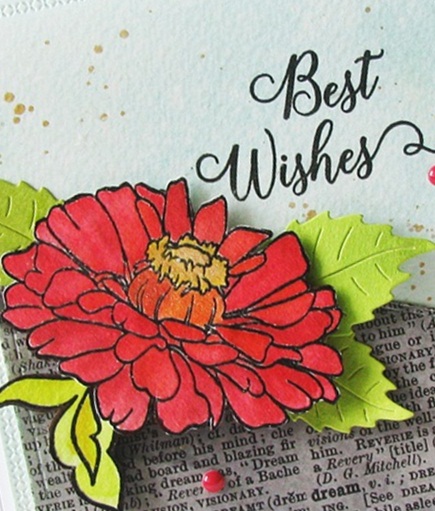
Today I'm sharing a card I made for the Collaboration Blog Hop going on between Papericious & Mudra. Here's a look at it :


I have used products from both companies on my card. The grey text pattern paper is from the July 2016 release from Papericious and is called 'Mi Estilo'. I have die-cut a diagonal panel using it. The super bright red flower is a stamp from Mudra called Zinnia which I have colored using 3 shades of Distress inks.
I did some light water-coloring on my card front and added few gold paint splatters using my favorite Heidi Swapp Color Shine Gold Lame Mist. Added some green die-cut leaves using a Cheery Lynn die and few enamel dots to finish off my card. I adhered this card panel to a white A2 card base. The sentiment is from another Mudra set and is called Sophisticated Sentiments.

I'm entering my card in the SSS - Fabulous Florals, Wow  Embossing Powder Challenge - Flowers, The Crafter's Cafe- Flowers and Stampotique Designer Challenge- Text background.

I hope you like my card. Do leave me your comments/suggestions regarding it :)


Have a nice day everyone!

Monday, July 25, 2016

On your Special Day

Hi friends!
This is third card I made for my Mudra post. I personally liked this one a lot, here's a look at my card :


Unlike my usual cards, I have not used a white card base here and gone with black. I really like how the flowers pop up against the stark black background.
If you see closely, you can see that I have dry embossed a clock on my card panel. I did that using my Embossing Tan Mats and have used a PaperTrey Ink die for doing so. As I mentioned in my previous post, it's my newest buy and I really love it a lot. It adds such a nice subtle texture to my card.

To make this card, I took a piece of an A4 black cardstock & folded it in half to create to create a top folding card. I die-cut a card front panel using my Gina Marie Stitched dies. I stamped the flowers and leaves from the Botanical Blooms set by Mudra. The inks I have used here are from the Altenew Minis in Red Cosmos & Cool Summer Night. Fussy-cut the flowers and the foliage and arranged them around the embossed area. I added some color coordinated ink spatters on the card front & to finish off,  I used some Pretty Pink Posh sequins to give some sparkle and shine. Finally added the sentiment for my card which is also from a Mudra set.

I'm entering my card in the Virginia's View ChallengeCreative with Stamps, Aud Sentiments and Creatilicious Challenges.


I hope you are liking my stamped cards! Do leave in your comments/suggestions. I love hearing from you :)

Have a nice day everyone!


Friday, July 15, 2016

You are Loved | Photo Tutorial

Hello everyone!
I'm back to share my second card that I made for my DT post at Pretty Paper Studio. I shared one card earlier HERE, incase you have missed seeing it.
I'm sharing the second one today with a step by step tutorial on how I made it. Here's a look at both the cards.


And the second card!


- - - - - - - - - - - - - - - - - - - - - - - - - - - - - - - - - - - - - - - - - - - - - - - -

TUTORIAL

Step 1 – I started with a piece of White cardstock measuring 4 1/4 inches by 5 and a 1/2 inches and I decided to create a stenciled background using The Crafter’s Workshop- Mini Cubist stencil & Distress ink- Hickory Smoke using the Ranger Mini Round Ink Blending Tool. I created some splatters on my card using the Heidi Swapp Color Shine- Rose Mist.

Step 2 – Once the background was created, I again stamped the flowers and the foliage using the Paper Smooches Clear Stamps 4″X6″ – Botanicals 3 stamp set. I stamped my flowers using 2 colours of ink- Cotton Candy from the Altenew Four Scoops ink set and Papertrey Ink Pure Poppy Ink. The leaves were stamped in Versafine Onyx Black ink. These were all fussy-cut. 

Step 3 – I used the Cheery Lynn- Anastasia border die to die-cut a border from Black CS, and added a strip of that pretty Washi Tape to my card base to anchor my floral arrangement. These flowers and leaves are all popped up on foam dots to give them a bit of dimension.


Step 4 – For the sentiment, I went for the Simon Says Stamp – Expressions for You stamp and die set. I  die-cut that ‘You’ using black cardstock and the ‘are loved’ is stamped. I distressed the edges of the piece using Altenew Cotton Candy ink pad.

Step 5– A complete look of the card. I mounted it on a white card base whose edges I had colored using Altenew’s Cotton Candy ink so that a hint of the pink shows through the all four sides! 

Supplies used :
Bazzill Cardstock 12×12″ Classic White 
Paper Smooches Clear Stamps 4″X6″ – Botanicals 3 Archival Ink Pad – Jet Black 
Bazzill Cardstock Orange Peel Black 12×12″ Cardstock Hero Arts Acrylic Stamping Block 
Hero Arts Acrylic Block 4.75″X 6″ 
Crafter’s Workshop Template 6″X6″ – Mini Cubist
Ranger Mini Ink Blending Tool 1″ 
Tim Holtz Distress Ink Pad – June-Hickory Smoke 
Heidi Swapp Color Shine Spritz 3/Pkg – Sweetheart 
Papertrey Ink Pure Poppy ink
Versafine Onyx Black Ink Pad
Altenew Four Scoops Ink Pad Pack 
Washi Tape – 527 

I'm entering my card into the SSS- Flora & Fauna, Peek-a-Boo Designs- Only layers  4 Crafty Chicks- Flowers, Moving along with the Times- No Designer Papers, & City Crafter Challenge - On the Border challenge.

I hope you like my card & tutorial. If you have any queries, please leave them below. If you liked my card, don't forget to leave me a comment :)

Have a nice weekend everyone!

Tuesday, March 1, 2016

Love- Mixed Media Wall Art and Tutorial

Hello friends!
I have a Mixed Media Wall art and fridge magnet to share today along with a step by step tutorial. Here's a look at what I have created :

This wall hanging would make a perfect accent to your craft room or even as a home decor and I have created this based on the current theme this month at Pretty Paper Studio which is “LOVE”. I have a step by step tutorial on how I have created this, so sit back and relax and hope you enjoy seeing the creative process .

 I first started by roughly drawing a freehand heart shape on a recycled cardboard packaging and fussy cutting it and for the magnet, I have die – cut a heart shape using my die directly on the cardboard. I have used papers from 6″ X 6″ Crate Paper pad : Craft Market collection.

After I had cut the heart shape, I cut out the papers from my paper pad and glued them on the cardboard base. (The brown woodgrain & dotted paper). Then it was time to add some texture to the base so I used Tim Holt Lace stencil and embossing paste along with some Heidi Swapp mists to create my background.

This is how the base looks once the embossing was done . On my dotted heart, I mixed some blue mist with my embossing paste before applying it through the stencil.

This is how the base looks once the embossing was done . On my dotted heart, I mixed some blue mist with my embossing paste before applying it through the stencil.

To create more background texture, I water colored two images from Prima Marketing Everyday Vintage Paintables Cards- Bohemian 4 ”X 6” using my Distress inks and I fussy cut the images and layered them on my heart base.

After I watercolored and fussy cut my image it was time to start embellishing and putting down all my elements on my heart base . I decided to use the Prima Marketing Resin icons in a Box- Chalk Black Lock and Key Sets for this, so I painted it with gesso and colored it with my mist to give it a hint of blue.

After playing around with my embellishments, I finally arranged them on my final piece. I have used handmade flowers and some die cut and colored leaves using Joy! Crafts Die- Leaf #2, added a American Crafts/Amy Tangerine Stamped Myflair Flairs – Embossed Gold along with the Prima Marketing Resin icons in a Box- Chalk Black Lock and Key Set.

 I also made a co-ordinating fridge magnet  to go with my wall hanging :

For the fridge magnet, I have used paper from Crate paper : Craft Market collection 6 ” X 6″ paper pad. I have die-cut a scalloped circle from this paper pad and have foam mounted it on my heart base and used some mulberry flowers and a Prima Resin Icon Key to embellish it, finally used some sequins to finish my project.

w&w_bb2ndb_challengefinal
I'm linking my wall hanging and fridge magnet to the Winnie and Walter Belated Second Birthday challenge-
Anything but a card, Gold + Watercolor challenge with Heather (I have watercolored the Prima Paintable image) and Floral challenge with Lydia

Also entering it in the Artful Crafting- Love challenge.

I hope you liked my post and tutorial. Do leave me your comments/suggestions. I always look forward to them. :)

Friday, February 12, 2016

Winnie and Walter 2nd Birthday Bash!

Hello friends,
I have a card to share today and this was made for the challenges that are taking place at the Winnie and Walter blog for their second birthday bash. There are a couple of fun challenges there and I have chosen to play along with a few :) Here's a look at my card first :

I created this card based on color challenge put by Heather P. The colors she chose for her challenge theme are so my kind of colors that I just had to play along with  it :) 
To make my card, I have used the W&W Thanks die and their floral stamp sets In Bloom: Anna's Flora, In Bloom : Elsa's Flora and In Bloom : Hollie's Festive florals. The stamped sentiment is from The Big, the Bold and You set also from Winnie and Walter.
I have colored the flowers and leaves using a few of PTI inks and Distress inks ..For the chartreuse green and aqua color, I have used the PTI dye inks the coral is from Hero Arts Peach ink and Abandoned Coral Distress ink.
I have very lighty colored my card base using Cracked Pistachio Distress ink and put some gold splatters using Heidi Swapp Color Shine Gold mist.
Used a gold glitter washi on the side of my card to finish it up.

I am entering this card for the following challenges :
Winnie and Walter - Color challenge with Heather P
Winnie and Walter- Floral challenge with Lydia

Peek -a- boo Tic Tac Toe challenge (I've chosen the grid line -Flowers, Gold and Heat embossing)


Hope you like my card. Please do leave me your comments /suggestions ..I love hearing from you :)

Saturday, December 26, 2015

Life is beautiful- Layout

Hello, everyone!
I'm posting after a long time on my blog but have not stopped crafting. I have been posting regularly on the Papericious blog and I will be catching up with all my remaining posts here soon. Today, I have the very gorgeous Infinity Collection from Papericious to share. As soon as I received these papers in my DT kit, I knew it would be perfect for a mixed media layout. The gorgeous prints and the coordinating die cuts are perfect for creating a shabby chic project, so here's a look at what I have made using these beautiful papers.


To create my LO, I selected one of the 12 X 12 " sheet from the Infinity collection and stuck it on a sturdy 12 X 12" cardstock. I, gessoed over the entire paper, once that was dry, I went to work with texture paste and a stencil which I had created using a die cut. Then, I sprayed and colored over my stenciled area with Lindy's Stamp Gang and Heidi Swapp sprays. All the die cuts that I used on this layout, are from the Infinity Collection Die cuts pack itself. I, further embellished it using my handmade flowers and a little bit of stamping on the background to create more texture.
My LO was totally inspired by the Mood Board from Scrap Around the World- December Challenge. The gold glitter, the sentiment- "Future is bright" and the colors of the moodboard are my main inspiration which I've tried to incorporate within my layout.

Here are some close-up pictures for you to see all  the details :


Here's a look at the inspiration picture from Scrap Around the World.

Please don't forget to leave me your comments/ suggestions. I love receiving your feedback. :)

Thursday, November 19, 2015

Best Mom in the world !!

Hello friends,
I have a card to share with you all today which I have created for this time's Altenew challenge From The Craft Room. I was really inspired by the colors and the various elements in the inspiration picture and wanted to capture it in my card. Here's a look at my card first :


And here'a look at the inspiration picture :

I really loved the color scheme of Navy and coral and so I inked up a piece of water color cardstock with distress inks Peacock Feathers and Chipped Sapphire. 
Then, I stamped and white heat embossed the Wild Hibiscus flowers and leaves on a kraft cardstock and colored it using watercolor pencils. First, I laid down a layer of white and then added peach color on top and blended it with a waterbrush, then fussy cut the flowers and leaves and popped them on foam dots.The glittered chevron are die cut using a slate grey Glitter Washi tape.

I wanted to incorporate both the chevron design as well as the glitter of the envelope in my card and these die cut chevron fitted the bill perfectly :)To incorporate the kraft cardstock from the picture I cut a thin piece from the Kraft paper and added it to the side of my card.
I heat embossed the sentiment from the Wild Hibiscus set on a white cardstock using the Ranger Platinum embossing powder and also inked it using Chipped Sapphire Distress ink, then spattered some Heidi Swapp Color Shine Coral color on the top to finish my card.

Hope you like my card. Do leave me your feedback I love hearing from you! :)
Have a nice day everyone !!

Sunday, September 27, 2015

Dream- Mixed Media Canvas

Hello, friends!
I am back again sharing a Mixed Media Canvas I have made using our Papericious's this month's release - "The Vintage Attire" and "The Golden Garden" collections. The Vintage Attire premium collection has some really beautiful prints, perfect for creating any backgrounds and all the Mixed Media fans would love the designs in this pack. I have used the Vintage Attire to create the base of my canvas design by doing paper tearing and layering these papers using Gel Medium, then I gessoed over it. Here's a look at it :


 Close-up of the sentiment and textures :

 To create the background of my canvas, I have layered strips of paper from The Vintage Attire collection by Papericious, then did stenciling using stencils from MFT and Tim Holtz using Wendy Vecchi Embossing paste in white. Once it dried, I used Lindy's Stamp Gang Mists- Hottie Pattotie. I have paper pieced some flowers and leaves from The Golden Garden collection by Papericious  and then embellished it using MDF pieces, a white resin frame and my handmade flowers, and some pollen fillers too.
The sentiment is stamped using Visible image stamp and heat embossed it using White embossing powder on a black cardstock paper. The word 'Dream' are alpha stickers from the Chickaniddy Crafts- Date Night collection which I have colored with Versafine Onyx black ink and added Glossy Accents over it.

My canvas was inspired by the this time's gorgeous inspiration photograph at the Scrap Around the World blog and it measures 10 X 10 inches. Here's a look at the beautiful picture :
I was inspired by the colors, the soft pink and the browns and the beautiful flower on the book and the script background. 
I'm also entering this in the PPS September challenge- Embossing. I've done heat embossing on the sentiment and on the MDF pieces.
I am entering this canvas for this month's STAMPlorations Mixed Media challenge - Sep  ( I have used  stencils on my background )
                                         
I have taken bits of the inspiration picture and included in my canvas. The quote is perfect with the theme of my canvas, too! Taking time to live life does, indeed inspire our work. :)

Hope you like my work. Your comments totally make my day, so do leave me your feedback.
Have a nice day everyone.