Showing posts with label Glitter. Show all posts

Friday, January 17, 2020

Spellbinders January Card Kit of the Month | Love The Moment


Hello there, crafty friends!
I have a couple of cards to share today featuring the January Card Kit by Spellbinders - Love The Moment. If you haven't heard about the Monthly Card Kits by Spellbinders or don't know how to subscribe to one, you can go over to the Spellbinders website and/or blog and read more about them HERE

This "Love The Moment" Kit, like all their other Card Kits, gives you everything you need to create 10 unique cards and even more. You now also get better goodies, including a 40 sheet paper pad, clear stamps, an adorable die set, tons of embellishments, and more!
Card Kit of the Month Membership

I have FIVE Cards to share with you today using this kit, so let's get started!

My first card features the Love the Moment Paper Pad, and the Love the Moment Die Cut Shapes Set.

This month's Card Kit is super gorgeous and I had a ball working with the floral images. To create this card, I picked out a patterned paper from the Love the Moment Paper Pad and adhered it on the right side of my card. Next, I used a couple of floral die cuts from the Love the Moment Die Cut Shapes Set and arranged them together in a cluster to create my focal.

I added a strip of Mirror Gold Cardstock to add some pizzazz to the design. Then, I added a sentiment piece and a butterfly from the Love the Moment Die Cut Shapes Set to complete my card design. I also adhered some pink rhinstones as the finishing touch for my card.


My next card is my favourite of the lot. I LOVE Vintage Cars and this month's "Love The Moment" Kit includes a fabulous die set to create your own customized cars. It is just perfect for creating Masculine Cards!
 My card features the Love the Moment Paper Pad, and the Love the Moment Die Cut Shapes Set, along with the Club Die Set.

I used the Cardstock sheets given in the Card Kit to create my car. Once I die cut and assembled it together, I started working on the background of my card. I pulled out a foiled patterned paper from the Love the Moment Paper Pad and adhered it to the bottom of my card. I also adhered a contrasting background patterned paper which would work well with the rest of my card. Next, I grouped some die cuts from the Love the Moment Die Cut Shapes Set together to create the backdrop for my car. I wanted all the die cuts to be circular in shape, so I die cut certain die cut shapes using the Nestabilities Standard Circles SM Etched Dies and popped them on my card panel using foam dots.

This card was very fun to create and I really enjoyed the process. I always struggle with Masculine Cards and the Die Set in the Card Kit die set offers some great possibilities! 


My third card is made using the Stamp Set included in the kit. I also used the Love the Moment Paper Pad on this card.

The background panel of my card features fussy cut floral motifs from a particular patterned paper design from the Love the Moment Paper Pad. I adhered these images all over my card panel and then trimmed it. Next, I die cut a frame in the centre using the Nestabilities Classic Squares SM Etched Dies. I then adhered two other frames over it to enhance the card design. I used the stamp set included in the Card Kit to stamp on the patterned paper to create the focal for my card.
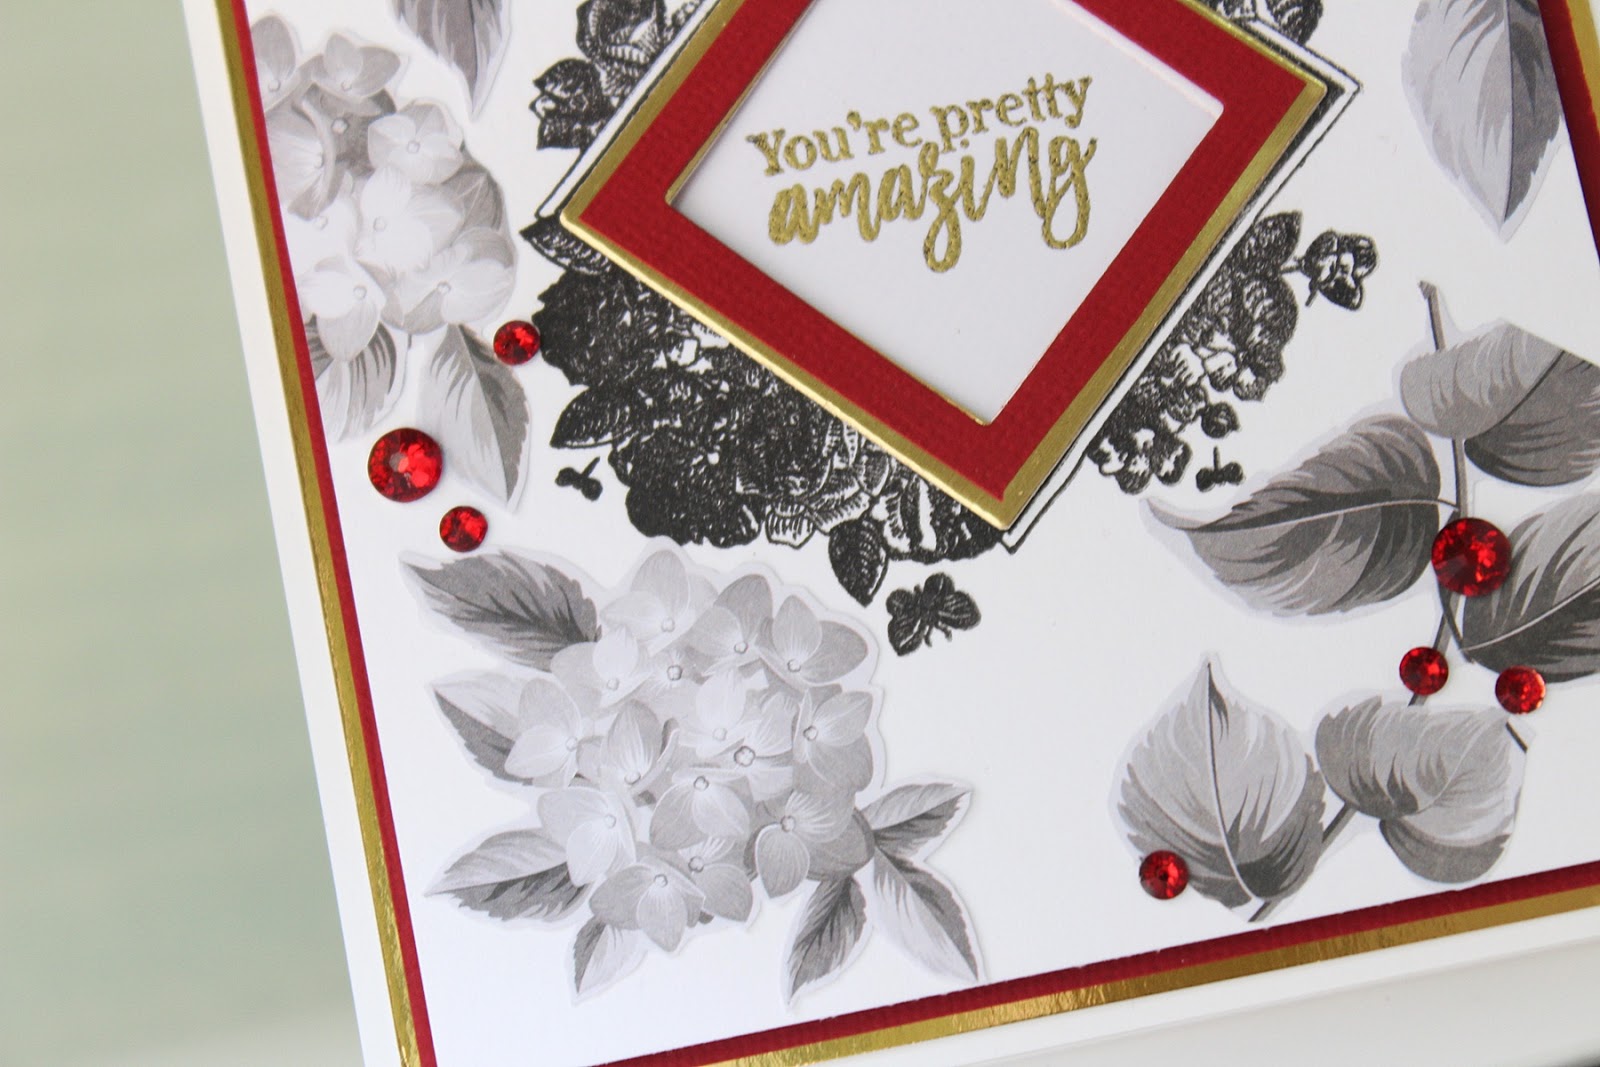
I heat embossed the sentiment in gold to add some glam to my design. My card was almost done here - I simply added some red rhinestones as the finishing touch to my card.


My fourth card features the Love the Moment Paper Pad, and the Love the Moment Die Cut Shapes Set, and the Love the Moment 3 Sheet Sticker Pack.

This card was simple to put together. I again used a foiled patterned paper from the Love the Moment Paper Pad for my card background. Next, I used a 3D sticker from the Love the Moment 3 Sheet Sticker Pack and a couple of other stickers from the same pack to create my card focal. I combined the stickers with some die cuts from the Love the Moment Die Cut Shapes Set to create my design.

I also used gold shimmer leaves included in the Card Kit to add some sparkle and shine to my design. I love how this one turned out!


My last card for today features the Love the Moment Paper Pad, the Love the Moment Die Cut Shapes Set, and the Love the Moment 3 Sheet Sticker Pack.

For this card, I started by embossing a piece of White Cardstock using the Fun Stampers Journey Love Stripes Embossing Folder. Then, I adhered a patterned paper from the Love the Moment Paper Pad on the bottom of my card and a strip of Mirror Gold Cardstock in the centre. I used a number of floral die cut pieces from the Love the Moment Die Cut Shapes Set to create the floral cluster for my card. I also incorporated some gold shimmer paper leaves to balance the card design.

The sentiment was a die cut which was popped on foam dots. I backed the die cut with a gold scalloped circle to add some interest. I also added some sparkly rhinestones to complete my card design.


If you want to find out more about the Club – prices, how you sign up and what’s included, please look ——–> HERE.
I know that I say this every month, but this kit is amazing and so worth the cost! You get everything you need to create AT LEAST ten cards. How awesome is that?!

That's it from me today! I hope you liked my cards using the Spellbinders January Card Kit. If you have a favourite, please do let me know. I would love to hear from you! :)
Thank you so much for stopping by!

Friday, August 2, 2019

Guest Post using CrafTreat Stencils


Hello, everyone!
I have some projects to share today I created using stencils from CrafTreat's April 2019 Release. Without further ado, let's get started!

My first card features the Round Dot Mandala Stencil. I have never worked with Mandala stamps or stencils before, so I was thrilled when I saw this design. To create my card background, I used Prima Marketing's Light Paste mixed with different shades of dye inks to achieve the colour hues I wanted for my card design. Once that was done, I used Papericious' Twinkling Spark Glitter Powder to sprinkle glitter all over the stenciled mandala design. This gave a really subtle yet pretty shimmer to the card. 

To complete my card, I fussy cut a couple of flowers and leaves from Altenew's Botanical Rhapsody Washi Tape and adhered them to my panel using foam dots for added dimension. 

Here's a look at the gorgeous shimmer and texture. I honestly am in love with the sherbet colours. These are my all-time favourites!

To complete the card, I added a sentiment to the centre and matted it on some grey textured cardstock. This was then adhered to an A2 sized top folding card base. 
  

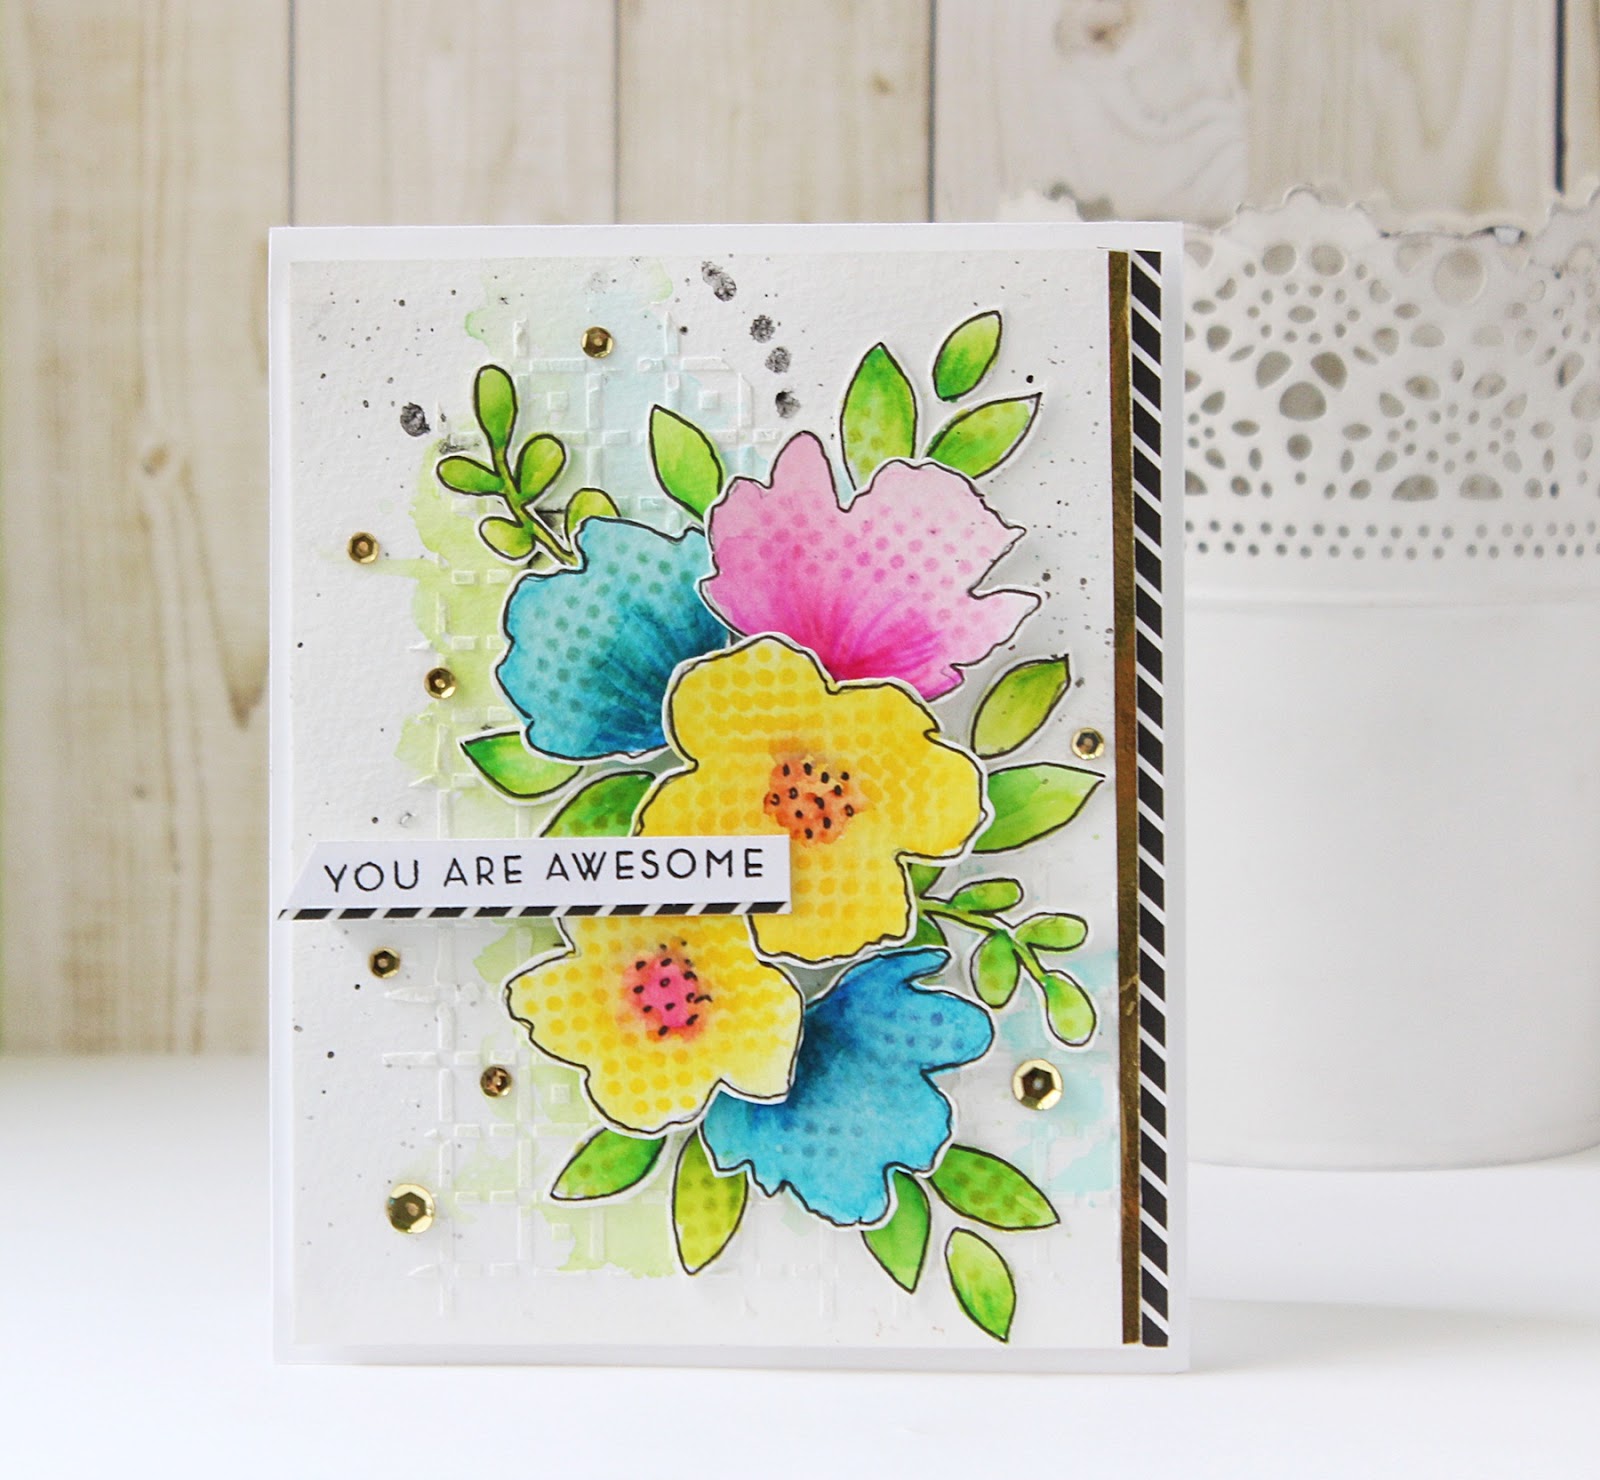
My next card is different from my usual style and is created using the Flower Fusion Positive Dots & Flower Fusion Negative Dots Stencils. This is something really new from CrafTreat and I was really excited to give it a try!

For my card, I wanted to use some fresh and bold colours reminiscent of spring. I started by stenciling my card panel using the Checkered Rose Stencil and Altenew's Modelling Paste. Once that was dry, I lightly watercolored the background.

For my card focal, I stenciled the flowers and leaves from the Flower Fusion Positive Dots & Flower Fusion Negative Dots Stencils. I sketched the outline of both the flowers and leaves using a Black Microtip Pen to add some definition to the design. I fussy cut these out and arranged them on my card panel. I also stamped my sentiment on a banner and popped it up on my card panel.

To accentuate my card design, I added a strip of Gold Mirror Cardstock and Papericious' Monochrome Patterned Paper along the right side of my card. I also added some gold sequins and black paint splatters to finish off my card. 


My third card for today is even more different from my regular cards. The Flower Fusion 2 Step Stencils were quite challenging for me to use and this is my take on them!

For my card, I used the Flower Fusion Step 1 Stencil to stencil the lovely tile design using Altenew Limestone Dye ink. My next step was to stencil the flowers over this background. I would like to say this here, that it is absolutely not necessary to use both these stencils together, you may just stop at one step or use both. That's the beauty of them! I went ahead with the Step 2 stencil and coloured the flowers and leaves using Prismacolor Pencils. 

I didn't want to take the focus away from the amazing background so I kept the rest of the card simple. I stamped the first half my sentiment on a banner and the other directly on the panel. I added some clear sequins for the finishing touches. I matted this panel onto some Gold Mirror Cardstock which was then adhered finally to an A2 sized top folding card base.

There are various ways you could use these Flower Fusion stencils! I really love that tile background and can see myself using it on a lot of projects. By the way, I am sorry that the Gold Mirror Cardstock is not reflecting in this picture. It's not a dark brown cardstock. :)


Now, I have some Gift Tags to share with you using the Flower Fusion Triangles Stencil. I have masked and used only a small portion of the stencil on the tags, but it adds so much to the design. Here's a look at them:

 I used the Flower Fusion Triangles Stencil and Altenew's Limestone Dye ink for stenciling on the bottom of the tags. Once that was done, I die cut and coloured the flowers and leaves and added them to the gift tags. All that was need to complete them was a sentiment, and that's it. They were done! 

These were really simple to put together and are great for mass producing or creating in bulk.


My final project for today is a Money Wrap. I love creating them and wanted to do something slightly different on this one, so I combined stenciling with Foamiran flowers. I used the Beaded Flourish Stencil for creating that flourish design on the patterned paper. Then, I embellished my wrap with a handmade Foamiran rose and some filler flowers and foliage. 

I tend to create very elaborate designs, but if you don't want to do that, you can make it simple by cutting down on the number of filler flowers and foliage. The stenciled design makes for a great background for envelopes and you can use it in different ways to achieve different results!

That brings me to the end of this post! I hope I gave you some ideas to use these stencils. I would like to thank Priya and her team for inviting me to guest design on the CrafTreat blog. This post was supposed to go live back in April, but I couldn't send it across at that time, so I am finally sharing these projects now. I hope you liked them! :)

Supplies Used:


If you have any questions regarding any of the projects or the supplies used, please don't hesitate to ask me in the comments section below. I would be happy to help you out.

Have a lovely day, you all!

Friday, May 17, 2019

Spellbinders + Amazing Paper Grace Die of the Month | May 2019


Hello, crafty friends!
I have a card to share today featuring the Spellbinders + Amazing Paper Grace May Die of the Month. This month's Nostalgic Serenade Card Frame Die Set is perfect for making gorgeous cards and more. Many of the monthly die sets will include options to make 5 x 7 cards, while the inlays and accessories include options for smaller presentations. Becca Feeken, the designer of these exquisite die sets, has shared some fabulous inspiration and ideas using this month's kit on her blog, which I highly recommend checking out. HERE is a link to her blog post. 

If you want to find out more about the Club – prices, how you sign up and what’s included, please look ——–> HERE. These dies are only available through the Club and are limited to the month of May, so hurry before they are sold out.


Now, let's have a look at my card. I tried to keep it simple and sweet and let the focus be on the elegant die cuts.

I love creating layered cards as such because they really make the dies the star of the show! To create my card, I first started by die cutting all the frames included in the set from Cream Cardstock. I cut out multiples of the largest frame, so that I could stack them one on top of the other for a raised look. Once I adhered all the frames in place, I started working on the embellishments for my card.

If you have been following me for a while now, you would know know, that I absolutely love creating my own handmade flowers. This time, I decided to create a paper rose using the Cinch and Go Flowers III Etched Dies. I die cut the flowers from White 80 LBS Cardstock, embossed them, and inked the petals using dye inks. The leaves are also a part of the same set and were lightly inked in green to complement the bright pink rose. The tiny flowers that you along the sides are made using the smallest flower die from the Cinch and Go IV Etched Dies. I used some Crystal Clear Glitter from Papericious for some sparkle and shine on the rose.

I added some rose buds and handmade filler flowers to complete my floral arrangement. Lastly, I stamped my sentiment on the smallest die cut piece which is from an older stamp set by Becca Feeken. And that's it! This card was finished!

Amazing Paper Grace Die of the Month Membership
If you are still on the fence about the Amazing Paper Grace Die of the Month Membership, do check out the other project samples created using it on the Spellbinders blog. The dies are total value for money and the cost of the kit includes shipping cost within USA. Isn't that awesome?!

That's it from me today! I hope you liked my card. If you did, please do let me know in the comments below. I always love hearing from you.

Thank you so much for your visit to my blog today!
Have a great day ahead!

Saturday, November 3, 2018

Guest Post using CrafTreat Stencils | Part Two


Hello everyone!
I am back to share some projects I made using the amazing stencils from CrafTreat's September 2018 Release. I am in love with their layered florals and amazing background stencils. So much variety to work with here! I have a total of SIX projects to share today, so let's dive right into it!


I have used the Tropical Leaves stencil for my first card. This is such a fun stencil and is so versatile to work with!


To create this card, I began by die cutting a scalloped circle frame from Neenah Classic Crest Solar White cardstock. Once the frame was die cut, I used two inks from Altenew's Tropical Forest Mini Dye inks to color the background using the Tropical Leaves stencil.


Next, I stamped, coloured, and fussy cut some animals and placed them on my card base where I had cut out the circle frame. I also fussy cut some leaves and popped them on foam dots to add some dimension to my card. I added a stamped and die cut sentiment to finish off my card.


Card Two - CrafTreat Stencils - 2 Step Peony & Tropical Leaves


I love combining my craft supplies to give them a new look and that's what I did for this card as well. I used two stencils - 2 Step Peony & Tropical Leaves to create this card. 


The peonies were coloured using Altenew's Rose Petal inks. I coloured, fussy cut them, and placed them on my light blue ink blended background to create the focal for my card. I used the Tropical Leaves stencil for creating the leaves on my card. I coloured them using Altenew's Tropical Forest Mini Dye inks and then fussy cut them to place on my card panel. 


I also added a mix of some Altenew filler flowers (from the Beautiful Day stamp set) to give a fuller look to the arrangement. I added a piece of black and white patterned paper on the bottom of my card which is from Papericious' Monochrome paper pack. Finally, I stamped a sentiment on my card panel and that's about it! I love how this card came together!


Next up, I am sharing a set of two bookmarks I made using the CrafTreat Stencil - Lily and Iris.

I really loved how these turned out! They make for such pretty gifts to be given to any bookworm! To create these bookmarks, I used the Lily and Iris stencil with the Tombow Colorless Blending Pen and dye inks to stencil the designs on the bookmarks. I used a colorless blending pen here so that it would add a soft look to the design. If you don't have dye inks in your stash, you can work with Distress inks as well. Distress inks are very vibrant in nature, but when used with a colorless blending pen give you very beautiful results.


I used Altenew's Shades of Purple Mini Dye inks + Distress ink - Twisted Citron + Tombow Colorless Blending Pen to create the bookmark on the left, while I used Distress inks: Peacock Feathers & Twisted Citron + Tombow Colorless Blending Pen to create the bookmark on the right. I wanted to leave them as is, but then decided to add some black paint splatters and a stamped sentiment to complete the look. 


Lastly, I have two money envelopes to share I made using stencils. These stencils can be used to create a lot of interesting designs on the background of envies. Here's how I used them!

Money Envelope One - CrafTreat Stencils - Leaf Pattern Background & 2 Step Peony.

I have to admit, this envelope isn't one of my favourites, because I ended up making a major mistake in the background. I wanted the coral flowers to have a grey backdrop, but unfortunately the grey ink I used turned out to be a dark grey which almost looks like black. But I still wanted to share it with you all to give you an idea on how to creatively stretch your stencils. I used the 2 Step Peony stencil to create the flowers on my envelope. I coloured and fussy cut them and placed it on a oval lace die cut. The background for the envelope was made using the Leaf Pattern Background stencil.


This is how the flap of the envelope looks. I extended the design to the back as well to give it a more finished look. The small rose bunch is made using the Mini Rose Background stencil.


This envelope is more of my usual style and I am happy with the way it turned out! I used Sakura Modelling Paste mixed with Papericious Rajni Chawla's - Crystal Clear Glitter to create a white sparkly paste, and used this paste with the Daisy Background stencil to create the background. Once it dried, I used Distress inks - Squeezed Lemonade and Spun Sugar to create a watercolour splash on the background.


Here's how the background looks. The Papericious Crystal Clear Glitter adds a subtle shimmer to the background.


And here's how the flap of this envelope looks. I followed the same method to create the background even here. Doesn't it look pretty? 


I hope you liked my projects and found them inspirational. If you liked them, please do leave a comment below. I would love to hear from you! If you have any queries regarding any of the products or techniques used on my prooejcts, please feel free to ask me.

Thank you so much for stopping by!