Hello, crafty friends!
It's the start of a new month which means it's time for a NEW Card Kit from Spellbinders. I have a couple of cards to share today featuring the August 2020 Card Kit by Spellbinders - Around The World. If you haven't heard about the Monthly Card Kits by Spellbinders or don't know how to subscribe to one, you can go over to the Spellbinders website and/or blog and read more about them HERE.
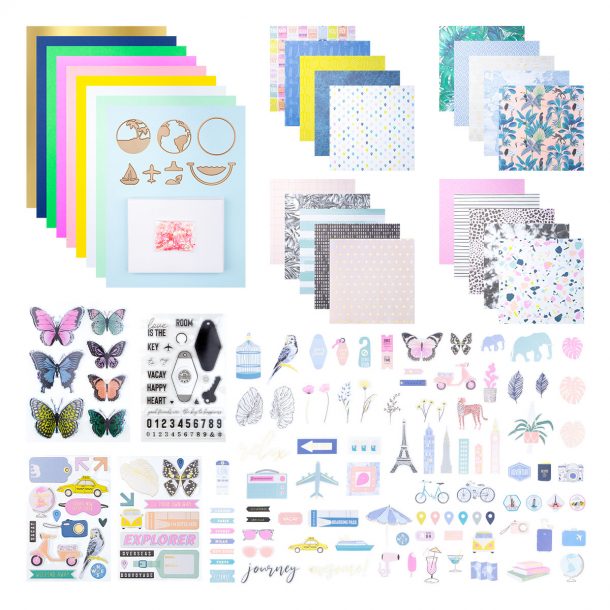
This "Around The World" Kit, like all their other Card Kits, gives you everything you need to create 10 unique cards and even more. You now also get better goodies, including a 40 sheet paper pad, clear stamps, an adorable die set, tons of embellishments, and more!
I have FIVE Card ideas to share with you today using this kit, so let's get started!


Card #1
My card uses the Around the World Paper Pad, Around the World Die Cut Shapes Set, Around The World Clear Stamp Set, and the exclusive dies in this month's Card Kit.

I LOVE the dies in the Card Kit this month as they're simply fabulous and so apt for the times we are living in. It kind of made me feel like I was traveling while crafting which is something we all would like to do during these extended periods of lockdown. I hope we can all get back to traveling like before. :) When I first saw the die set, I instantly knew that I wanted to create a Spinner Card using the main globe die from the set. For my card, I started by die cutting the different pieces of the globe from Navy Blue Cardstock and Brush Gold Cardstock. I assembled it together, adhering the gold inlay pieces on both sides of the circle because this was going to be a Spinner Card, and both sides would show. I also die cut a tiny heart and an aeroplane from Red Cardstock and adhered them to the front of the die cut piece in order to add some interest to my design.

Then, I took a folded White Notecard from the Card Kit and die cut a circle in the centre of the panel using the Nestabilities Standard Circles LG Etched Dies. Next, I adhered the globe circle die-cut on some Journey Twine Licorice Twist and kept it aside to dry for some time. In the meantime, I took a piece of foiled pattern paper from the Around the World Paper Pad and die cut a circle from it using the same Nestabilities Standard Circles LG Etched Dies. I did this so that I could sandwich the twine in between the card base and the foiled pattern paper to provide for the spinner effect. Once the die cut had stuck firmly to the twine, I adhered the twine to my card base, and then the patterned paper over it to create the front of the card.

To make the globe look more complete, I die cut some of the coordinating accent pieces from Brush Gold Cardstock and adhered them to the patterned paper. I love the glitz the gold cardstock offers!

The sentiment is from the Around The World Clear Stamp Set. I heat-embossed it in gold on a die cut banner of Navy Blue Cardstock. I added a small red heart as well for more interest. To finish off my card, I added a die cut piece from the Around the World Die Cut Shapes Set underneath my sentiment banner. I love how this one turned out. I think it's pretty cool - What do you think?!

Card #2
My second card uses the Around The World Clear Stamp Set, and the exclusive dies in this month's Card Kit.

I love CAS cards, but I often find them very difficult to make. This is my take on one, albeit with loads of dimension! :D To create this card, I first took a piece of White Cardstock from the Card Kit and die cut a circle from the centre of the paper using a circle die from the Nestabilities Standard Circles LG Etched Dies.
Next, I took another piece of White Cardstock and repeated the earlier process, but I used a slightly smaller circle die this time. I adhered the smaller circle panel to my card base using Journey Craft Glue, while for the panel with the larger circle die cut, I foam mounted the panel for dimension and depth.

For the focal of my card, I decided to create a mini watercoloured scene. I die cut a circle from Brustro Cold Pressed Watercolour Paper and adhered it down to the panel using foam dots. Next, I die cut the sailboat, trees, and waves using the dies from the Card Kit and coloured them using Zig Brush Markers. I assembled them on the circle die-cut, and watercolored the sky and some birds for added interest. I popped one of the waves on foam tape for more depth. I also die cut the axis of the globe from Brush Gold Cardstock and adhered it to my panel.

I stamped my sentiment and the lil' elements directly on my card panel using a variety of different ink colours. I used the Around The World Clear Stamp Set for it.

Card #3
My next card uses the Around the World Paper Pad, Around the World Die Cut Shapes Set, Around The World Clear Stamp Set, and the exclusive dies in this month's Card Kit.

For this card, I started by selecting a patterned paper print from the Around the World Paper Pad, which I then adhered to my White Notecard. Next, I cut out some coordinating mat layers from Brush Gold Cardstock and White Cardstock and adhered them over my card base.

For my card focal, I die cut the various components of the globe from Brustro Cold Pressed Watercolour Paper and Brush Gold Cardstock. I watercolored the main piece using Zig Brush Markers and then adhered it to the panel using foam tape. I also added a red die-cut heart, a sentiment tab piece from the Around the World Die Cut Shapes Set, and an aeroplane die cut and adhered them over the watercolored circle die cut using foam dots. Then, I adhered the stand for the globe which was die cut from Brush Gold Cardstock on my main panel.

I picked out a die cut piece from the Around the World Die Cut Shapes Set and popped it on my panel using foam dots. I finally stamped my sentiment on my card panel, which is from the Around The World Clear Stamp Set.

Card #4
My card uses the Around the World Die Cut Shapes Set, and Around The World Clear Stamp Set.

This card was so simple to put together and it hardly took me time to create it as well! To start with, I took a piece of Bristol White Paper and added some light watercolour washes to it using Distress Inks - Tumbled Glass and Mowed Lawn. Once I was happy with the way it looked, I die cut the panel using a Stitched Rectangles Die.

To embellish my card, I used some wildflower die cut pieces from the Around the World Die Cut Shapes Set which were adhered to the panel using foam dots. I also stamped some birds using Black Licorice Ink and added paint splatters in blue to add cohesiveness to the design.

The sentiment is from the Around The World Clear Stamp Set and was stamped on a strip of White Cardstock using Black Licorice Ink. I die cut another strip from Brush Gold Cardstock and added it to the edge of the white strip for more interest. I foam mounted the panel to my card base and it was done!

Card #5
My last card uses the Around the World Die Cut Shapes Set, and Around The World Clear Stamp Set.

I wanted to keep this one simple and effective and I quite like how it worked out. To begin, I took a piece of White Cardstock and used the Fun Stampers Journey Love Stripes Embossing Folder to emboss my panel. This is one of my favorite folders and I love using it to add some texture to my card backgrounds. When I embossed my piece this time, it dawned on me, that with a little tweaking I could use it to create a gingham background. In order to do so, I simply turned the paper while it was still in the folder, and again embossed it to create this gingham pattern. Even though the embossing is really subtle, I like how it looks.

Next, I die cut a circle from this embossed panel to create an aperture. I used the Spellbinders Nestabilities Standard Circles LG Etched Dies for it. I added a piece of Mint Cardstock behind the panel to accentuate the look. Then, I sorted through the die cuts from the pack and decided to use these two identical die cut pieces from the Around the World Die Cut Shapes Set and adhered them to my panel.

The sentiment is from the Around The World Clear Stamp Set and was stamped directly on the panel using Black Licorice Ink. I mounted this panel to a piece of Brush Gold Cardstock, which was then finally adhered to my card base. For the finishing touch, I added some clear sequins.

I have FIVE Card ideas to share with you today using this kit, so let's get started!


Card #1
My card uses the Around the World Paper Pad, Around the World Die Cut Shapes Set, Around The World Clear Stamp Set, and the exclusive dies in this month's Card Kit.

I LOVE the dies in the Card Kit this month as they're simply fabulous and so apt for the times we are living in. It kind of made me feel like I was traveling while crafting which is something we all would like to do during these extended periods of lockdown. I hope we can all get back to traveling like before. :) When I first saw the die set, I instantly knew that I wanted to create a Spinner Card using the main globe die from the set. For my card, I started by die cutting the different pieces of the globe from Navy Blue Cardstock and Brush Gold Cardstock. I assembled it together, adhering the gold inlay pieces on both sides of the circle because this was going to be a Spinner Card, and both sides would show. I also die cut a tiny heart and an aeroplane from Red Cardstock and adhered them to the front of the die cut piece in order to add some interest to my design.

Then, I took a folded White Notecard from the Card Kit and die cut a circle in the centre of the panel using the Nestabilities Standard Circles LG Etched Dies. Next, I adhered the globe circle die-cut on some Journey Twine Licorice Twist and kept it aside to dry for some time. In the meantime, I took a piece of foiled pattern paper from the Around the World Paper Pad and die cut a circle from it using the same Nestabilities Standard Circles LG Etched Dies. I did this so that I could sandwich the twine in between the card base and the foiled pattern paper to provide for the spinner effect. Once the die cut had stuck firmly to the twine, I adhered the twine to my card base, and then the patterned paper over it to create the front of the card.

To make the globe look more complete, I die cut some of the coordinating accent pieces from Brush Gold Cardstock and adhered them to the patterned paper. I love the glitz the gold cardstock offers!

The sentiment is from the Around The World Clear Stamp Set. I heat-embossed it in gold on a die cut banner of Navy Blue Cardstock. I added a small red heart as well for more interest. To finish off my card, I added a die cut piece from the Around the World Die Cut Shapes Set underneath my sentiment banner. I love how this one turned out. I think it's pretty cool - What do you think?!

Card #2
My second card uses the Around The World Clear Stamp Set, and the exclusive dies in this month's Card Kit.

I love CAS cards, but I often find them very difficult to make. This is my take on one, albeit with loads of dimension! :D To create this card, I first took a piece of White Cardstock from the Card Kit and die cut a circle from the centre of the paper using a circle die from the Nestabilities Standard Circles LG Etched Dies.
Next, I took another piece of White Cardstock and repeated the earlier process, but I used a slightly smaller circle die this time. I adhered the smaller circle panel to my card base using Journey Craft Glue, while for the panel with the larger circle die cut, I foam mounted the panel for dimension and depth.

For the focal of my card, I decided to create a mini watercoloured scene. I die cut a circle from Brustro Cold Pressed Watercolour Paper and adhered it down to the panel using foam dots. Next, I die cut the sailboat, trees, and waves using the dies from the Card Kit and coloured them using Zig Brush Markers. I assembled them on the circle die-cut, and watercolored the sky and some birds for added interest. I popped one of the waves on foam tape for more depth. I also die cut the axis of the globe from Brush Gold Cardstock and adhered it to my panel.

I stamped my sentiment and the lil' elements directly on my card panel using a variety of different ink colours. I used the Around The World Clear Stamp Set for it.

My next card uses the Around the World Paper Pad, Around the World Die Cut Shapes Set, Around The World Clear Stamp Set, and the exclusive dies in this month's Card Kit.

For this card, I started by selecting a patterned paper print from the Around the World Paper Pad, which I then adhered to my White Notecard. Next, I cut out some coordinating mat layers from Brush Gold Cardstock and White Cardstock and adhered them over my card base.

For my card focal, I die cut the various components of the globe from Brustro Cold Pressed Watercolour Paper and Brush Gold Cardstock. I watercolored the main piece using Zig Brush Markers and then adhered it to the panel using foam tape. I also added a red die-cut heart, a sentiment tab piece from the Around the World Die Cut Shapes Set, and an aeroplane die cut and adhered them over the watercolored circle die cut using foam dots. Then, I adhered the stand for the globe which was die cut from Brush Gold Cardstock on my main panel.

I picked out a die cut piece from the Around the World Die Cut Shapes Set and popped it on my panel using foam dots. I finally stamped my sentiment on my card panel, which is from the Around The World Clear Stamp Set.

Card #4
My card uses the Around the World Die Cut Shapes Set, and Around The World Clear Stamp Set.

This card was so simple to put together and it hardly took me time to create it as well! To start with, I took a piece of Bristol White Paper and added some light watercolour washes to it using Distress Inks - Tumbled Glass and Mowed Lawn. Once I was happy with the way it looked, I die cut the panel using a Stitched Rectangles Die.

To embellish my card, I used some wildflower die cut pieces from the Around the World Die Cut Shapes Set which were adhered to the panel using foam dots. I also stamped some birds using Black Licorice Ink and added paint splatters in blue to add cohesiveness to the design.

The sentiment is from the Around The World Clear Stamp Set and was stamped on a strip of White Cardstock using Black Licorice Ink. I die cut another strip from Brush Gold Cardstock and added it to the edge of the white strip for more interest. I foam mounted the panel to my card base and it was done!

Card #5
My last card uses the Around the World Die Cut Shapes Set, and Around The World Clear Stamp Set.

I wanted to keep this one simple and effective and I quite like how it worked out. To begin, I took a piece of White Cardstock and used the Fun Stampers Journey Love Stripes Embossing Folder to emboss my panel. This is one of my favorite folders and I love using it to add some texture to my card backgrounds. When I embossed my piece this time, it dawned on me, that with a little tweaking I could use it to create a gingham background. In order to do so, I simply turned the paper while it was still in the folder, and again embossed it to create this gingham pattern. Even though the embossing is really subtle, I like how it looks.

Next, I die cut a circle from this embossed panel to create an aperture. I used the Spellbinders Nestabilities Standard Circles LG Etched Dies for it. I added a piece of Mint Cardstock behind the panel to accentuate the look. Then, I sorted through the die cuts from the pack and decided to use these two identical die cut pieces from the Around the World Die Cut Shapes Set and adhered them to my panel.

The sentiment is from the Around The World Clear Stamp Set and was stamped directly on the panel using Black Licorice Ink. I mounted this panel to a piece of Brush Gold Cardstock, which was then finally adhered to my card base. For the finishing touch, I added some clear sequins.

If you want to find out more about the Club – prices, how you sign up and what’s included, please look ——–> HERE.
The Card Kits for Spellbinders Monthly Clubs are exclusive to Spellbinders and you won't find them anywhere else, so be sure to gets yours before it gets sold out! If there are any leftovers, they are added to the Spellbinders store for sale at full price after a few months. You can see all of the past Card Kits HERE.
If you'd like to see some more project inspiration using the Card Kit, check out THIS super helpful YouTube video that has some awesome card ideas using the Card Kit.
That's it from me for today! I hope you liked my cards. Let me know if you have any favourite(s)! I would love to hear from you.
If you would like to see more of my work using Spellbinders, do follow my Instagram page - @hussena_cal
Thank you so much for your visit to my blog today!


No comments:
Post a Comment