Hello, crafty friends!
I'm so honoured to be guest posting today on the Spellbinders blog using dies from the new Garden Shutters Collection by Becca Feeken. This is a very unique collection that can be used to create a fun element of motion. It creates a beautiful card, and with one pull of a tab, the shutters open to reveal a sweet surprise sentiment, but the die layers can really be used on any kind of card!

I had to start out by trying my hand at one of the classic Garden Shutters cards first. The Butterfly Bliss Garden Shutters 5 x 7" Card Base Etched Dies was the first set to catch my eye and I had to use it to create a delicate and feminine encouragement card for a friend. I also used elements from the Eyelet Lace Frame Etched Dies and the Primrose Heart Façade Etched Dies to embellish my card.

To create my card, I first die-cut Snowdrift Cardstock three times using the kinetic layer die in the Butterfly Bliss Garden Shutters 5 x 7" Card Base Etched Die Set. I folded the layers following the instructional PDF HERE and adhered down the layers using liquid adhesive to my already die-cut 5" X 7" card base. It did take me a while to get the configuration right, but once you get the hang of it, these will be a breeze to make! Next, I die cut Snowdrift Cardstock and Mirror Gold Cardstock using the Decorative Rectangle Insert Die from the Butterfly Bliss Garden Shutters 5 x 7" Card Base Etched Die Set. I adhered the layers together using liquid glue, allowing a bit of the gold to show as a shadow.

Then, to embellish my card, front I die cut Snowdrift Cardstock using the butterfly and primrose dies from the Butterfly Bliss Garden Shutters 5 x 7" Card Base Etched Die Set and Primrose Heart Façade Etched Dies. I used Copic Markers to colour and shade the die-cut pieces, but you can also cut out the pieces from colored cardstock and assemble them together. I also die cut the body of the butterflies from Mirror Gold Cardstock for interest. Next, I used Gold Hot Foil to foil Onyx Cardstock using one of the sentiments from the Mini Sincere Sentiments Glimmer Hot Foil Plate and cut it out using the coordinating die. I adhered the piece onto my panel using foam tape for a raised effect.


Next, I die cut Waterfall Cardstock with the Scallop Rim and Outer Eyelet Insert Dies in the Eyelet Lace Frame Etched Die Set and adhered it on the front of the card base with liquid adhesive. Then, I die cut Waterfall and Mirror Gold Cardstock using the Pull Tab dies and adhered it to the back of the top front piece of the card to create the interactive motion for the card. When the recipient pulls on the top tab, the shutters open and the scene assembles itself almost magically. It's such a joy to look at how it works! I adhered down the various die-cut elements using foam adhesive for depth and dimension and completed the card by adhering down my card front panel to a side-folding Waterfall card base.

If you're not a fan of 5" X 7" Cards and would like something more petite and pretty, the Daisy Delight Garden Shutters A2 Card Base Etched Dies is just the set for you! Here I used the interactive A2 (4.25 x 5.5-inch) card base to create a soft floral birthday card.

To create my card, I die cut A2-sized Alabaster Cardstock thrice using the kinetic layer die included in the Daisy Delight Garden Shutters A2 Card Base Etched Die Set. Once the base of my card was die-cut and ready, I folded the layers following the instructional PDF HERE and adhered down the layers using liquid adhesive to my already die-cut A2 card base. Next, I die cut Pink Sand and Alabaster Cardstock using the Design Rectangle outline and insert Dies from the Daisy Delight Garden Shutters A2 Card Base Etched Die Set. I adhered down the layers to the front and back of the shutter layers for interest and then proceeded with embellishing the card front.

I die-cut Snowdrift Cardstock using the Angled and Side Flower Dies and the Stem Dies from the Daisy Delight Garden Shutters A2 Card Base Etched Die Set. I coloured the individual die-cut pieces using Copic Markers, adding some simple shading to each die-cut, however you can always use Distress inks or Watercolour Brush Markers too if you like.

Next, I die cut Mirror Gold Cardstock using the 'Happy Birthday To You' Dies from the Daisy Delight Garden Shutters A2 Card Base Etched Die Set and adhered it down on my card panel using liquid adhesive. For the reverse layers, I die-cut Snowdrift Cardstock using the Angled and Side Flower Dies and the Stem Dies and Butterfly 2 Dies from the Daisy Delight Garden Shutters A2 Card Base Etched Die Set and Butterfly Bliss Garden Shutters 5 x 7" Card Base Etched Die Set. Once again, I coloured the pieces with Copic Markers and did some light shading and blending on the daisies for interest.

Then, I die cut Graphite Cardstock with the A2 Card Base included in the Daisy Delight Garden Shutters A2 Card Base Etched Die Set. Next, I die-cut the kinetic layer die from the set twice to create a frame for my card and adhered it on the front of the card frame piece with liquid adhesive. Next, I die cut Alabaster Cardstock using the Large Rectangle Outer Rim and Insert Die together from the Fluted Classics Rectangles Etched Dies and adhered the piece down onto my panel with liquid adhesive. I also die-cut Pink Sand Cardstock using the Pull Tab dies included in the Butterfly Bliss Garden Shutters 5 x 7" Card Base Etched Die Set and adhered it to the back of the top and bottom frame piece to create the interactive motion for the card.
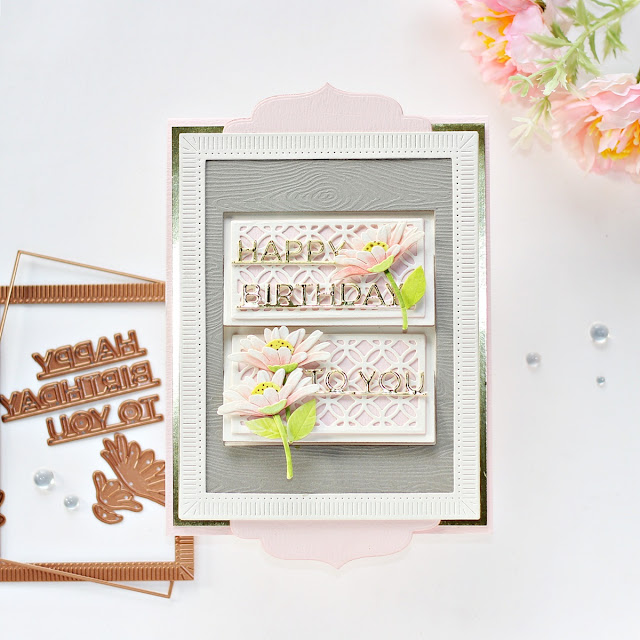

I adhered down all the different die cut elements to the card front using foam adhesive and matted the entire panel with Mirror Gold Cardstock. Then, to finish, I adhered the card front to a top-folding Pink Sand card base with tape runner. The layers in the set make it effortless to create a distinctive card! These cards can easily be mass-produced as well if you would like to create and give these cards to your friends and/or family members. There is something about interactive cards that appeals to all age groups. It's so rewarding to create them too!

If you don’t want to create kinetic cards, this collection also has some gorgeous accessory die sets! I used the Eyelet Lace Frame Etched Dies and Primrose Heart Façade Etched Dies and lots of intricate layers to create this floral congratulations card.

For my card, I began by creating a top-folding A7-sized card base out of Pink Sand Cardstock by trimming it to 7” x 10” and scoring it down the center. Next, I die-cut Alabaster Cardstock using the Scallop Rim and Outer Eyelet Insert Dies from the Eyelet Lace Frame Etched Dies. Next, I die-cut Alabaster Cardstock using the Inner Rectangle Outline and Eyelet Insert Dies from the same set and layered it over the intricate die-cut frame with foam adhesive. Then, I cut Alabaster Cardstock using the smallest Inner Rectangle Outline and Inner Inner Oval Outline Dies and popped it over the die-cut panel using foam adhesive.

Once my card layers were in place, I die-cut Snowdrift Cardstock using the flower layer and leaf dies from the Primrose Heart Façade Etched Dies. I inked the centre of the petals using Coral, while the tips and the centres of the leafy branches were colored using Seaweed and Siren. I die-cut some additional foliage from Snowdrift Cardstock using dies from the Flourished Fleurit Die Set and the Sweet Cottage Flowers Etched Dies and coloured them using the same colours as above.

Next, I die cut Alabaster Cardstock and Mirror Gold Cardstock using the Inner Oval Outline Die from the Eyelet Lace Frame Etched Dies. I used the negative die-cut piece to stamp a sentiment from the All Occasion Sentiments Stamp and Die Set in Versafine Onyx Black ink and adhered the layers together using liquid glue, allowing a bit of the gold to show as a shadow. I then popped it on the die-cut panel using foam adhesive for dimension. Then, to finish, I adhered all the flowers and leaves down to the left of my panel using a combination of foam adhesive and liquid adhesive.


SPELLBINDERS SUPPLIES:
CS-005, CS-017, CS-024, CS-027, CS-030 SCS-118, SDS-166, SDS-167, S4-1025, S5-479, S5-484, S6-183, S6-184, GLP-288, DOMAPG-OCT21, GLF-014, GLS-003EUK, JD-041, PCGO4E, PE-100, T-021, AD-0084
OTHER SUPPLIES:
Neenah Solar White Cardstock, Copic Markers, Peeled Paint, Picked Raspberry, Twisted Citron Distress Inks, Versafine Onyx Black Ink, Sponge Daubers, MISTI Stamping Tool, Tape Runner, White Fun Foam Sheets
I hope you enjoyed this set of layered floral cards featuring the Garden Shutters Collection and are inspired to give it a try. Thank you so much for stopping by today!
You can find more inspiration over at my Instagram page.


these are all beautiful I just love how you used the flowers with them!
ReplyDelete