Hello everyone!
I am really excited and honoured to be guesting on the Spellbinders Paper Arts blog this month. I have two cards to share today I made using dies from the Romancing The Swirl collection by Amazing Paper Grace/Becca Feeken. This collection has some beautiful dies which are perfect for making shaped cards, and today I will be sharing one such card I made using these dies. Let's have a look at my card first:


To create this shaped card, I first took a sheet of White 8.5" X 11" heavyweight cardstock and cut the base of my card using the frame outline die from the Spellbinders Ringlet Round Etched die set. Once my card base was cut, I die-cut the lacy frame outline from the same Ringlet Round Etched die set, first from some white paper, next from some white fun foam, and lastly from gold mirror cardstock. I adhered all the three layers using liquid adhesive to form my card front. It is very difficult to capture the foil on camera, and in most pictures, it looks like I have used dark brown cardstock, but that's not the case :(

Next, I wanted to add some pink polka dots pattern paper to the center of my card front. I die-cut the pattern paper using the inside frame outline die from the same set, and then once again from white fun foam so that my pattern paper would have a raised look.

To further accentuate my design, I added a elegant frame which was cut from gold mirror cardstock, and adhered onto my pattern paper. This die is also from the same set I used to create my card base - Spellbinders Ringlet Round Etched die set. Each and every die in this entire collection is so thoughtfully designed, and all the dies coordinate with each other so beautifully!

Once I adhered my frame, I wanted to add a sentiment to my card. I decided to use the Nestabilities Curvy Labels Etched dies for my sentiment piece. I stamped my sentiment using Versafine Onyx Black ink on the die-cut piece, lightly inked the edges using pink dye ink and popped the piece on foam tape for dimension.

It was now time to embellish my card, which also happens to be my most favorite part while making cards. :) I first made a bow from some White Seam Binding Ribbon and adhered it to the left side of my card, because I knew I would be placing my floral cluster over it, and I just wanted a little bit of the ribbon to show through. For making my handmade flowers, I used Foamiran sheets with the Card Creator A2 Corner Cotillion Dies set. I die cut both the flowers and leaves from white Foamiran sheets. I also cut some extra flowers so that I could create my own filler flowers.

The central flower was made by lightly inking the centers of the die cut pieces using pink dye ink, and then heating them with the help of an iron to give it a fuller look. I also added a bunch of thread pollens to give it a more realistic touch. I lightly inked the leaves using a green dye ink and heat set them so that they would have a curled look. I adhered everything on my card base with the help of a Hot Glue Gun.

I used the exact same techniques for creating my filler flowers. This time I used lesser number of die cut pieces so that the flowers wouldn't be as big as my main flower.


The flowers add lots of dimension to this card, and I love how beautiful they look against the gold mirror cardstock.


My second card for today incorporates lots of layering. Here's a look at it:

To create my card, I first took a pre-scored and cut A2 white card base. I wanted my card front to have a nice and elegant card frame, so I decided to go with the large panel pattern die from the Card Creator A2 Corner Cotillion Dies set. I cut the die from regular white cardstock. I then adhered some blue textured cardstock behind my frame so that the intricate pattern would show up clearly.

I wanted to have an intricate design behind my Hemstitch Circle piece, so I decided to stretch my frame pattern die from the Flourished Square Etched die set to come up with this design on the top and bottom of my card. I die cut it from gold mirror cardstock and then snipped the die cut into four pieces so that I could tuck in two pieces behind the circle die cut.
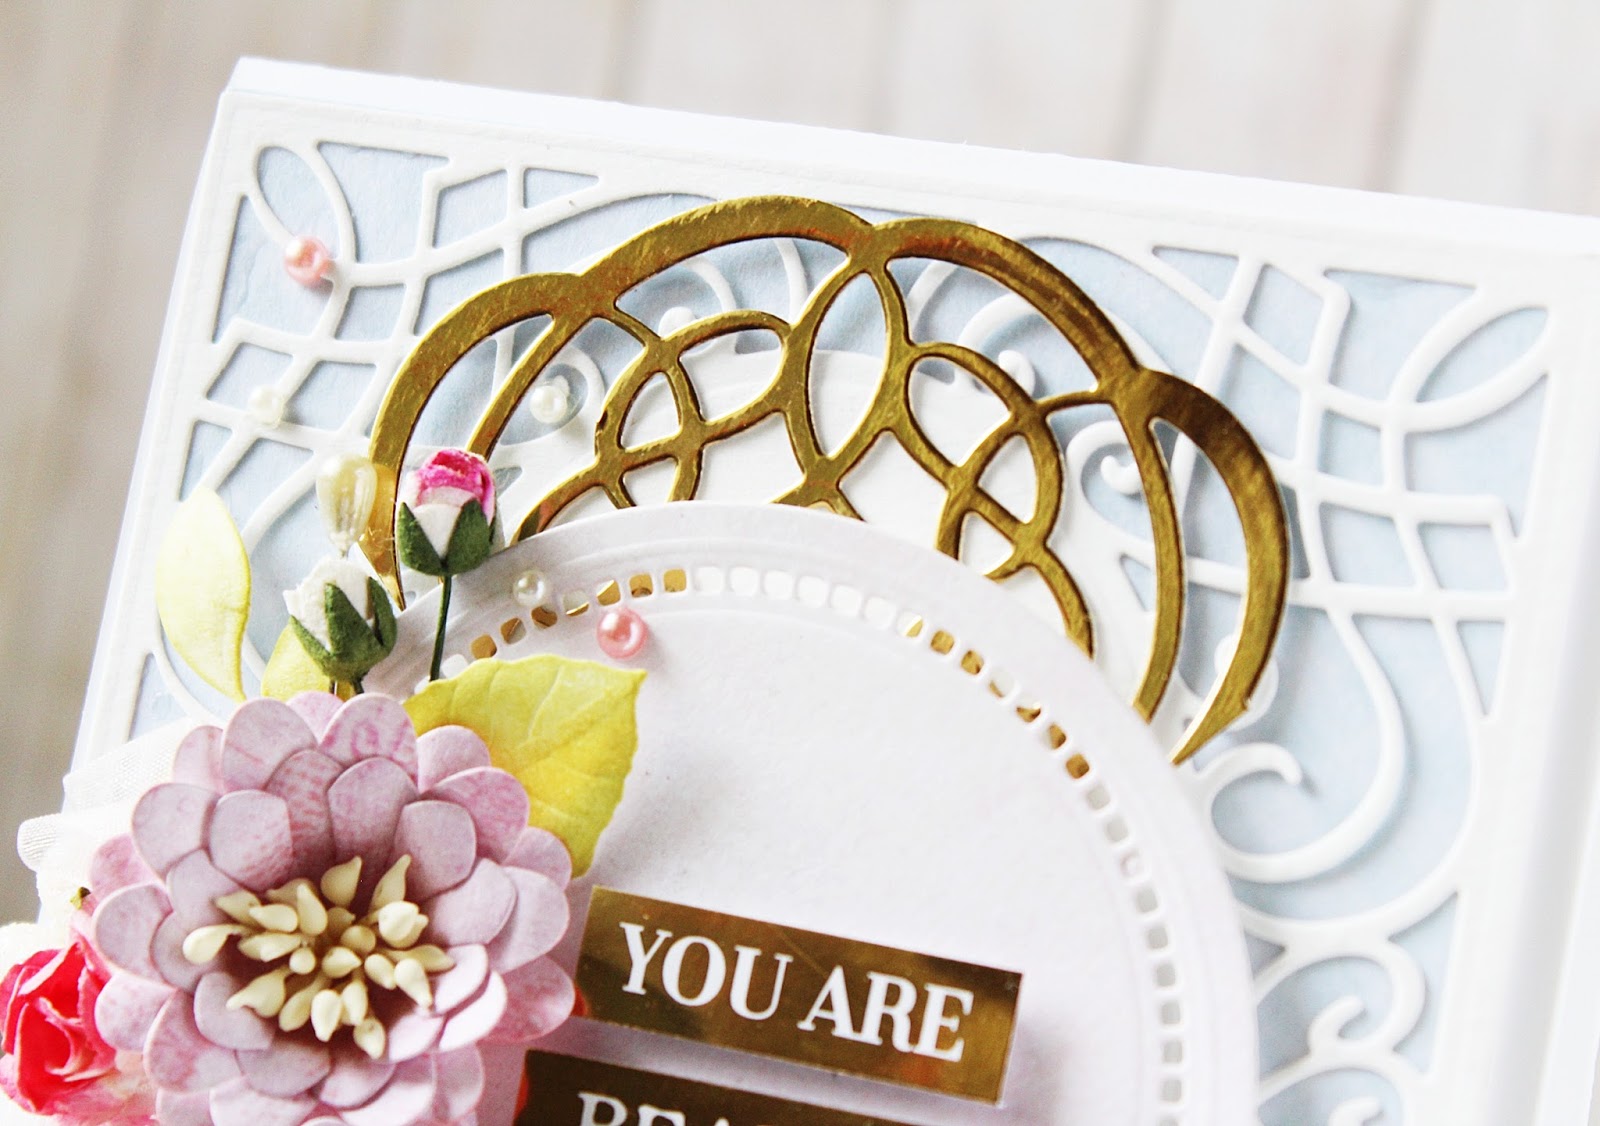
Once I adhered the two pieces, I die-cut the hemstitch circle 2 from the Hemstitch Circles Etched dies using white cardstock. I also added two foil stickers to the center of the circle to create my own sentiment.

This time instead of using Foamiran sheets, I die cut the flowers from patterned paper to give it a vintage look. I used the Card Creator A2 Corner Cotillion Dies to cut my flowers and leaves. The leaves were cut from White Foamiran and inked using a green dye ink. I also added some cream pollens to the centers of my flowers.

For my foliage, I used organza ribbon, a dark pink mulberry flower and some pink fillers.

I also added a white hatpin, and rose buds. To complete the look of my card, I decided to add some pearls in pink and white too!

I like the look of the organza against the pink vintage flowers. What do you think?

S4-930 Nestabilities Curvy Labels Etched Dies
S4-928 Nestabilities Hemstitch Circles Etched dies
S5-364 Card Creator A2 Corner Cotillion Dies
S5-367 Shapeabilities Flourished Square Etched die set
S5-369 Shapeabilities Ringlet Round Etched die set
PE-100 Platinum 6 Die Cutting and Embossing Machine - 6" Platform
T-001 Tool' N One
Other supplies used : Neenah Solar White 110 LB cardstock, American Crafts Colored 12×12 cardstock, White 80 LBS Cardstock Sheets, Gold Foil Cardstock, Papericious Ephemera 12" X 12" pattern paper, White Foamiran sheets, White Fun Foam; Stick It Double Sided Adhesive Sheets; Adhesive: Scrapbook Adhesives 3D Foam Squares, Tombow Mono Multi Liquid Glue, Double Sided Foam Tape; Versafine Onyx Black Ink Pad, Distress inks, McGill Inc. Paper Blossoms Tool kit, Mulberry flowers, Micro Rose Buds, Organza Ribbon, Seam Binding Ribbon, Thread Pollens, Fillers, Pearls.
Thank you so much, for taking out time and reading my post. I hope I could inspire you with my creations. Have a great day ahead.


Bothof them are so Gorgeous and Elegant !! Delicate Lacy die-cuts and soft flowers .. prettiest combo !
ReplyDeleteBoth cards are just stunning, love the flowers on both and such lovely dies for background and framing!
ReplyDeleteSoooo gorgeous!! I lovvvve them!
ReplyDelete