Showing posts with label Inspired by Stamping. Show all posts

Thursday, June 7, 2018

Spellbinders Guest Post Three | Romancing The Swirl

Hello friends!
I am back to share my third guest post for Spellbinders. This post was supposed to go live a while back, but things just got in the way and I couldn't get around publishing this post. Nonetheless, I am happy I got a chance to share them now! I have two projects to share today I made using dies from the Romancing The Swirl collection by Amazing Paper Grace. This is another spectacular collection with amazing Nestabilities shapes, tags, and intricate dies. I have made a shaped card and it's coordinating gift box for today's post. I will start with the card first:

To create this card, I started by die cutting the base of my card using the Sweetheart Swirl Etched Dies. I die-cut the frame pattern from white heavyweight cardstock as well as pattern paper so that I could adhere the pattern paper over the white card base. This formed the base of my card. Next, I used the coordinating frame outline from the same die set, and die-cut it using some white metallic cardstock and adhered that to my card base.

For the focal element of my card, I decided to die cut two circles from the Nestabilities Hemstitch Circle Etched Dies. I used gold mirror cardstock for die cutting the bigger circle, while I used White 80 LBS cardstock to cut the smaller circle. I also lightly inked the edges of the smaller circle using pink dye ink.

If you see my card closely, you will find that I have added two ovals behind the bigger gold circle. I cut those from purple pattern paper and tucked them behind the circle for added interest. The ovals were cut using the die included in the Card Creator A2 Corner Cotillion Dies.

I decided to create my florals this time from coloured Foamiran sheets. I used Lilac and Ivory coloured Foamiran sheets to die cut my flowers. For the ivory colour flowers, I used light pink dye ink to color the centers of my flowers. I also embossed and heat set them to give them a more natural and realistic look. The flowers were made using the small flower dies included in the Card Creator A2 Corner Cotillion Dies. The leaves were also cut using dies from the same set, and were cut from Olive Green Foamiran.

Here is a look at the full flower arrangement. I also added some white wired pollens as foliage.

I also added some intricate motifs cut from gold mirror cardstock to my card panel to further embellish my card. I used the Trefoil Crest Etched Dies for it. I snipped off a part of the die cut to fit on my card panel.

Here is a final look at the floral arrangement. I hope you like what I have made :)


My second project is a coordinating gift box I made for my card. Since the cards I make are very dimensional, I need to make gift boxes for them so that they can be mailed easily.

I made the gift box keeping in mind the measurements of my card. This was a shaped card, so the dimensions were customized according to it. Once I created the box, I adhered pattern paper on the lid of the box. I also die cut and used the frame pattern from the Card Creator A2 Corner Cotillion Dies over my pattern paper. I think it looks quite elegant!

I wanted to keep the embellishments on the box to a minimal. I decided to use the same flowers and leaves I used on my card to coordinate with the box. I also added an intricate motif below the flowers which was die cut using the swirl accent die from the Swirl Booklet Insert Etched dies.

Here is a closer look at the flowers. I love the soft pink colour!

I wanted to add some detailing to the sides of the box as well and hence decided to use the same die I used on the lid of my box. I die cut the frame pattern from the Card Creator A2 Corner Cotillion Dies and trimmed it into two strips so that I could add them to the two sides of my box.

And here is how the box looks :)


Spellbinders supplies used :
S4-927 Trefoil Crest Etched Dies
S4-928 Nestabilities Hemstitch Circle Etched Dies
S5-363 Shapeabilities Swirl Booklet Insert Etched Dies
S5-364 Card Creator A2 Corner Cotillion Dies
S5- 365 Sweetheart Swirl Etched Dies
PE-100 Platinum 6 Die Cutting and Embossing Machine - 6" Platform
T-001 Tool' N One


Other supplies used : Neenah Solar White 110 LBS cardstock, Neenah Solar White 80 LBS Cardstock Sheets, Gold Foil Cardstock, Papericious Whimsical Pattern Paper Pack 12 X 12, Ivory Foamiran Sheets, Lilac Foamiran Sheets, Olive Foamiran Sheets, White Fun Foam; Stick It Double Sided Adhesive Sheets; Adhesive: Scrapbook Adhesives 3D Foam Squares, Tombow Mono Multi Liquid Glue, Double Sided Foam Tape; Versafine Onyx Black Ink Pad, Distress inks, Clear Stamps, McGill Inc. Paper Blossoms Tool kit, Wire Pollens


Thank you so much, for taking out time and reading my post. I am so happy and thankful to the entire Spellbinders team for inviting me to be a Guest Designer and sending me these stunning dies to work with. I totally loved working with the Romancing The Swirl collection. I hope I could inspire you with my creations. If I did, please do let me know. :) Thank you so much for stopping by!

Wednesday, May 23, 2018

Spellbinders Guest Post Two | Romancing The Swirl

Hello everyone!
I am really excited and honoured to be guesting on the Spellbinders Paper Arts blog this month. I have two cards to share today I made using dies from the Romancing The Swirl collection by Amazing Paper Grace/Becca Feeken. This collection has some beautiful dies which are perfect for making shaped cards, and today I will be sharing one such card I made using these dies. Let's have a look at my card first:


To create this shaped card, I first took a sheet of White 8.5" X 11" heavyweight cardstock and cut the base of my card using the frame outline die from the Spellbinders Ringlet Round Etched die set. Once my card base was cut, I die-cut the lacy frame outline from the same Ringlet Round Etched die set, first from some white paper, next from some white fun foam, and lastly from gold mirror cardstock. I adhered all the three layers using liquid adhesive to form my card front. It is very difficult to capture the foil on camera, and in most pictures, it looks like I have used dark brown cardstock, but that's not the case :(

Next, I wanted to add some pink polka dots pattern paper to the center of my card front. I die-cut the pattern paper using the inside frame outline die from the same set, and then once again from white fun foam so that my pattern paper would have a raised look.

To further accentuate my design, I added a elegant frame which was cut from gold mirror cardstock, and adhered onto my pattern paper. This die is also from the same set I used to create my card base - Spellbinders Ringlet Round Etched die set. Each and every die in this entire collection is so thoughtfully designed, and all the dies coordinate with each other so beautifully! 

Once I adhered my frame, I wanted to add a sentiment to my card. I decided to use the Nestabilities Curvy Labels Etched dies for my sentiment piece. I stamped my sentiment using Versafine Onyx Black ink on the die-cut piece, lightly inked the edges using pink dye ink and popped the piece on foam tape for dimension.

It was now time to embellish my card, which also happens to be my most favorite part while making cards. :) I first made a bow from some White Seam Binding Ribbon and adhered it to the left side of my card, because I knew I would be placing my floral cluster over it, and I just wanted a little bit of the ribbon to show through. For making my handmade flowers, I used Foamiran sheets with the Card Creator A2 Corner Cotillion Dies set. I die cut both the flowers and leaves from white Foamiran sheets. I also cut some extra flowers so that I could create my own filler flowers.

The central flower was made by lightly inking the centers of the die cut pieces using pink dye ink, and then heating them with the help of an iron to give it a fuller look. I also added a bunch of thread pollens to give it a more realistic touch. I lightly inked the leaves using a green dye ink and heat set them so that they would have a curled look. I adhered everything  on my card base with the help of a Hot Glue Gun.

I used the exact same techniques for creating my filler flowers. This time I used lesser number of die cut pieces so that the flowers wouldn't be as big as my main flower.

Here's a closer look at the fillers. I also added some white shimmery buds for my flower foliage.

The flowers add lots of dimension to this card, and I love how beautiful they look against the gold mirror cardstock.

Here's a final look at my card. I love how unique and elegant this die is, and it surely can be used for creating lots of other projects too other than cards.


My second card for today incorporates lots of layering. Here's a look at it:

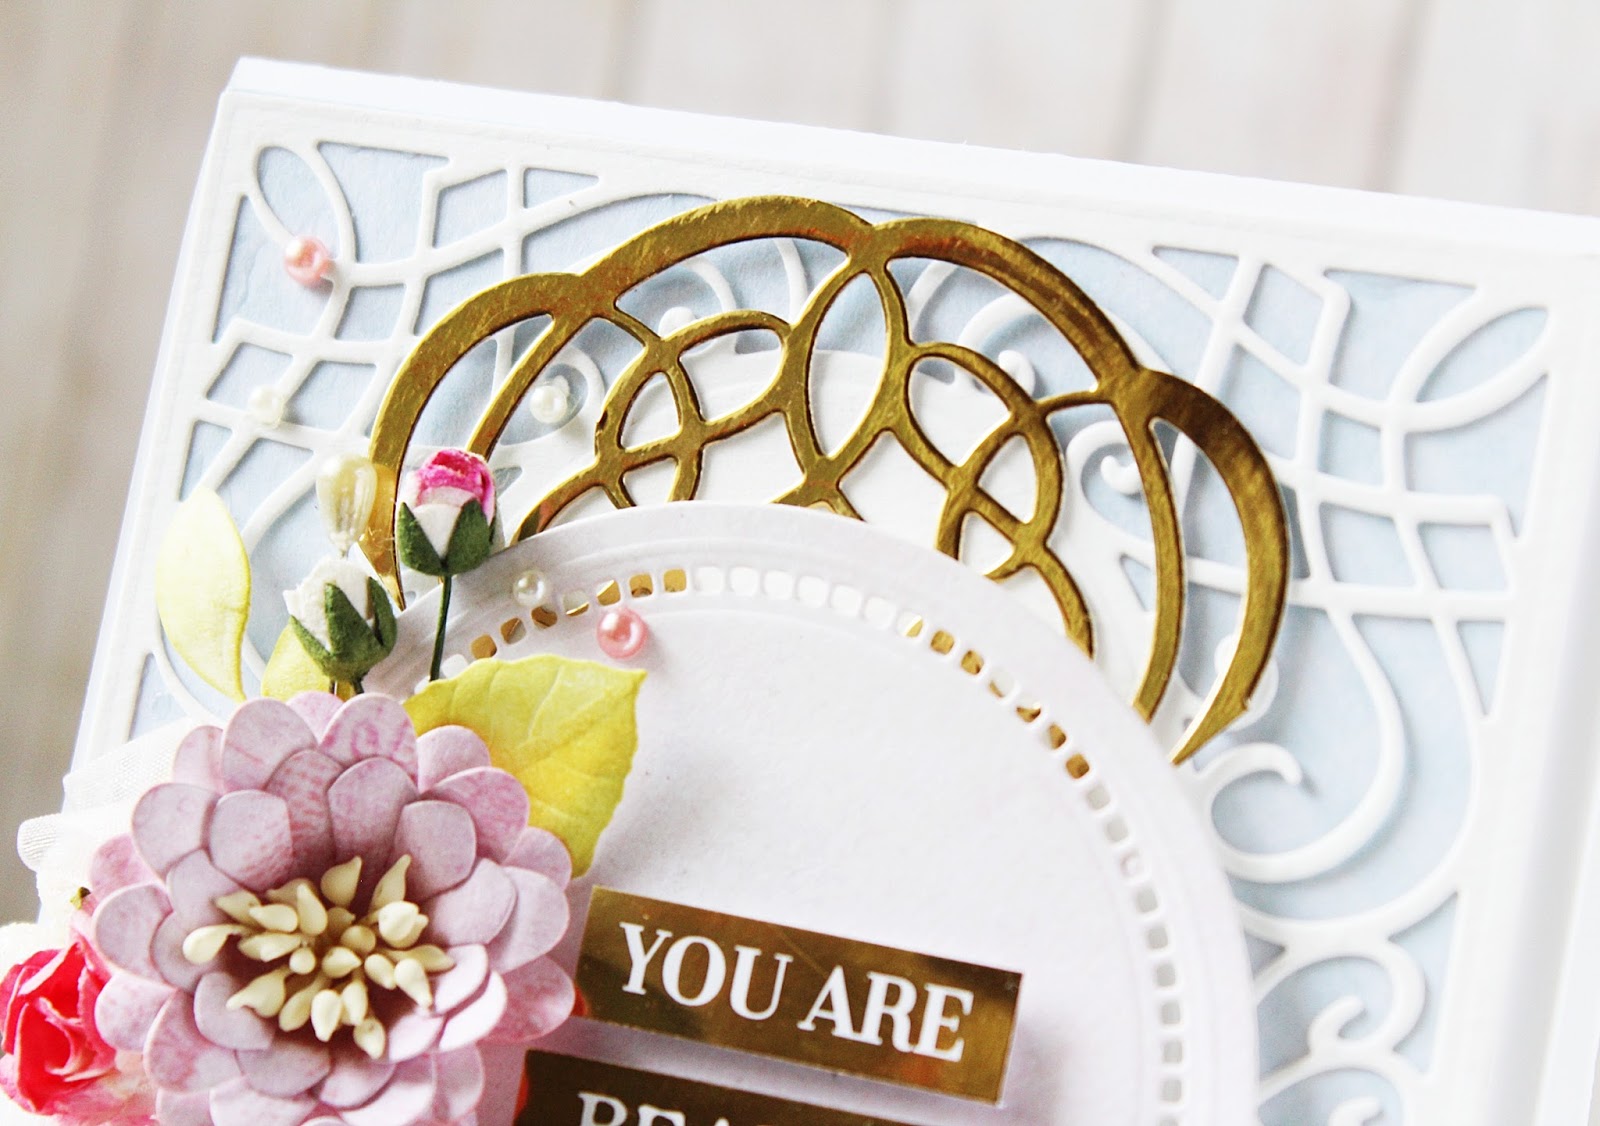
To create my card, I first took a pre-scored and cut A2 white card base. I wanted my card front to have a nice and elegant card frame, so I decided to go with the large panel pattern die from the Card Creator A2 Corner Cotillion Dies set. I cut the die from regular white cardstock. I then adhered some blue textured cardstock behind my frame so that the intricate pattern would show up clearly.

I wanted to have an intricate design behind my Hemstitch Circle piece, so I decided to stretch my frame pattern die from the Flourished Square Etched die set to come up with this design on the top and bottom of my card. I die cut it from gold mirror cardstock and then snipped the die cut into four pieces so that I could tuck in two pieces behind the circle die cut.

Once I adhered the two pieces, I die-cut the hemstitch circle 2 from the Hemstitch Circles Etched dies using white cardstock. I also added two foil stickers to the center of the circle to create my own sentiment.

This time instead of using Foamiran sheets, I die cut the flowers from patterned paper to give it a vintage look. I used the Card Creator A2 Corner Cotillion Dies to cut my flowers and leaves. The leaves were cut from White Foamiran and inked using a green dye ink. I also added some cream pollens to the centers of my flowers.

For my foliage, I used organza ribbon, a dark pink mulberry flower and some pink fillers.

I also added a white hatpin, and rose buds. To complete the look of my card, I decided to add some pearls in pink and white too!

I like the look of the organza against the pink vintage flowers. What do you think?


Spellbinders supplies used :
S4-930 Nestabilities Curvy Labels Etched Dies
S4-928 Nestabilities Hemstitch Circles Etched dies
S5-364 Card Creator A2 Corner Cotillion Dies
S5-367 Shapeabilities Flourished Square Etched die set
S5-369 Shapeabilities Ringlet Round Etched die set
PE-100 Platinum 6 Die Cutting and Embossing Machine - 6" Platform
T-001 Tool' N One


Other supplies used : Neenah Solar White 110 LB cardstock, American Crafts Colored 12×12 cardstock, White 80 LBS Cardstock Sheets, Gold Foil Cardstock, Papericious Ephemera 12" X 12" pattern paper, White Foamiran sheets, White Fun Foam; Stick It Double Sided Adhesive Sheets; Adhesive: Scrapbook Adhesives 3D Foam Squares, Tombow Mono Multi Liquid Glue, Double Sided Foam Tape; Versafine Onyx Black Ink Pad, Distress inks, McGill Inc. Paper Blossoms Tool kit, Mulberry flowers, Micro Rose Buds, Organza Ribbon, Seam Binding Ribbon, Thread Pollens, Fillers, Pearls.


Thank you so much, for taking out time and reading my post. I hope I could inspire you with my creations. Have a great day ahead.

Friday, June 3, 2016

Guest Post for Happy Momentzz!

Hello everyone!
I was so excited to be invited as a Guest Blogger for Sharada's Happy Momentzz's 5th birthday party!

 I'll be sharing with you a simple DIY project using a very common household item- which is a cereal box which I have upycycled into a gift bag. I know this idea is not very new, and has been done many times, but my process is a little different and hopefully you will enjoy this tutorial and give it a try :)

So, let's start with our project :

You will need :-
1. An empty cereal box. ( I have used one from Kellogg's Chocos- Small size).
2. White Chart Paper.
3. 12 X 12'' Pattern Papers of your choice.
4. Eyelets and Cord to make the handles of your gift bag.
5. Some die-cuts, paper flowers, embellishments to decorate. (This is totally optional).

Steps (1-4)
  • After selecting a cereal box of your choice, very delicately and patiently open the box completely on the bottom and from the side seams. Try to do this without tearing the paper. 
  • Once the box has been opened completely, using a craft knife and a ruler, cut apart the top part of the box which consists of the flaps.
  • Now, trace the rest of the box (except the bottom part as shown in the picture) on to a chart paper using a pencil and a ruler and cut it out. 
  • Now, score this paper according to the folds of the box, this will make it easier to bend the paper on the sides when you construct your bag! ( Refer to my picture below for an idea )

Steps (5-6)
  • Once you have cut and scored your chart paper glue it on the cereal box using any liquid adhesive. I have used fevicol.
  • Now fold the box into shape and glue the sides and for the base of the box measure and cut a small piece of chart paper in the approximate size of the box base and glue it separately.

Your box should look something similar to the one in the below picture.


Steps (7-8)
  • Once the box/bag base is ready you need to distress the edges of your box using Distress Ink of your choice. I have used Cracked Pistachio Distress Ink as it is very similar in color to the pattern paper that I have used to make my bag.
  • Once the edges are distressed it's time to add pattern paper. Cut your pattern paper 1/4 inch smaller than the size of the box size that you are covering.

Steps (9-10) 
  •  Once the pattern paper is glued, it's time to embellish your bag with die-cuts of your choice and also add in your eyelets and handle of your bag before adding on all your embellishments.


Here's how now final bag looks like after I added the flowers and some foliage to it.


I hope you liked my project and will give it a try. These DIY bags are just perfect for gifting to any of your family or friends while at the same time helping to recycle a common household item which could otherwise be trashed :)


Sunday, July 27, 2014

A gift bag with a tutorial !

Hi friends!
I am posting after a long time. As many of you may know, this month Ramadan was going on for us, and it has been tough past few days with fasting and lots of prayers, so I have been very inactive regarding my blog. But, I am here to share my gift bag with you all, this was made as a a part of my DT project at Lulupu and I have shared a tutorial for it too. So, here's a look at what I have created :


Here's how the back and the sides look like :

 Another side view :

It's a very simple bag and here's a template on how I have created the base of the bag :
Please right click on the picture to see the measurements clearly, but just incase, I am sharing those measurements again :
1. Take a 8 X 11 inches piece of cardstock.
2. On the long side (11 inch), score at 4.5 inches and 6.5 inches.
3. On the short side (8 inch), score at 2 inches and 6 inches.
4. Following the below template, cut on the dotted lines of your scores and fold all your scored lines to create the base of the bag.
5. For the handle of the bag, I have taken a piece of cardsotck measuring 11 inches x 1 1/2 inches.

I made some tags to gift along with this bag. Here's a look at those :

The panels of my bag are created by heat embossing and distressing and I have a detailed tutorial on how it is made on the Lulupu blog. Do check it out, HERE.
The yellow rose has been handmade by me using the new Spellbinder's D-lites die- Create a Rose. It was so much fun assembling this flower as it is almost similar to doing a three-dimensional punched flower because this die cuts out petals along with the centres and you have to emboss each petal separately and create your flower layers!

Supplies used :
Cardstock- Local buy
Watercolor paper- Fabriano Brusto.
Punches : EK Success Scalloped Scallop border punch, Martha Stewart 3 in 1 Butterfly punch.
Dies : Spellbinders D-lites Create a Rose die, Sizzix Flower Branches and leaves set die, Spellbinders border die (Name not known).
Stamps : Kaisercraft Twig and Berry stamp set, Kaisercraft Humming bird stamp set, Inspired by Stamping Creative tags stamp set.
Inks: Distress inks- Fired brick, Antique linen, Vintage photo, Victorian velvet, Tattered rose, Shabby shutters and Crushed olive.
Versamark Frost embossing ink pad, Ranger Clear Super fine embossing powder.
Heidi Swapp Gold Lame Color shine mist.
Filler flowers, Lines and Paris Japanese Washi tapes.

Challenges entered :
4 Crafty Girls -Anything goes.
Tuesday Throwdown- Handmade flowers.
Crafting with dragonflies- Bag and a tag. (I have created my bag from scratch using a scoreboard). ( Winner and Top 3! )  
Creative Moments- Anything goes with Flowers.
The Sisterhood of Crafters -Die cuts/ punches. ( Made it to Top 3! )
SSS -Emboss it (I have heat embossed the flourish).

Hope you like my work! Please leave me your comments/suggestions. :)
Have a nice day everyone!

Sunday, February 23, 2014

An Accordion Fold card! :)

Hi friends,
Today, sharing with you all an Accordion fold card which I have made for my inspiration post at Lulupu where our current challenge #26 is 'Try something New' .I have tried this fold card for the very first time and here's how it looks :                                                            
Here is how it looks when it is opened fully :
A look at some of the inside pages :

I have made a co-ordinating box to keep this card in. Here's a look at it :

This card opens up to 4 inches by 18 inches and I have embellished the front of the card with handmade flowers made using Joy! Crafts flower dies and colored them using Distress inks. Have also used Spellbinder's dies to layer my die-cuts. The corner, the border die are all from Spellbinder's. Unfortunately, don't know the name for this die as it is now, discontinued :( My box measure 51/2 inches by 1/2 inches and there's ample space inside for the card and the ribbon bow on the side. I have created the window using Spellbinder's Square dies and then placed a acetate sheet below the scalloped square.
 I am entering this card in Brenda's 5th Blogoversary Celebration .I would like to mention here that my all time favorite craft items to work with are definitely my Distress inks and my flower dies. I almost always make my own flowers and color them using distress inks :)

Supplies used :
Pattern papers - Prime Rondelle Collection and Prime Romance Novel paper pad.
Embossing folder - Provocraft/Cuttlebug Swiss Dots embossing folder.
Punches -Martha Stewart 3 in 1 Classic Butterfly Punch.
Dies  - Spellbinder's Fluer De lis Square die,  Sags Ironworks Motif Scalloped Squares die, Joy! Crafts Flower dies, Spellbinder's Leaf Foliage die, Cheery Lynn Olive Branches die.
Inks - Distress inks -Spun Sugar, Victorian Velvet, Peacock Feathers, Shabby Shutters, Peeled Paint.
Versafine Onyx Black ink pad.
Stamps - Inspired by Stamping Small Fancy Labels 18,  Micia Hello Girl stamp set.
Kaisercraft Pink flowers, Daisy flowers, Pearls.
                                                                      
Challenges entered :
PPS -All about Love
Itsy Bitsy -Say it with Roses
Allsorts -Ladies Day
Inkspirational Challenge -Bingo (Shaped card, Ribbon or lace, Punches or Dies)
The Card Concept -I have chosen the style Shabby Chic.
Inspired by Stamping Customer Gallery Contest - I have used the Inspired by Stamping Small Fancy Labels 18


Hope you all like my card. Please do leave me your comments/ suggestions. I love to hear from you! :)
Have a nice day everyone!