Hello everybody!
I hope you are keeping well. Today's post has been long overdue because the cards that I am sharing today were created and photographed back in May 2021. I got around editing the pictures today and am so happy to finally blog about my projects.
My cards for today feature the Spellbinders Birdhouses Through the Seasons Collection by Vicky P. This whimsical and unique collection includes five die sets and a sentiment stamp set with which you can create bird and/or birdhouse-themed cards. You can use the products in a variety of different ways, no matter what the season!
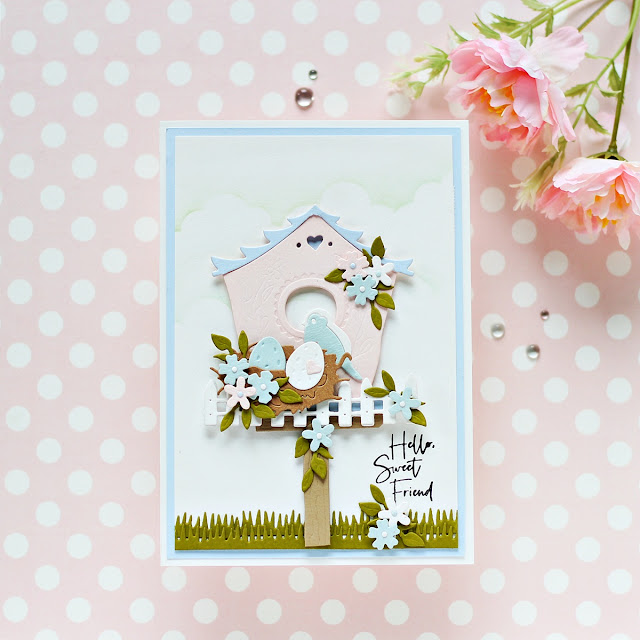
My first card features the Build a Spring Birdhouse Etched Die Set. I used the different elements from the die set to create a sweet floral spring card for a friend.
To begin, I die cut Pink Sand and Raindrop Cardstock with the birdhouse die from the Build a Spring Birdhouse Etched Die Set. Next, I die cut Snowdrift, Pink Sand, Raindrop, and Fern Cardstock with the flower and leaf dies from the Build a Spring Birdhouse Etched Die Set. Once that was done, I die cut Oatmeal Cookie Cardstock with the birdhouse stand die and the nest die included in the set. Then, to complete the birdhouse, I die cut Snowdrift Cardstock with the picket fence die and the egg die from the same set. I die cut everything using my Spellbinders Platinum 6" Machine and then kept the die cuts aside to work on my card panel.
I trimmed a piece of Snowdrift Cardstock to size and used a Cloud Stencil with Green Olive ink to give the illusion of green skies. I then die cut some blades of grass from Fern Cardstock and adhered them along the bottom of the card. Next, I stamped my sentiment from the Borders and Sentiments Clear Stamp onto the panel with black ink.
It was now time to assemble my card together. I adhered the roof, the birdhouse, and the birdhouse stand on to my card panel using foam squares. I then added the bird to the opening of the house along with the nest, the egg, and the picket fence. I embellished the house with the various die cut flowers and leaves. Next, I added mini die cut circles to the centre of the flowers for interest.
To finish, I trimmed a piece of Raindrop Cardstock to size and adhered it a side-folding 5" X 7" white card base.
My second card for today features the Build a Summer Birdhouse Etched Die Set. I paired the lighthouse birdhouse die with the Sun Burst Stencil from the Liberty Collection to create a bright and cheery slimline card that is perfect for sending a sunny hello.
To begin, I trimmed a piece of Snowdrift Cardstock to 4" X 7" and secured the Sun Burst Stencil on the top of the panel to blend Squeezed Lemonade Distress ink with a blending brush. I then removed the stencil from the panel and secured a DIY Cloud Stencil on the top to blend Tumbled Glass Distress ink on the panel with a blending brush to give the illusion of blue skies.
Next, I die cut a few valleys to create the landscape of a beach on my card. I die cut them from Oatmeal Cookie and Raindrop Cardstock and adhered them to my panel using liquid adhesive. I blended Tumbled Glass Distress ink along the edge of the slope with a sponge dauber to add some definition and interest. Once that was done, I stamped a sentiment from the Borders and Sentiments Clear Stamp onto the panel with black ink.
It was now time to create focal for my card. I die cut Snowdrift, Comsic Blue, Pomegranate, Portbello, and Timber Cardstock with the birdhouse die and the coordinating elements from the Build a Summer Birdhouse Etched Die Set. I also die cut Snowdrift Cardstock with the shell, starfish, and gull dies. I used Nuvo Alcohol Marker Pens to colour the shells and the starfish. I then added a coat of Diamond Stickles for some sparkle and shine.
I assembled the different components of the lighthouse together and adhered it to my card panel using foam squares. I also adhered the seagulls to my card panel using foam adhesive. Next, I adhered the lighthouse stand, the starfish, the anchors, and the sea shells on to my panel using foam squares for dimension. Then, to finish, I adhered the background panel to a 4.25" X 7.25" side-folding white card base.
I hope you enjoyed this duo of nature-inspired cards. You can see Birdhouses Through the Seasons by Vicky P. HERE. It is truly marvelous and these die sets make creating so fun!
Thank you so much for your stopping by and reading this blog post. I hope you liked my projects!
If you like what you've seen from me, please give me a follow over on my Instagram (@hussena_cal) and/or subscribe to my blog if you haven't already.
Wishing you a great day ahead!


these are all so cute, love them!
ReplyDelete