Hello there, crafty friends!
I have a couple of cards to share today featuring the May Card Kit by Spellbinders - All The Little Things. If you haven't heard about the Monthly Card Kits by Spellbinders or don't know how to subscribe to one, you can go over to the Spellbinders website and/or blog and read more about them HERE.
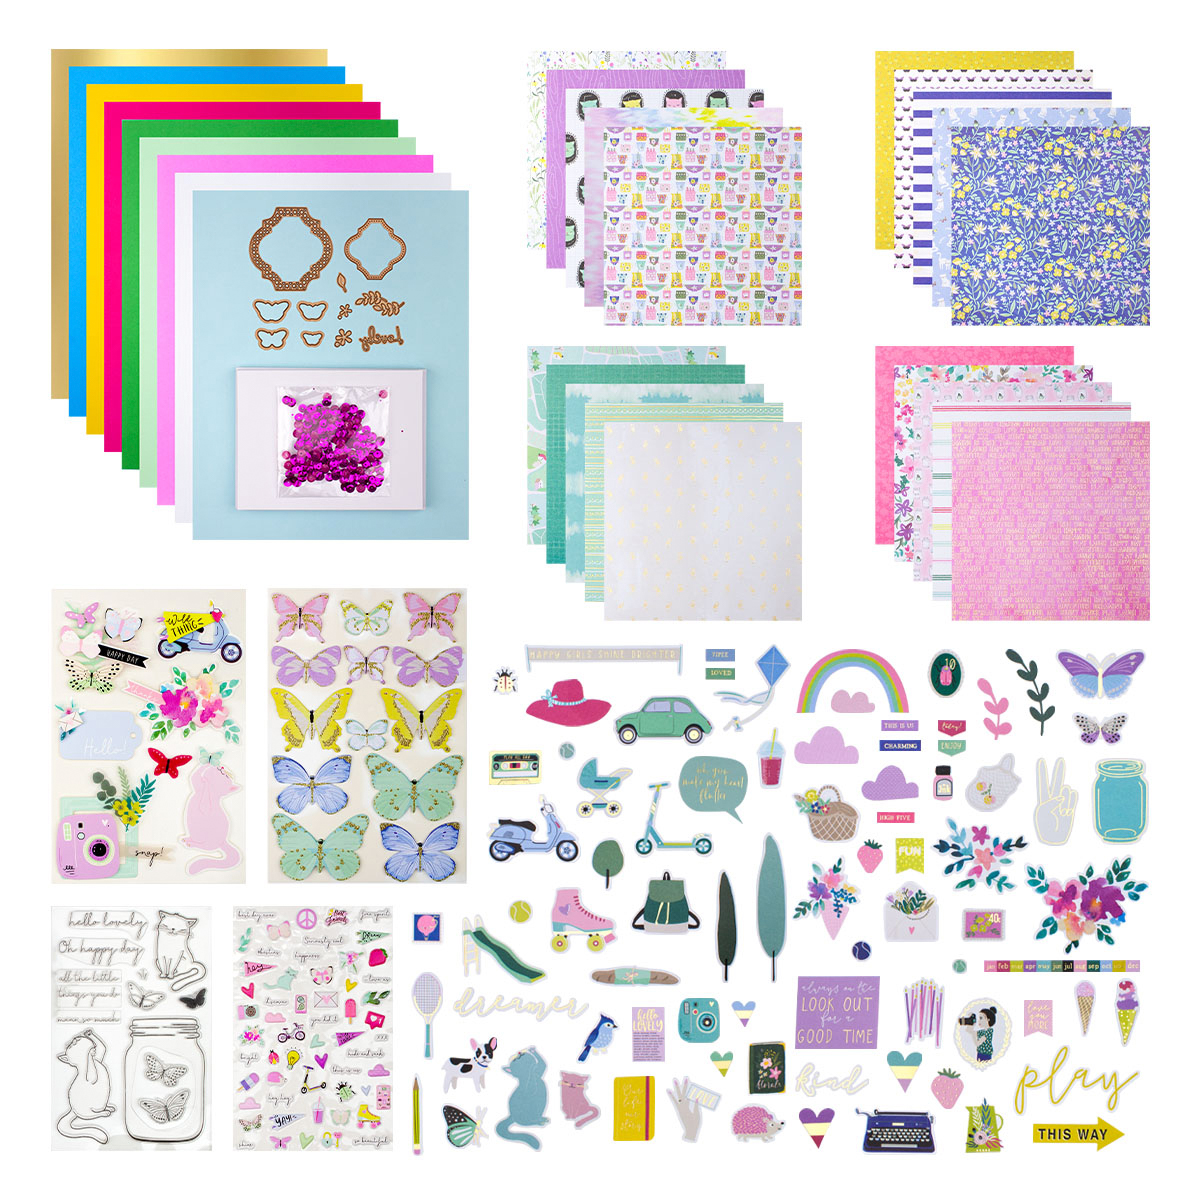
This "All The Little Things" Kit, like all their other Card Kits, gives you everything you need to create 10 unique cards and even more. You now also get better goodies, including a 40 sheet paper pad, clear stamps, an adorable die set, tons of embellishments, and more!
I have FIVE Card ideas to share with you today using this kit, so let's get started!

Card #1
My card uses the All the Little Things Die Cut Shapes Set, All the Little Things Clear Stamp Set, All The Little Things Dies, and the All The Little Things Sticker Sheets.

For this card, I die cut several labels using the main shape die from the Card Kit from Sky Blue Cardstock. I adhered them down to my panel and started working on my focal.

I used a mix of 3D Stickers for my card design. I love the soft colours and the sheer variety of prints in the Stickers. You are so spoilt for choice! I could have never imagined creating cards predominantly with them, but they really are so amazing to use.

I tucked in two stickers together to create one single piece. I also stamped and coloured a butterfly using the All the Little Things Clear Stamp Set. I used its coordinating die to die cut the butterfly and popped it over on my panel. I also adhered some additional 3D Butterfly Stickers to jazz up the design. Finally, I added some Epoxy Stickers to create my sentiment and complete my card design. This was really so fun to create!

Card #2
My card uses the All the Little Things Paper Pad, All the Little Things Die Cut Shapes Set, All The Little Things Dies, Sticker Sheets.
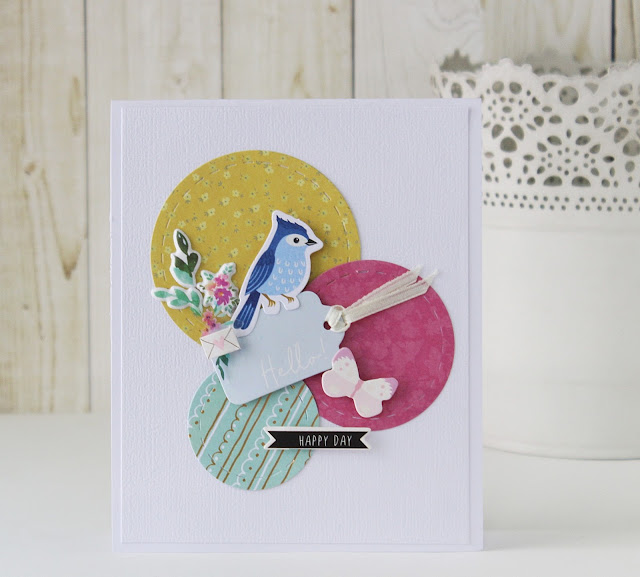
My second card is another Clean and Simple design. To create this card, I first die cut three circles of different sizes from varied patterned papers from the All the Little Things Paper Pad using a Stitched Circles Die Set and adhered them down to my panel. Then, for my focal, I used a beautiful 3D Sticker. I have rarely used Stickers to create my cards, so this was definitely a great experience. I love how they can dress up any project in a jiffy!

I wanted to add some more elements to my card to make it all look cohesive, so I adhered a bird die cut from the All the Little Things Die Cut Shapes Set. I also popped in a 3D Butterfly from the Sticker Sheet included in the Card Kit along with the sentiment banner. And my card was complete!

Card #3
My card uses the All the Little Things Paper Pad, All the Little Things Die Cut Shapes Set, All The Little Things Dies, and the All the Little Things Clear Stamp Set.

For my card, I first die cut a panel using a Stitched Rectangles die from a patterned paper from the All the Little Things Paper Pad. Next, I die cut another rectangular frame using the same Stitched Rectangles Set from another patterned paper. Then, I used my Nestabilities Standard Circles Dies to die cut a circle from the green patterned paper and adhered it to my card base. I also adhered the frame using foam dots to give it some dimension.

For my focal, I picked out few die cuts from the All the Little Things Die Cut Shapes Set and adhered them to my panel. I die cut some leaves using the dies included in the Kit from Mirror Gold Cardstock and added them to my panel as well. I also die cut my sentiment using the word die included in the Kit from White Cardstock which was then coloured using a Yellow dye ink.

Then, I stamped the word 'Hello' onto the mason jar to complete my sentiment. Next, I stamped and die cut few butterflies and popped them on my panel. The beautiful butterflies are from the All the Little Things Clear Stamp Set and I love how Spellbinders now has coordinating dies for their Stamps in the Card Kit. It makes creating so much more simple and easy. Lastly, I die cut two flowers using the flower Dies from the Kit and colored them using the same Yellow dye ink.

Card #4
My card uses the All the Little Things Die Cut Shapes Set, All The Little Things Dies, and the All The Little Things Stickers.

I rarely do 'Cute' Cards, so this was again something new for me. For this one, I first took a piece of A2 Whip Cream Cardstock and embossed it using the Layered Scallops Embossing Folder. I have used this particular folder quite a few times on my cards and love how it goes well with almost any card design.

I had to use the beautiful frame die included in the Card Kit, and so die cut it from Mirror Gold Cardstock. I also die cut the coordinating inlay piece from Sky Blue Cardstock which is again from the Kit itself. I adhered both the pieces using foam dots on my panel.

For my card focal, I used a combination of Die Cuts and Stickers. I used a 3D Sticker for the cat on the right, while the one in the centre is a die cut from the All the Little Things Die Cut Shapes Set. The sentiment bubble is also from the Die Cut Shapes Set. To add some more interest to my design, I added tiny little butterflies, which came from the Sticker Sheets from the Kit. As the finishing touch, I added two hearts to tie it all in together!

Card #5
My final card uses the All the Little Things Paper Pad, All the Little Things Die Cut Shapes Set, and the All The Little Things Sticker Sheets.

For my card, I first die cut a panel using a Stitched Rectangles die from a patterned paper from the All the Little Things Paper Pad. Next, I die cut another card panel using the same Stitched Rectangles Set from Whip Cream 12x12 Cardstock. I adhered this one right on top of the previous panel using foam dots. I then picked out few die cuts which would go well with my card design.

The rainbow and the clouds are from the All the Little Things Die Cut Shapes Set while the scooter is a gorgeous 3D Acetate Sticker included in the All The Little Things Kit. I wanted to dress up this sticker for some more visual interest, so I popped in another Epoxy Sticker to add to the fun quotient.

I also used some 3D Epoxy Stickers to create my sentiment. As the finishing touch, I adhered two puffy heart stickers which are again from the Card Kit. Simple and easy, and SO FUN!

If you want to find out more about the Club – prices, how you sign up and what’s included, please look ——–> HERE.
The Card Kits for Spellbinders Monthly Clubs are exclusive to Spellbinders and you won't find them anywhere else, so be sure to gets yours before it gets sold out! If there are any leftovers, they are added to the Spellbinders store for sale at full price. You can see all of the past Card Kits HERE.
If you'd like to see some more project inspiration using the Card Kit, check out THIS super helpful YouTube video that has some awesome card ideas using the Card Kit.
That's it from me for today! I hope you liked my cards. Let me know if you have any favourite(s)! I would love to hear from you.
If you would like to see more of my work using Spellbinders, do follow my Instagram page - @hussena_cal
Thank you so much for your visit to my blog today!


No comments:
Post a Comment