Hello, friends!
I am beyond thrilled and honoured to say, that I am a guest blogger on the Spellbinders blog. I am here to share five projects that I’ve made with the absolutely glorious, Vintage Treasures Collection by Becca Feeken. It’s an absolute joy to work with this collection - The die designs are so ingenious and make creating projects a breeze! I can't wait to show you my projects using this collection.
Vintage Treasures Collection by Becca Feeken brings classic circular motifs and elegant flourishes to life. A perfect addition to her other Spellbinders collections for making beautiful projects!
My first project is a Circle shaped Card made using the Tiffany Lavaliere Etched Dies, the Brillante Rondelle Etched Dies, and the Cinch and Go V Etched Dies.
I love creating shaped cards, and when I saw these particular dies in the collection, I knew I had to make one! To create my card, I first die cut the large circle from the Tiffany Lavaliere Etched Dies. Next, I embossed the circle using the inner rim die from the same collection to give my card some dimension. Once that was done, I die cut the intricate circle die from the Brillante Rondelle Etched Dies using gold mirror cardstock. I layered this circle with another intricate die cut which was cut from pale blue textured cardstock, and then finally added the label pattern and label rim die cuts. This card is all about layers and you may want to use a lesser number of die cuts if you don't want it to become bulky.

I stamped my sentiment in the centre of the die cut and then started working on my embellishments. I used the Cinch and Go V Etched Dies to create my flowers and leaves. I die cut them from white cardstock and coloured the tips of the flowers using light pink dye ink. Once that was done, I embossed them using Embossing Ball Tools and added pollens to the centres of the flowers. The leaves were also die cut from white cardstock and coloured using green dye ink and slightly embossed.

Here's a closer look at the floral arrangement. I also added some mulberry rose buds and filler flowers to compliment my handmade flowers.

And here's a look again at my finished card.

My second project is a Tall Gift box made using the Delicate Tendril Border Etched Dies, Brillante Rondelle Etched Dies, Nobel Chatelaine Etched Dies, and the Cinch and Go V Etched Dies.
This gift box was really lovely to put together! I wanted to make the Delicate Tendril Border Etched Dies the star of my project, and what better than using it as a framed border across a gift box! I die cut the border pattern and outer rim from white cardstock and gold mirror cardstock respectively and adhered them on top of the other to create an inlay effect. I think it looks really pretty and can be used in so many different ways!

For the lid, I used a variety of dies to embellish it. I first die cut the inner frame from the Nobel Chatelaine Etched Dies from gold mirror cardstock. Then, I used the inner frame from the Brillante Rondelle Etched Dies and die cut it from white cardstock. I also went ahead and stamped my sentiment in the centre of this die cut. I also added some delicate flourishes die cut from gold mirror cardstock on all four sides of the box. The flourish die is a part of the Delicate Tendril Border Etched Die Set.

The flowers are made using the Cinch and Go V Etched Dies. I used light yellow and peach Foamiran sheets to create them. The leaves are also die cut from Green Foamiran. I even added some glitter pollens and small daisy flowers to complete my floral bunch.

And here's how the sides of the bos look like. The gift box has quite a lot of space to include jewelry pieces, trinkets, chocolates, or even some special souvenirs in it.

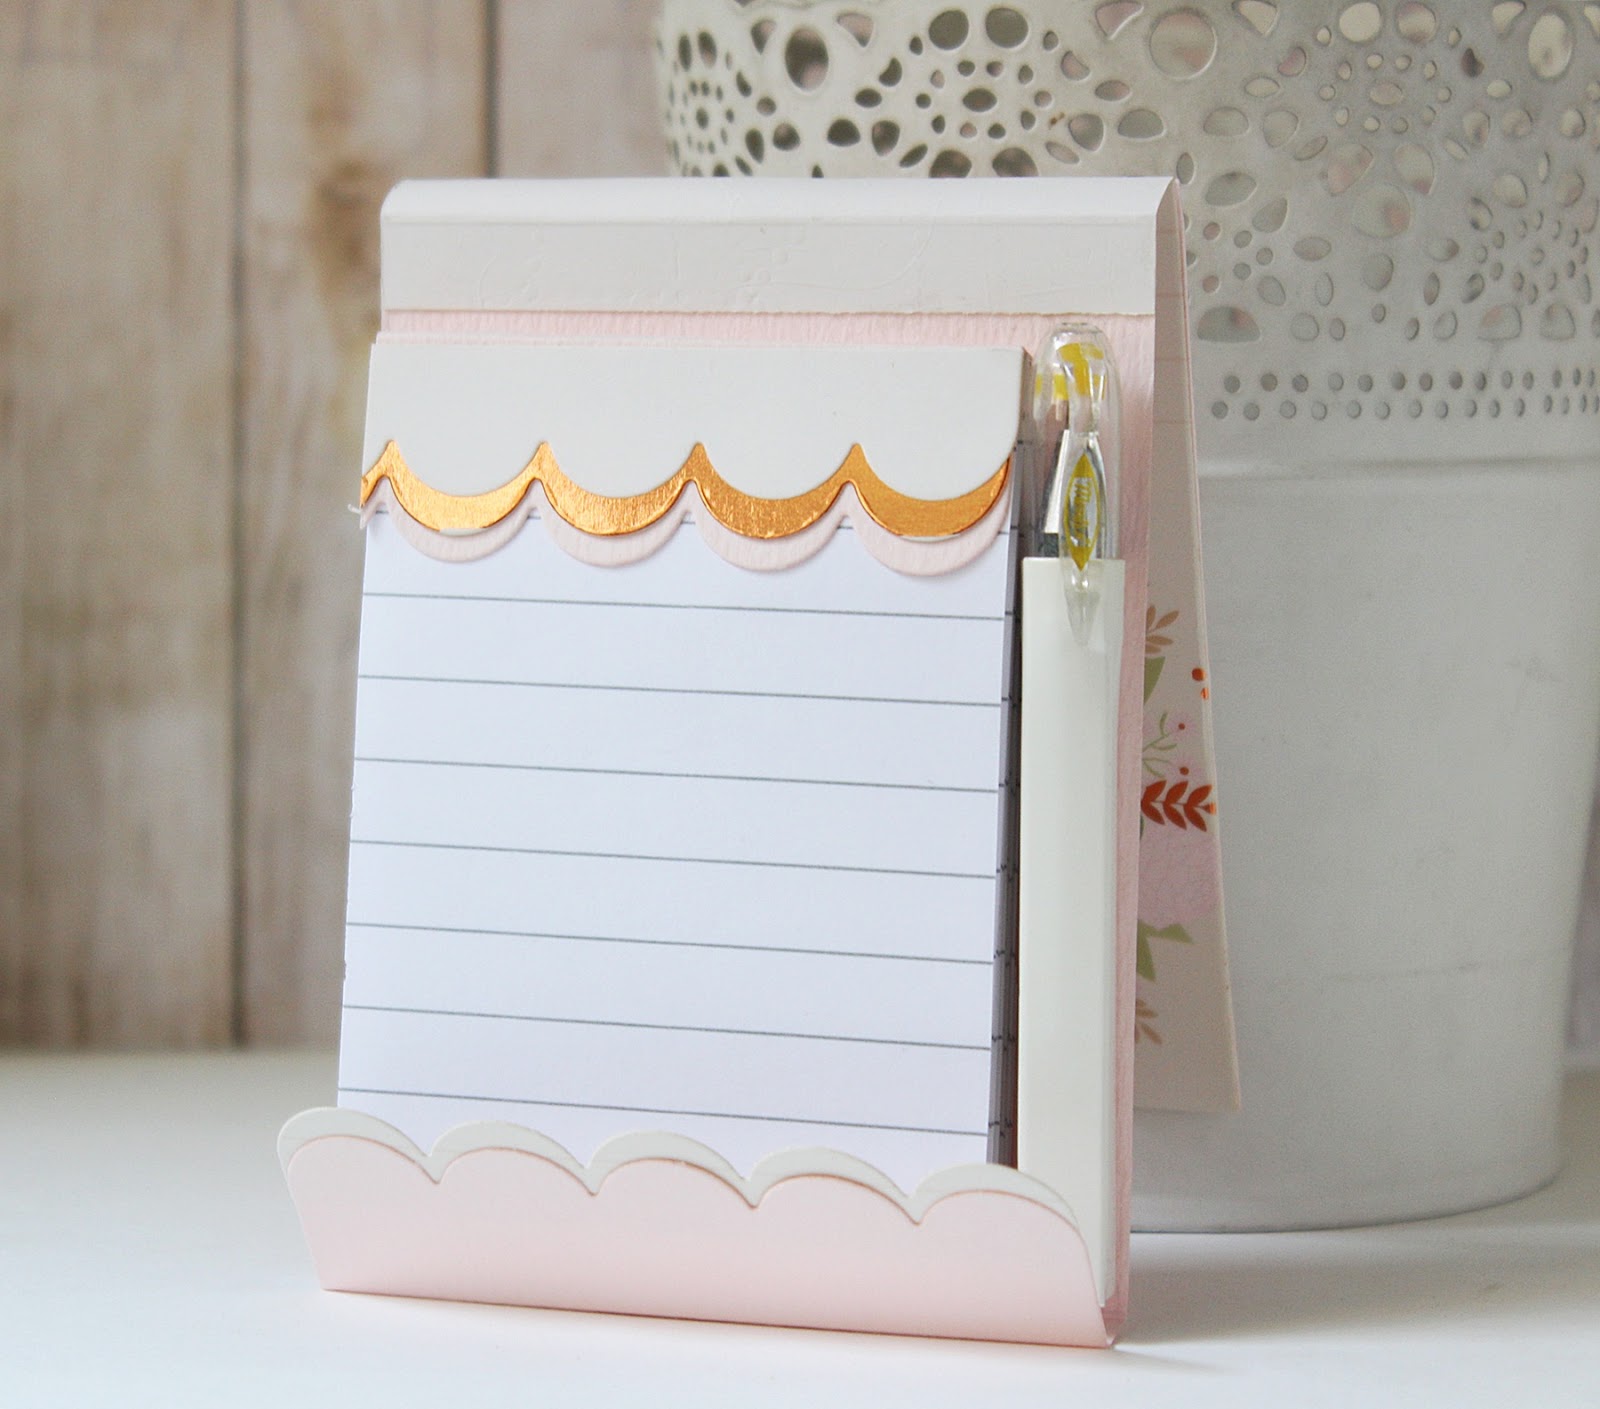
My third project is a lil' Note Pad Holder made using the Adorned Notepad Etched Dies. This is an ingenious die which allows you to create your very own notepad holders and is such a delight to work with!
To create this notepad, I followed THIS video tutorial from Becca Feeken to assemble it. This is really simple to put together and hardly takes time. Once I assembled the basic structure of the notepad, it was time to work on the embellishments. I matted gold mirror cardstock on the base, and then added another layer of patterned paper over it. I also used the inner frame from the Brillante Rondelle Etched Dies to further embellish it. I also added a little sentiment tab 'For My Record' inside the frame. I admit, I did go a bit overboard with gold mirror cardstock on this project as evident in the project photographs. :D

I wanted to keep the floral embellishments to a minimal and therefore only used the tiny flowers from the Adorned Notepad Etched Die Set. I die cut them from peach Foamiran sheets and added around four-five cream pollens to the centres. The leaves were hand cut from green Foamiran. The four corners are die cut using the accent piece included in the Marquise Diamond Pendant Etched Dies. I split the accent piece in half so that I could use them as corners. Another great way to get more out of your dies than their intended use!

I used gold mirror cardstock to create the pen holder and added a little pen inside it. I also added some additional scallops on the bottom to give it a more elegant look. I really love this die set and cannot wait to create more notepad holders using it. :)

My fourth project is again another Notepad Holder. I am obsessed with this die set and have already made three different notepads using it so far! Trust me, this is really addictive and you won't be able to stop at one.
I kept the colour tones for this project very soft and muted which is also my personal favourite! I used a gorgeous patterned paper to create the flap of the note pad holder. The patterned paper did all the work for me! I just added the die cut word' Notes' and the sentiment sticker 'For the Record' to the notepad.

I die cut the word 'Notes' from pink and copper foil cardstock and slightly offset it. This word die is a part of the Adorned Notepad Etched Die Set.

Here's how the inside of the holder looks like.

I have added small magnets for the closure of my notepad. You may leave it as is if you don't want to use magnets.
And my final project for today is a Card made using the Floral Tiara Topper Etched Dies, Brillante Rondelle Etched Dies, and the Cinch and Go V Etched Dies.
I know, the colours look pretty faded out in the picture, but it is not so in real life. I had a hard time capturing the real colours on this card.

For creating this card, I first started by die cutting the borders from the Floral Tiara Topper Etched Dies using light pink textured cardstock and gold mirror cardstock. While adhering them, I offset them a little so that it would add some interest to my card design. I did this twice so that the borders would serve as an elegant oval frame. I adhered them on the top and bottom of my card panel and then started working on the focal of my card.

I used the intricate frame die from Brillante Rondelle Etched Dies to die cut the center piece from cream cardstock. Once that was done, I stamped my sentiment on it. I used a pretty bold font so that it would bring focus to the card centre.

The flowers were made using the Cinch and Go V Etched Dies. I die cut them from pink cardstock, lightly embossed and shaped them, and added pollens to the centres to give them a fuller look. The leaves were die cut using the leaf die included in this set. I did not add any flowers fillers on this card and kept it fairly simple.

Spellbinders Supplies:
Other Supplies: Neenah Solar White 110 LB cardstock, Cream Linen Textured 12 x 12 Cardstock, Pale Pink Textured Cardstock, Pale Blue Textured Cardstock, American Crafts Colored 12×12 cardstock, Gold Mirror Cardstock, White Fun Foam; Adhesive: Scrapbook Adhesives 3D Foam Squares, Tombow Mono Multi Liquid Glue, Double Sided Foam Tape, Glue Gun; Stamps: Fun Stampers Journey Inside & Out Stamp Set, Altenew Faithful Feather Stamp Set; Foamiran Sheets (Light Yellow, Peach, Green, and Pink), McGill Inc. Paper Blossoms Tool kit, Pollens, Micro Rose Buds, Filler Flowers.
If you managed to bear with me till the end of this post, thank you! I hope you liked my creations. If you did, please let me know which one is your favourite! :) To see more of my work with Spellbinders products, do visit me on my Instagram or subscribe to my Blog.
Have a wonderful day ahead!


Your creations are just gorgeous!! Especially the first one, it is super classic, elegant, love all those intricate details in the die!! <3 <3 And the notepad holder is so rich and very professional!! Love your work always!! :)
ReplyDeleteGorgeous creations, I love the use of the gold touches and your flowers are beautiful!
ReplyDelete