Hello everyone!
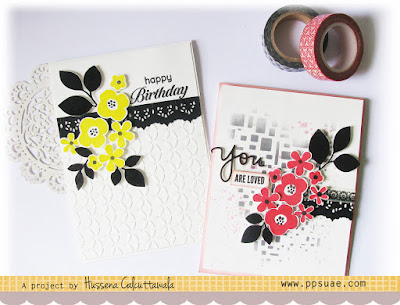
I'm back to share my second card that I made for my DT post at Pretty Paper Studio. I shared one card earlier HERE, incase you have missed seeing it.
I'm sharing the second one today with a step by step tutorial on how I made it. Here's a look at both the cards.
And the second card!
- - - - - - - - - - - - - - - - - - - - - - - - - - - - - - - - - - - - - - - - - - - - - - - -
TUTORIAL
Step 2 – Once the background was created, I again stamped the flowers and the foliage using the Paper Smooches Clear Stamps 4″X6″ – Botanicals 3 stamp set. I stamped my flowers using 2 colours of ink- Cotton Candy from the Altenew Four Scoops ink set and Papertrey Ink Pure Poppy Ink. The leaves were stamped in Versafine Onyx Black ink. These were all fussy-cut.
Step 5– A complete look of the card. I mounted it on a white card base whose edges I had colored using Altenew’s Cotton Candy ink so that a hint of the pink shows through the all four sides!
Bazzill Cardstock 12×12″ Classic White
Paper Smooches Clear Stamps 4″X6″ – Botanicals 3 Archival Ink Pad – Jet Black
Bazzill Cardstock Orange Peel Black 12×12″ Cardstock Hero Arts Acrylic Stamping Block
Hero Arts Acrylic Block 4.75″X 6″
Crafter’s Workshop Template 6″X6″ – Mini Cubist
Ranger Mini Ink Blending Tool 1″
Tim Holtz Distress Ink Pad – June-Hickory Smoke
Heidi Swapp Color Shine Spritz 3/Pkg – Sweetheart
Papertrey Ink Pure Poppy ink
Versafine Onyx Black Ink Pad
Altenew Four Scoops Ink Pad Pack
Washi Tape – 527
I'm entering my card into the SSS- Flora & Fauna, Peek-a-Boo Designs- Only layers 4 Crafty Chicks- Flowers, Moving along with the Times- No Designer Papers, & City Crafter Challenge - On the Border challenge.
I hope you like my card & tutorial. If you have any queries, please leave them below. If you liked my card, don't forget to leave me a comment :)
Have a nice weekend everyone!


Beautiful cards! I just got some stencils, but haven't had a chance to try them out yet! Your lovely creations inspire me!
ReplyDeleteOH MY GOODNESS! This is STUNNING! And thank you for the tutorial! I LOVE it!
ReplyDeleteBeautiful cards!! Thanks so much for playing along at CCCB!
ReplyDeleteWow, they are absolutely stunning!! I love the designs!! Your tutorial is fabulous, too!! Have a great weekend!! Big hugs :)
ReplyDeleteLisa
A Mermaid's Crafts
Beautful cards Hussena, thanks for the step by step pics !!
ReplyDeleteGorgeous cards! Love your fussy cutting and great tutorial :)
ReplyDeleteSuch a pretty and graphic card! So glad to have found you through the City Crafter Challenge Blog.
ReplyDeleteHello... Gorgeous card, thanks for sharing with the challenge over at Moving Along With The Times... hope you will join us again next time.
ReplyDeleteDiane (DT member) x
Striking colour mix on these lovely cards. Thanks for joining in at City Crafter.
ReplyDeleteLove the stenciled background and the flowers pop so pretty against the black and white!
ReplyDeleteTwo beautiful cards which are just so elegant and sophisticated! Thank you so much for playing along with us and for sharing your project sover on the Simon Says Stamp Monday Challenge Blog... :)
ReplyDeleteYour cards are gorgeousl I especially love the contrast of black/white and pink. Thanks so much for being with us this week at CCCB!
ReplyDeleteSo LOVELY!!
ReplyDeletevery pretty cards.. awesome designing.
ReplyDeleteGorgeous cards!!
ReplyDeleteWHoaaaa!!! BOTH your cards are so beautiful!! LOVE the soft stenciling in the background! The flowers just pop up! :)
ReplyDeleteSuchi xx
Awesome Tutorial and the card is so pretty, thanks very much for playing our challenge at 4 Crafty Chicks.
ReplyDeleteLeanne DT/4CC
Both the cards are stunner...loved the way you have used white,black n colours..stencil one is my favourite.. Thanks for sharing at PABD challenge
ReplyDeleteThose are just stunning art pieces...
ReplyDeleteWish to see you again next month with Peek-a-boo designs products...
Thank you for joining us at Peek-a-boo challenge this month...
Swapna,
Peek-a-boo design team
totally stuning projects! stop here and follow you! Wish to see you again next month with Peek-a-boo designs products...
ReplyDeleteThank you that you play at Peek-a-boo challenge this month...
Gorgeous set of cards dear Hussena and a fantastic tutorial! :) Thank you so much for playing along Challenge #8 over at Peek-a-Boo Designs!
ReplyDeleteAll the best! <3