Hello everyone!
I am back today to share a couple of cards featuring dies from the NEW Susan's Garden Club by Spellbinders. This is an exquisite collection comprising a variety of realistic florals which will help you add classic garden blooms into your creations. If you're a botanist or a flower enthusiast, you will certainly enjoy creating with the dies in this collection!

My first card features the Hybrid Tea Rose and Tea Pot, Ferns & Ivy Etched Dies, Mosaic Bracket Card Builder Etched Dies, and the Sending You Stamp & Die Set.

I think all flowers are beautiful, but there is something about a rose that makes it a prize to receive, to grow and to create using paper. My first card HAD to feature them in one of my all-time favorite colors - Pink! The tea pot and the lovely foliage made designing this card so much easy and fun!

To create my card, I first die cut Susan's Specialty Cardstock using the flower dies from the Hybrid Tea Rose and Tea Pot Die Set using my Spellbinders Platinum 6" Machine. I die cut quite a number of pieces, as I wanted to create a bunch of four flowers in total for my card. I coloured the die cut pieces using watercolor half-pans in the shades - Cotton Candy and Coral Berry and shaped the petals using the loop tool and tweezers from Susan’s Garden Ultimate Tool Kit. Next, I die cut Fern Cardstock using the leaf and fern dies from the Hybrid Tea Rose and Tea Pot Die Set and Ferns & Ivy Etched Dies. I added striations and veins to the die cut pieces using the leaf tool from Susan’s Garden Ultimate Tool Kit and blended Aged Mahogany Distress Oxide around the centres using a sponge dauber for interest.

Next, I die cut Watercolor Sheets and Brush Gold Cardstock using the teapot die included in the Hybrid Tea Rose and Tea Pot Die Set. I watercoloured the piece using Mountain Mist paint and adhered the gold die cut pieces along the bottom of the teapot and the handle. Once that was done, I went ahead and die cut Snowdrift Cardstock and Brush Gold Cardstock using the mosaic pattern die from the Mosaic Bracket Card Builder Etched Dies and slightly offset the two pieces to create an illusion of depth. I adhered it to my card panel using foam adhesive and then assembled the rest of the card together. I then stamped the sentiment from the Sending You Stamp Set onto Snowdrift Cardstock using Versafine Onyx Black Ink and then die cut out the images using the coordinating dies. I popped them on to my card panel using foam tape for dimension.

I matted my card panel to Pink Sand Cardstock and adhered it to a side-folding white square card base with tape runner. Then, to finish, I added a row of white pearls to the bottom of the tea cup and around my background panel, which were coloured using a Sharpie Metallic Marker in Gold.

My next card features the Cactus Dahlia and Ornamental Garden Pottery, Ferns & Ivy Etched Dies, and the Sending You Stamp & Die Set.

To begin, I die cut Susan's Specialty Cardstock using the flower dies from the Cactus Dahlia and Ornamental Garden Pottery Die Set using my Spellbinders Platinum 6" Machine. I die cut a large number of petals to help me create three large and a couple of other smaller flowers. I love Pink Dahlias, so I tried to create them using paper on my card here. I coloured the pieces using watercolor half-pans in Rubellite, Coral Berry, and Cotton Candy, and shaped the petals using the loop tool and tweezers from Susan’s Garden Ultimate Tool Kit. Next, I die cut Fern Cardstock using the leaf, fern, and ivy dies included in the Cactus Dahlia and Ornamental Garden Pottery Die Set and Ferns & Ivy Etched Dies. I added striations and veins to the die cut pieces using the leaf tool from Susan’s Garden Ultimate Tool Kit and blended Aged Mahogany Distress Oxide to the centres using a sponge dauber. I must also mention here that I have followed Susan's method of colouring and shaping the flowers as demonstrated in her videos on the Spellbinders YouTube channel, so if you would like to learn how to create such realistic-looking flowers, I highly recommend following her videos.

Next, I trimmed a piece of patterned paper from Papericious's The Date Night Collection to a 5.75" square, mat it to a panel of Brushed Silver Cardstock, and then adhered it to a top-folding white square card base with tape runner. Next, I die cut Portobello Cardstock using the Pottery Die from the Cactus Dahlia and Ornamental Garden Pottery Die Set. I blended Aged Mahogany Distress Ink around the edges of the die-cut to add dimension. I popped the blooms, foliage, and the pot on to my card panel using a mix of liquid adhesive and foam squares.

The sentiment from the Sending You Stamp Set was stamped on to Snowdrift Cardstock using Versafine Onyx Black Ink and then die cut out using the coordinating die. I trimmed out the secondary part of the sentiment 'Lots of Love' using my scissors and popped the pieces to my card background using foam adhesive. Then, to complete my design, I adhered a few Crystal Clear Droplets in varying sizes.

Moving on to my third card for the day, which features the Geranium and Antique Wooden Bucket Die Set and the Ferns & Ivy Etched Dies. I decided to incorporate some stenciling on this card for texture and dimension.

For my card, I first die cut Susan's Specialty Cardstock using the flower dies from the Geranium and Antique Wooden Bucket Die Set using my Spellbinders Platinum 6" Machine. I die cut quite a large number of flowers, since I wanted to create a bucket overflowing with handmade flowers. I blended two shades of orange (Sunkissed and Orange Cream) to colour the die cut pieces and shaped the petals using the loop tool and tweezers from Susan’s Garden Ultimate Tool Kit. I added White Micro Pearl Beads to the centres of each flower for interest and kept them aside to work on my other card elements.

Next, I die cut Fern Cardstock using the leaf and ivy dies included in the Geranium and Antique Wooden Bucket Die Set and Ferns & Ivy Etched Dies. I added striations and veins to the die cut pieces using the leaf tool from Susan’s Garden Ultimate Tool Kit and blended Aged Mahogany Distress Oxide around the edges of the pieces using a sponge dauber for definition. Next, I die cut Graphite Cardstock using the Antique Wooden Bucket Die from the Geranium and Antique Wooden Bucket Die Set. I also die cut Silver Mirror Cardstock using the Bucket Bail Die and Timber Cardstock using the Bucket Bail Handle Die. I assembled the piece together using liquid adhesive and kept it aside to work on my stenciled background.

Next, I secured the Cubist Cube Stencil on a sheet of Watercolor Paper to stencil over the background using Modelling Paste mixed with Silver Lake ink. Once the panel was dry, I lightly watercolored the bottom of it with Paper Bag Ink as a way to ground the images. I also watercolored the upper two-thirds of the panel using Mountain Mist ink to help bring the colours together. I then adhered the geraniums and the bucket together on my stenciled card background using a mix of liquid adhesive and foam tape. The sentiment was stamped using Versafine Onyx Black onto a panel of Snowdrift Cardstock and then cut out using a Mini Tag Die. I matted my card background to a custom-colored panel, which was watercolored using Sunkissed and Orange Cream inks, and then adhered it to a top-folding white card base with tape runner.

My last card for today features the Oriental Lily and Wellies Die Set, Kerria Japonica Etched Dies, Shapeabilities Vintage Stitched Squares Etched Dies, and the Sending You Stamp & Die Set. The cute rain boots included in the Oriental Lily and Wellies Die Set are very hard to resist, so I combined it with a bouquet of handmade lilies blooms for a cheerful thank you card.
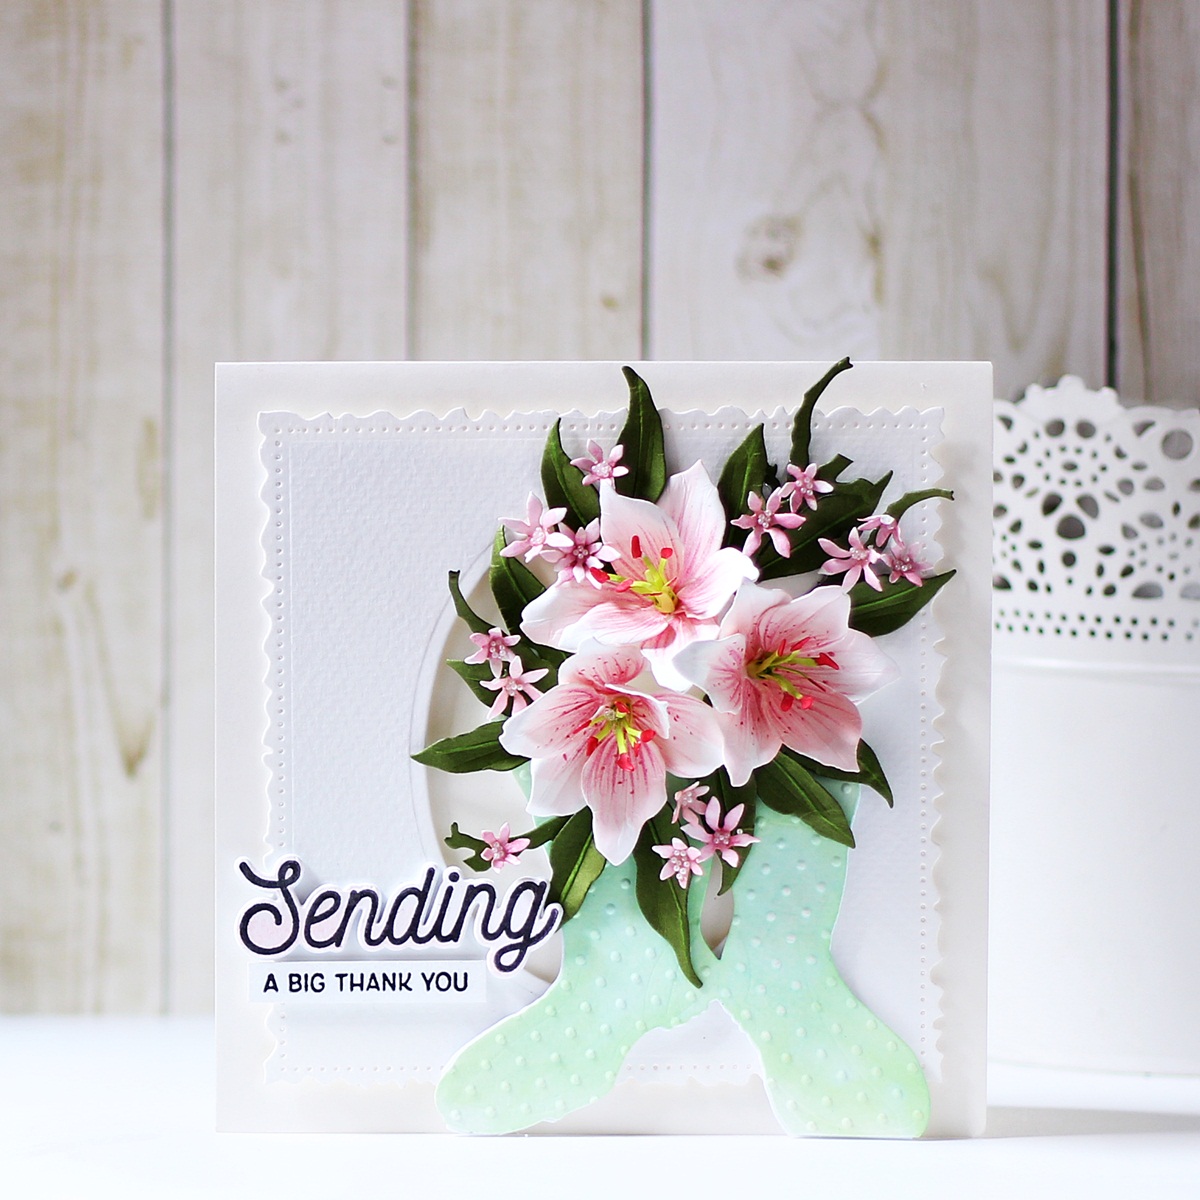
To create my card, I first die cut Susan's Specialty Cardstock using the flower dies from the Oriental Lily and Wellies Die Set using my Spellbinders Platinum 6" Machine. I die cut a sizable number of petals to help me create three flowers for my card. I colored the centre of the petals using Pink Diamond and Cotton Candy watercolor half-pans and shaped the petals using the loop tool and tweezers from Susan’s Garden Ultimate Tool Kit. The tips of the stamens were coloured using Festive Berries Distress ink, while the base was coloured using Twisted Citron Distress ink. I also added some dot and line details with Alcohol Markers on the petals to help make the lilies look very realistic.

Next, I die cut Fern Cardstock using the leaf and branch dies included in the Oriental Lily and Wellies Die Set and Kerria Japonica Etched Dies. I added striations and veins to the die cut pieces using the leaf tool and small ball stylus from Susan’s Garden Ultimate Tool Kit. I also die cut Snowdrift Cardstock using the Medium and Small Flower dies included in the Kerria Japonica Etched Die Set. I coloured the pieces using the Cotton Candy Paint Pan and shaped the petals using the loop tool and tweezers from Susan’s Garden Ultimate Tool Kit. I added White Micro Pearl Beads to the centres of each flower for interest and kept them aside to work on my other card elements.

I die cut Watercolor Paper using the Wellies die included in the Oriental Lily and Wellies Die Set. I watercolored the piece using Frayed Leaf and Mountain Mist half-pans and then embossed the panel using the Swiss Dots Embossing Folder. Next, I die cut Watercolor Paper using the Square 2 Die in the Shapeabilities Vintage Stitched Squares Etched Dies. Then, I cut an aperture in the centre of the panel using the Nestabilities Classic Ovals (Large) Etched Dies. Next, I stamped my sentiment from the Sending You Stamp Set on to Snowdrift Cardstock using Versafine Onyx Black Ink and then cut it out using the coordinating die. I trimmed out the secondary part of the sentiment 'A Big Thank You' using my scissors and popped the pieces to my card background using foam adhesive. I lightly inked the die cut sentiment using Cotton Candy ink for interest.
The card panel was foam mounted to a top-folding white square card base for dimension. I assembled the wellies, the lilies, and the sentiment on my die cut panel and popped them to my panel using foam adhesive. Then, to finish, I popped the sentiment strip up on the bottom of the card with foam adhesive.

I hope you enjoyed this set of floral cards and thank you so much for stopping by today. Be sure to check out the Susan's Garden Club Collection on the Spellbinders website for more inspiration and details! The possibilities are truly endless!

If you like what you've seen from me, please give me a follow over on my Instagram (@hussena_cal) and/or subscribe to my blog if you haven't already.


Wow they are all just stunning, gorgeous work on the shaping and coloring, lovely arrangements, all are wonderful!
ReplyDeleteWhat gorgeous set of cards. Wow. I just got the Geranium set and can't wait to try them!
ReplyDelete