Hello, crafty friends!
I have something very new and exciting to share today. The lovely folks at Spellbinders sent me their Amazing Paper Grace February Die of the Month to work with and I have some project ideas to share using it. If you are not familiar with the Spellbinders Club Kits, I highly recommend checking them out. HERE's a link to all their Monthly Club Kits. Their kits are truly value for money and I have really enjoyed working with them.
I have TWO projects to share today using the APG (Amazing Paper Grace) February Die of the Month, so without further ado, let's get started:
I have always been a big fan of Becca Feeken's dies and designs. They are so intricate and exquisite and can really dress up any project without doing much. I wanted to create a Card which would be perfect to use as a Wedding Card. This Enchantment Tall Flip and Gatefold Card Die Set can be used to create a variety of projects and are designed in signature Becca style.
My card measures 5" X 7". To create this card, I first started by die-cutting the main card panel. I cut two die panels and folded them in half leaving a 1/2" inch space on the side of the paper to glue this to the card base. This has to be done, because the largest frame die cuts only one one side and scores on the other as these dies are designed to create Gate Fold Cards. HERE is a video by Becca Feeken explaining how to use these dies.
After adhering the two side panels of the card on to my card base, I created a belly band to hold the card close. I have used a 12" X 2" piece of cardstock to create the band and scored it at 5" approximately to fold.
Then, I die cut the center piece using a patterned paper and stamped my sentiment on it. I also added gold foil cardstock behind it to help accentuate it. I die cut a border from the Shadow Box Ribbon Threader Etched Dies using gold foil cardstock to add some detail to the belly band.
The white and blue flowers were made using the flower dies included in the Enchantment Tall Flip and Gatefold Card Die Set. I lightly coloured and embossed them to give them a more natural look. I also adhered some mulberry flowers, fillers, and rose buds to complete my cluster.
Here is how the card looks when opened. There is enough space to include a message for the recipient.
My second project is an Envelope cum Card. This piece can again be gifted to someone at their Wedding or any special occasion. I have tried to keep this one simple and elegant. Trust me, this looks really glamorous in real life.
The concept behind this project was that I wanted to create a card which was shaped like a Clutch Purse, since this particular die is shaped like a handle when used individually. It's perfect for making small gift bags and hence, an elegant purse too!
You can see the gorgeous gold foil in this picture. I created this handle like shape for the clutch by partially die cutting the die twice from cream cardstock to give it some thickness, and once from gold foil cardstock to accentuate it. I adhered all the three layers one on top of the other.
I went with a dainty floral arrangement on this one. I die cut the flowers from the flower dies included in the Enchantment Tall Flip and Gatefold Card Die Set. I lightly shaped and coloured them and grouped them together with some mulberry rose buds and die cut leaves to give it a complete look.
I have used the corner dies included in the set to create inserts for my project, both on the outside flap as well as inside the card.
I also used tiny magnets for the closure of this card. These magnets are super strong and give the project the proper look of a clutch purse while serving a more practical purpose.
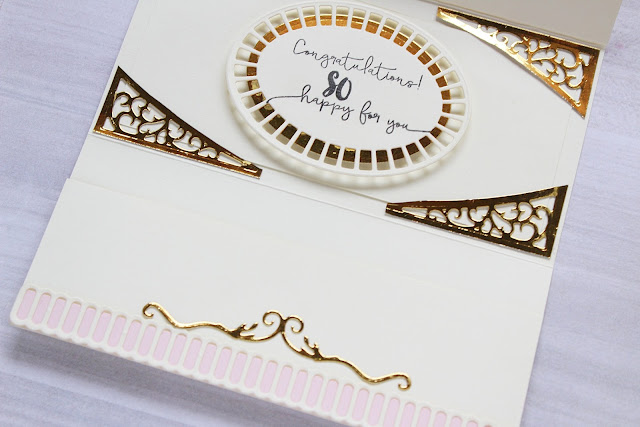
When the card is opened, the top half can be used for writing a little note to the recipient or you can stamp a sentiment in the centre like I did. The bottom half has a pocket in which you can either place a gift card or add some money depending on who you are looking to gift it to!
Here's a closer look at the corners and the sentiment. I have used gold foil cardstock for die cutting them. I feel it gives it a very regal look.
I also wanted to some pretty little details to the bottom half of the pocket. I die cut a flourish from gold foil cardstock using the die included in the Shadow Box Ribbon Threader Etched Dies. I also added a die cut ribbon using dies from the same set and adhered it to my card for a finishing touch.
That's it from me today. I hope you enjoyed seeing my projects. I really loved creating with the APG February Die of the Month. This is truly a very versatile set and I would recommend checking out the other inspiration projects using this die set on Becca's blog. There's so much one can do with it!
If you liked my projects and found them inspirational, please leave a comment letting me know. Thank you so much for stopping by!
Have a great day!


Absolutely Gorgeous 😍!!
ReplyDeleteWowww!! This is such an intricate and gorgeous die and super fabulous inspirations from you!! <3
ReplyDeleteGorgeous
ReplyDeleteWow, amazing projects! So sweet and elegant. Amazing dimension and designs.
ReplyDelete