Hello friends!
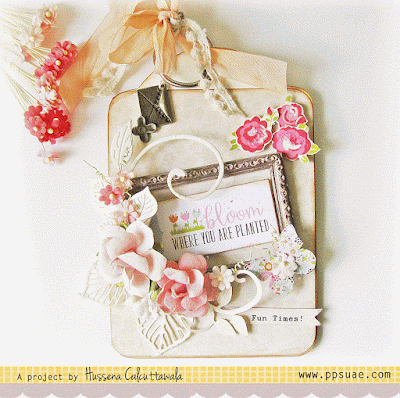
Today I have a Tag Album to share and I also have a step by step tutorial on how I created it. This was made way back in May, but I just kept feeling lazy and never got around posting it. Anyhow, I hope you like it. :)
In the meantime, here’s a detailed look of this tag album. I have created a 5 page album and embellished it using die-cuts from the Echo Park Spring Ephemera Pack and the base papers used in the album are from Graphic 45 Mon Amour Collection & Echo Park Teacher’s Pet collection.
Cover page of the album.
The back side.
Second page.
Back side.
Third page.
Back side.
Fourth page.
Back side.
The last page..Phew!
And the back side. I have created a lil' pocket to hold some tags for journaling.
Now, for the TUTORIAL
Step 1 –To begin with the base of the album, I have taken a Graphic 45 tag as my base template and I have drawn and hand-cut the tags by tracing it on a creme color cardstock. I cut out 5 tags, but you can choose the number of tags you want to work with. You can even use old wedding cards or other scraps of paper left over in your stash. The base tags will eventually be covered with patterned paper, so none of the designs will show through.
After, I had traced and cut the tags, I punched in the eyelets using the WRMK Crop-A-Dile and 3 1/4″ bronze colored eyelets.
I had also created a square base template for the tag. This template will help you to trace around your pattern papers which are to be stuck on both sides of your tags. ( I simply eyeballed the square shape of the tag to create the template)
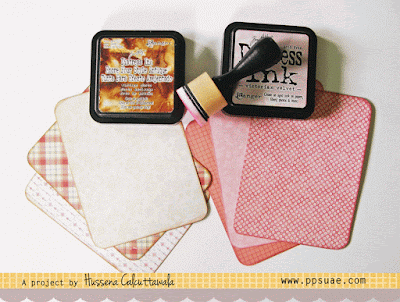
Step 2 – Now using the square template shown above, first trace it on your pattern paper. In my case, it’s Graphic 45 Mon Amour Paper pad. Use a paper trimmer and a corner-rounder punch to give your base a neat finish.
These are the papers I selected to work with.
Step 4 – Now, distress the edges of your base pattern papers using the same colors of Distress inks.
Step 5 – I adhered the patterned papers on both sides of the tags using liquid adhesive so that there is scope for adjustment before you finally stick your paper to the tag. These are the tags with the patterned papers adhered on the front side.
And this is the back side!
Graphic 45 Mon Amour 6 X 6″ Paper Pad
Echo Park Teacher’s Pet 6 X 6″ Paper Pad
Authentique Collection Kit 12 X 12″– Infused
Crate Paper 6 X 6″ Paper Pad- Craft Market
Cuttlebug A2 Embossing Folder/Border Set Anna Griffin Brocade
October Afternoon Sidewalks Flower Sack
Echo Park Spring Ephemera Pack
Prima Marketing Tales of You & Me Flowers- Love Letters Faber Castell Gesso Jar
Prima Marketing Art Ingredients: Mica Powder
Martha Stewart 3 in 1 Hydrangea Punch
Martha Stewart 3 in 1 Butterfly Punch
Spellbinders Nestabilities Label 18 Die
Spellbinders Fluer De Lis Rectangles Die Ranger Inkessentials Mini Ink Blending Tool
Distress Inks- Vintage Photo
Tim Holtz Ideaology Metallic Trimmings Pack
Ranger Inkessentials Wonder Tape redline – 0.5″ X 15′ Crop-A-Dile Eyelet Setter and Punch
Seam Binding Ribbon
Hope you like my tutorial. If you have any queries, please leave me a comment below and I will try to answer it as soon as possible. Thank you for stopping by!
I'm entering this tag album in the Simon Says Stamp- Wednesday Challenge
P.S - I know I have become very irregular in posting as well as commenting on all your posts, but don't worry. I have loads of projects to be posted in July so do keep a look out. ;) I will also try to catch up with all your posts.
Have a nice day everyone!


So glad you shared this album on your blog, Hussena. It's just awesome. Your work is very inspiring.
ReplyDeleteWOW! Gorgeous album! Love it! Each page is so beautifully embellished! Your creativity is amazing! :)
ReplyDeleteOh wow, it's absolutely stunning!! I love the design!! You embellished each tag perfectly!! What a gorgeous project this is!! Love, love it!! Have a great day!! Big hugs :)
ReplyDeleteLisa
A Mermaid's Crafts
Its Gorgeous ,loved seeing it once again :) beautifully embellished ,Hussena Style ! Looking forward to your posts as I have been missing them :)
ReplyDeleteVery Pretty in classic Hussena style
ReplyDeleteCheers
Dr Sonia
SO beautifully made Hussena!! Each and every tag is gorgeous!! :)
ReplyDeleteSuchi xx
Gorgeous tag album Hussena! It's so pretty and feminine & beautifully embellished.
ReplyDeleteThanks for joining us at Simon Says Stamp Wednesday Challenge
Mandy xx