Hello friends!
I am posting after quite a long time. I am trying to be more regular on my blog, but somehow don't seem to find time. :(
If you want to be updated with my latest work, please do follow Papericious and Pretty Paper Studio. You will find all my new work there :)
Moving onto today's post, I have an altered DIY tin to share. This is a very easy to do fun crafty makeover and I even have a step by step tutorial for it, so sit back, relax and hope you like it!


PHOTO TUTORIAL
Supplies used :
Core’dinations Kraft Core Nostalgic Cardstock
Cuttleubg A2 Embossing Folder/ Border set by Anna Griffin- Brocade
Spellbinders Nestabilities Decorative Elements Dies Elegant Ovals
Prima Marketing Tales of You & Me Flowers -Sweet Little Notes
Prima Marketing Tales Of You & Me Flowers – Love Letters Authentique Collection Kit 12″X12″ – Infused
Cheery Lynn Design Dies – Small Exotic Butterflies #1 W/Angel Wings
Tim Holtz Idea-Ology Sanding Grip Hand Held Block
Faber Castell Gesso Jar 100ml
Prima Marketing Chalkboard Paint 8.5oz Charcoal Black Distress Ink – Peacock Feathers
Sizzix Big Shot Machine Gray & White
Plaid® Mod Podge® Matte 8 Oz
American Crafts This To That Foam Tab Adhesive – Circles

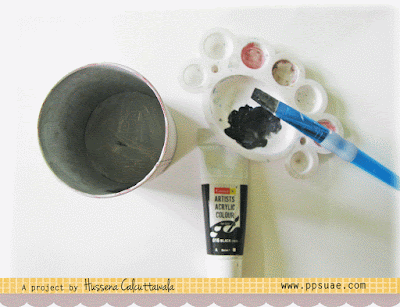
Step 1 – I first sanded the entire base of the tin both on the outside as well as on the inside before covering it up with a layer of White Gesso.

Step 2 – After the Gesso dried completely, I colored the insides of my tin using a black Acrylic paint to give it a better finish.
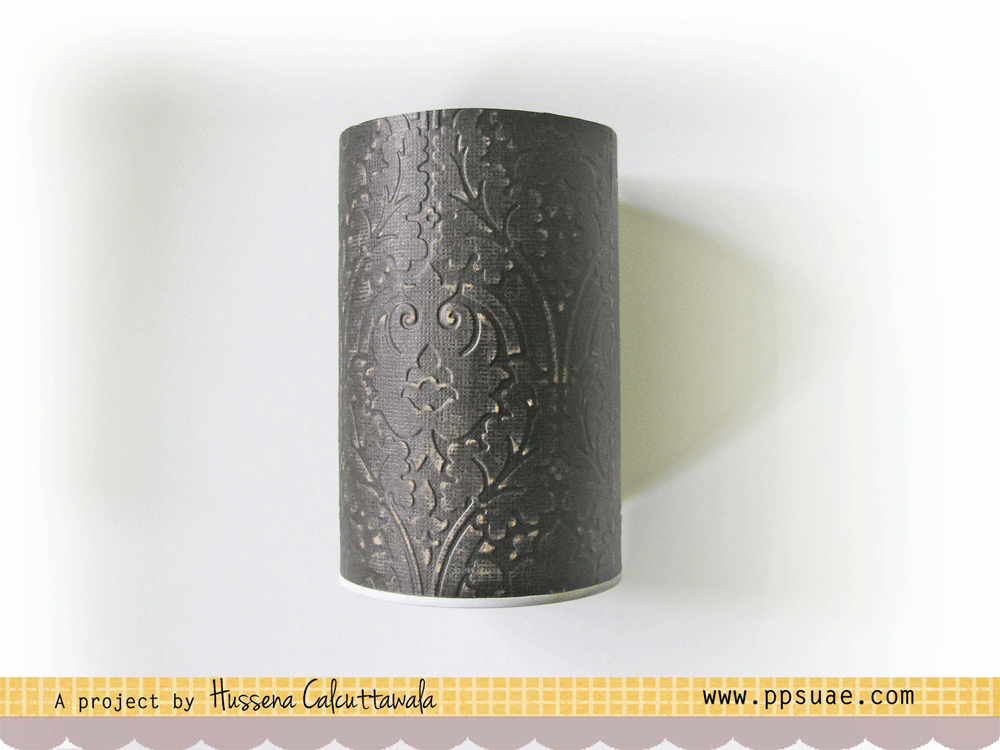
Step 3 – To decorate the outside of the tin, I have used Core’dinations Kraft Core Nostalgic Cardstock and embossed it using an embossing folder from Anna Griffin – Brocade. You will need atleast 2 sheets of 6 X 6” cardstock to cover the entire tin depending on the width and height of your tin.
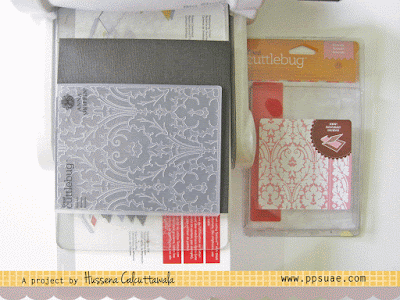
Step 4 – After I embossed the cardsotck, I sanded it using a small sanding block from my stash. This brings out the ‘Kraft core’ beautifully as shown in the picture.


Step 5 – Cover the entire base of the tin using the embossed cardstock. Adhere it using Tacky tape or some other strong glue. I used Mod Podge as my adhesive.

Step 6 – It’s time to now embellish the tin and I have used the Spellbinders Elegant Ovals die to die-cut three different sizes of decorative ovals using the Tim Holtz Kraft Core Nostalgic Cardstock.

Step 7 -I punched out scalloped laces using the EK Success Scalloped Scallop punch from the Authentique Infused 6 X 6” Paper pad.

Step 8 – I die-cut the leaves for my foliage using a Sizzix Sizzlits- Medium Branch die from Tim Holtz Kraft Core Nostalgic Cardstock pack.

Step 9 – For my flowers, I have used a mix of flowers from Prima Marketing- Tales of You & Me collection and the small blue filler flowers are handmade using a Punch Bunch Punch which I then colored using Peacock Feathers Distress Ink.

Step 10 – I assembled everything and then added a butterfly which I die cut from a Cheery Lynn Designs die and a sentiment quote from a Fiskars stamp set.

I'm linking my project to this month's Ranganjali Challenge which is - Framed. (I have used die-cuts from Spellbinders to get that framed effect for my sentiment). Also linking it to SSS- Anything Goes.


Step 1 – I first sanded the entire base of the tin both on the outside as well as on the inside before covering it up with a layer of White Gesso.

Step 2 – After the Gesso dried completely, I colored the insides of my tin using a black Acrylic paint to give it a better finish.


Step 4 – After I embossed the cardsotck, I sanded it using a small sanding block from my stash. This brings out the ‘Kraft core’ beautifully as shown in the picture.


Step 6 – It’s time to now embellish the tin and I have used the Spellbinders Elegant Ovals die to die-cut three different sizes of decorative ovals using the Tim Holtz Kraft Core Nostalgic Cardstock.


Step 8 – I die-cut the leaves for my foliage using a Sizzix Sizzlits- Medium Branch die from Tim Holtz Kraft Core Nostalgic Cardstock pack.

Step 9 – For my flowers, I have used a mix of flowers from Prima Marketing- Tales of You & Me collection and the small blue filler flowers are handmade using a Punch Bunch Punch which I then colored using Peacock Feathers Distress Ink.

Step 10 – I assembled everything and then added a butterfly which I die cut from a Cheery Lynn Designs die and a sentiment quote from a Fiskars stamp set.

I'm linking my project to this month's Ranganjali Challenge which is - Framed. (I have used die-cuts from Spellbinders to get that framed effect for my sentiment). Also linking it to SSS- Anything Goes.
I hope you like this tutorial and find it helpful. Do leave me your comments/suggestions regarding this!
Have a nice day everyone!


Beautiful altered tin.
ReplyDeleteJulie x
This is gorgeous!! Love this! Great tutorial also. I love that spellbinders frame. :)
ReplyDeleteThis is really beautiful Hussena! I am amazed! :)
ReplyDeleteSuchi xx
I love your projects...hugs Ela
ReplyDeletehello! this is stunning, thanks so much for sharing the steps.....I created one years ago and it was so much fun, thanks for the inspiration! I am so glad you played along with us at simon says stamp wednesday challenge!
ReplyDeleteblog-paperie blooms
ig-2klines
sparkle & shine, kindness *~*
Gorgeous project!
ReplyDelete