Showing posts with label Guest Design Post. Show all posts

Thursday, January 6, 2022

Spellbinders Guest Design Post | Love You More Collection


Hello, crafty friends!
I'm so honoured to be guest posting today on the Spellbinders blog! I'm sharing a set of two cards today using dies from the NEW Love You More Collection. This die cutting collection features two sets that you can mix and match to create a variety of projects ranging from Valentine's Day cards or Anniversary Cards, just to name a few.

The Open House Door Base Die Set coordinates together with the Open House Valentines Set, but if you don't have that in your stash, you can easily substitute it with the Always Welcome Die Set as all of the accessories mix and match between these two styles of doors.

My first card features the Open House Valentines Set. I wanted to showcase how the die set could be used even without the front door die and this would be perfect to send to a friend or a loved one!

To create my card, I first trimmed piece of Snowdrift Cardstock to 4.25” x 5.5” and ink blended the top three-quarters of the panel using Cracked Pistachio and Tumbled Glass Distress inks, concentrating the darker shade towards the top. Next, I matted my panel with a piece of Brush Gold Cardstock. 

I die cut Wild BerryPink Sand, and Brush Gold Cardstock using the banner dies included in the Open House Valentines Set. I adhered each of the pieces down on my panel using foam adhesive for dimension. Next, I die cut Vellum using a Scalloped Circle die included in the Nestabilities Classic Scalloped Circles Small Etched Dies. Then, I die cut Snowdrift Cardstock using the 1-1/8-inch Circle Die from the Nestabilities Small Standard Circles Etched Dies. I layered the two pieces together, one on top of the other, using foam adhesive. Next, I die cut Wild Berry and Pink Sand Cardstock using the heart dies included in the Open House Valentines Set. I also die cut Pink Sand and Brush Gold Cardstock using the cute envelope and arrow dies included in the set. I adhered all the different die cut pieces on my panel using a mix of liquid glue and foam adhesive. 

Once that was done, I die cut SnowdriftWild Berry, and Brush Gold Cardstock with the door mat dies in the set. I layered the pieces together and adhered it on my panel using foam piece. I also die cut some mini hearts using leftovers from the die cut pieces to add to my card panel using liquid adhesive. Then, to complete, I went ahead and adhered the panel to a top-folding A2-sized white card base with tape runner.


For this card, I started off by die-cutting Snowdrift Cardstock using the Circular Stitch Background Etched Die in my Spellbinders Platinum 6" Machine. This die is super versatile and I love the beautiful die cut details in it! I matted the entire die cut panel with Pink Sand and Waterfall Cardstock before adhering to it a top-folding A2-sized white card base.   

I die-cut Pink Sand Cardstock, Brush Gold Cardstock, and White Foam Sheets using the outline and insert dies included in the Love You More Die Set. I adhered the pink die-cut sentiment on top of the gold die-cut with liquid glue, offsetting them a bit to form a shadow. I then adhered the shadow layers for each of the die cut pieces for dimension and depth. I then ink blended Picked Raspberry ink to the top three-quarters of the sentiment die-cut pieces for more depth. Once that was done, I adhered the pieces down to my panel using foam adhesive.

I die cut SnowdriftWaterfall, Brushed Silver, and Pink Sand Cardstock using the mini flower, leaf, and foliage dies from the Mini Blooms and Sprigs Etched Dies and Layered Blooms Etched Dies. I assembled the floral sprays together in the corners of the card and adhered them down on my panel using a mix of foam adhesive and liquid adhesive for dimension and interest. Then, to finish, I adhered a few sparkling blue rhinestones to the flower centers and around my panel to embellish. 

I hope you enjoyed this duo of cards featuring the Love You More CollectionThank you so much for stopping by today! You can find more inspiration over at my Instagram page

SPELLBINDERS SUPPLIES:
CS-003, CS-005, CS-017, CS-024, CS-027, SCS-116, SCS-117, SCS-151, SCS-160 S2-314, S4-114, S4-1091, S5-490, PCGO4E, PE-100, T-021

OTHER SUPPLIES:
Neenah Solar White Cardstock, Copic Markers, Picked Raspberry Distress Ink, Blending Tool, Sponge Daubers, Tape Runner, Foam Adhesive, Rhinestones, White Fun Foam Sheets

Tuesday, November 9, 2021

Handmade Cards using Be Bold Color Block Collection | Guest Post by Hussena Calcuttawala


Hello, crafty friends!
I'm so honoured to be guest posting today on the Spellbinders blog! I'm sharing a set of two cards today using dies from the new Be Bold Color Block Collection. I have made my cards in two different sizes - Slimline and Square and used varied colour schemes for making them too! 
The large letters from the Be Bold Color Block Collection stand out and add color for a fabulous colour block design. These dies are truly one a kind and so fun to create a variety of card designs!

I LOVE Slimline Cards and it's been a while since I made one, so I reached for the Merry Christmas Etched Dies first to create this bold and bright Christmas card. 

To begin, I trimmed a piece of Alabaster Cardstock to 9.5" X 4" and matted the entire panel with a piece of Pomegranate Cardstock. Then, I went ahead and adhered it to a top-folding slimline-sized white card base with tape runner.

I die cut the word 'Merry' from Pomegranate Cardstock, while the coordinating sentiment was die cut from Brush Gold Cardstock using the Merry Christmas Etched Dies. I also cut out the words from White Foam Sheets to adhere beneath the paper die cuts for dimension. 

Next, I die cut Pink Sand Cardstock using the small poinsettia die included in the Pop Up 3D Vignette Poinsettia Sleigh Set. I blended Worn Lipstick ink in the centre of each petal using a blending tool and embossed the petals using the 2mm ball stylus from Susan's Garden Ultimate Tool Kit. I also die cut Olive Green Cardstock using the evergreen sprig die included in the same die set. I adhered the different die cut pieces to my card front using the Bearly Art Precision Craft Glue. To finish, I adhered some Crystal Jewels to the flower centers for a bit of sparkle. 


My next project features the Love You Etched Dies from the Be Bold Color Block Collection. I really love the clean, simple, and modern look of this die set. It has so many possibilities! 

To create my card, I first trimmed a piece of Snowdrift Cardstock to 5.75" X 4.25". Then, I cut paper strips of varying sizes out of Pink SandBrush GoldWild Berry, Poppy Field, Persimmon, Beeswax, Rainforest, Fern, and Waterfall Cardstock using a paper trimmer to create my card background. I adhered the strips down on to my card panel using the Bearly Art Precision Craft Glue

I die cut the sentiment pieces from SnowdriftWild Berry, and Brush Gold Cardstock using the Love You Etched Die Set. I also cut them from White Foam Sheets to adhere beneath the paper die cuts for dimension. I wanted the sentiment to stand out from the rest of the card, so I ink blended Picked Raspberry Distress ink around the bottom two-thirds and edges of the letters with a blending brush to help define the edges more. Then, I popped up the sentiment on the panel using liquid adhesive. 

I adhered the gold die-cut sentiment on top of the pink die-cut with liquid glue, offsetting them a bit to form a shadow.  I die cut few hearts from Wild Berry and Brush Gold Cardstock and adhered it to my panel using the Bearly Art Precision Craft Glue. Finally, to complete, I adhered the panel to a top-folding white card base with tape runner.

OTHER SUPPLIES:
Light Pink Cardstock, Olive Green Cardstock, Raspberry Cardstock, Picked Raspberry and Worn Lipstick Distress Ink, Blending Tool, Tape Runner, Foam Adhesive, Crystal Jewels

I hope you enjoyed this set of bright and bold cards featuring the Be Bold Color Block Collection and are inspired to give it a try. Thank you so much for stopping by today! 
 You can find more inspiration over at my Instagram page. 

Tuesday, April 13, 2021

Spellbinders Guest Design Post | Spring Flora by Susan's Garden


Hello, crafty friends!
I am so honoured to be guest designing on the Spellbinders blog and have four card projects to share which I created using the exquisite Spring Flora Collection by Susan Tierney Cockburn. The entire collection is a treat for all flower makers and will help you create realistic and natural spring flowers. 


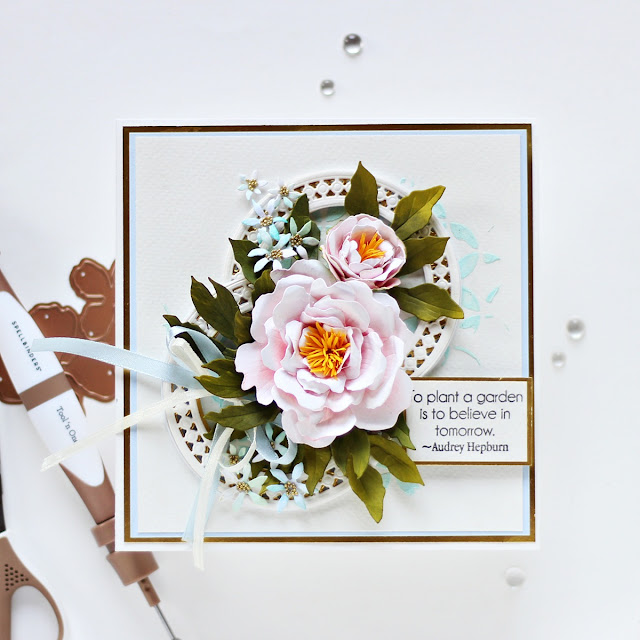
My first card features the Double & Single Peonies Etched Dies, Kerria Japonica Etched Dies, Lily of the Valley Etched Dies. I love peonies and had to start out by making a card featuring them in their full glory!

To create my flowers, I die cut the Double & Single Peonies Etched Dies out of Susan's Specialty Cardstock using my Spellbinders Platinum Machine. I die cut the medium and large layers twice from Specialty Cardstock, while the smallest layer was die cut thrice. Once all my pieces were die cut, I added some colour to the centres of the flowers using a foam blending tool. Then, I embossed the individual petals using the stylus tips from the Susan's Garden Ultimate Tool Kit

The stamens were die cut out of Lemon Drop Cardstock using the Double & Single Peonies Etched Dies. Once they were die cut, I simply rolled them up using a pair of tweezers and added them to the centre of the peonies using Craft Glue. The filler flowers were die cut out using the Kerria Japonica Etched Dies from Susan's Specialty Cardstock. I added some colour to the centres of the flowers using a foam blending tool and then embossed and shaped the petals using the stylus tips from the Susan's Garden Ultimate Tool Kit. Then, I added some mirco glitter balls to the flower centres for visual interest. 

The leaves were die cut from Fern Cardstock using the Lily of the Valley Etched DiesI lightly embossed them and added some detail to the die cuts using the various stylus tips (ball stylus tips, loop tools) included in the Susan's Garden Ultimate Tool Kit. Then, for my card background, I trimmed a piece of Watercolor Cardstock and used some coloured Embossing Paste to create a stenciled pattern on the panel.

Next, I die cut the Candlewick Circle Etched Dies from White Cardstock and Gold Mirror Cardstock and slightly offset the two frames to create an illusion of depth without excessive bulk. I arranged my floral spray over it and adhered it down to my panel using Craft Glue. The sentiment from the Spring Quotes Clear Stamp Set was stamped on a piece of White Cardstock using Black Licorice ink. I added a mat layer of Gold Mirror Cardstock to give it a more finished look and adhered it to my panel using foam squares

I matted my panel with Light Blue Cardstock, then Gold Mirror Cardstock, and finally adhered it to a top-folding white card base


My next card features the Parrot Tulip Etched DiesKerria Japonica Etched Dies, and the Lily of the Valley Etched Dies. I truly enjoyed creating these flowers for my card and have kept the background on this card very simple to keep the attention on the blooms. 

I die cut the flowers from the Parrot Tulip Etched Dies out of Susan's Specialty Cardstock. I coloured the sides and the centres of the petals using two different shades of Distress Oxides and then embossed and shaped them using the loop tool stylus tips from the Susan's Garden Ultimate Tool Kit. I really love how this tool kit includes everything to help you create realistic flowers and leaves, right from the ball stylus tips to the leaf tool tip, to the foam pads, tweezers and more. If you're passionate about flower making, this is one tool kit that you should definitely invest in. It has all the required tools in one place and is great value for money!

The filler flowers were die cut from Susan's Specialty Cardstock. I used Spun Sugar Distress ink to colour each of the petals using using a foam blending tool and then lightly shaped them using the 2mm ball stylus tip. Once they were all coloured and dry, I added micro glitter balls to the centres for visual interest. The leaves were  cut from Fern Cardstock using the Lily of the Valley Etched DiesI lightly embossed them and added some detail to the die cuts using the various stylus tips (leaf veiner, loop tools) included in the Susan's Garden Ultimate Tool Kit

I die cut the square pattern from the Fleur de lis Grandeur Fold Over out of White Cardstock and Gold Mirror Cardstock and slightly offset the two frames to create an illusion of depth. I foam mounted it to my panel and adhered the floral spray on it using Craft Glue. I stamped the sentiment from the Spring Quotes Clear Stamp Set using Black Licorice ink on the negative die cut piece of the Fleur de lis Grandeur Fold Over. I foam mounted it for dimension and then mounted the panel to a piece of Gold Mirror Cardstock. I mat the panel with a layer of Alabaster Cardstock and finally adhered it to a top-folding cream card base


My next card features the Hyacinth Etched Dies and the Lily of the Valley Etched Dies. This card took me a while to make simply because I had to die cut, colour, and emboss a large number of hyacinths to create my card design, but it was really fun at the same time!

I started by die cutting the Hyacinth Etched Dies out of Susan's Specialty Cardstock. I cut out multiples of them, so that I had extras on hand. This helps save a lot of time and effort when you're working on your projects. I used three different shades of Distress inks to colour each of the hyacinths. This was slightly time consuming, however if you want to do this quickly, you can use coloured cardstock or even paints/sprays to colour your die cuts. Once I finished colouring all the petals, I embossed them using the 2mm embossing stylus tip from Susan's Garden Ultimate Tool Kit. I used the foam mat included in the kit while embossing the flowers and it came in very handy. 

Then, I adhered each of the die cut pieces together using Craft Glue to create my hyacinths. The leaves were die cut using the Lily of the Valley Etched Dies out of Fern Cardstock. I used Peeled Paint Distress ink to colour the sides of the leaves using a foam blending tool for some definition and interest. I then lightly embossed them and added some detail to the die cuts using the various stylus tips (leaf veiner, loop tools) included in the Susan's Garden Ultimate Tool Kit

I trimmed a piece of White Cardstock to size and used a Moroccan Lattice stencil to create a soft, stenciled background design using a sponge dauber and Broken China Distress ink. Next, I die cut the large lace frame in the Floral Lace Frame Die Set from White Cardstock and Gold Mirror Cardstock and slightly offset the two frames for interest. 
Then, I die cut several panels of the Shapeabilities Vintage Stitched Squares Etched Dies out of White Cardstock and Gold Mirror Cardstock and adhered them one on top of the other to create the illusion of a frame. The large lace frame was foam mounted on this piece and the hyacinths were attached to the panel using Craft Glue. To finish, I adhered my card panel to a top-folding cream card base


My final card for today features the Lily of the Valley Etched Dies. This is such a dainty yet elegant die set and I wanted to create a card featuring the flowers and leaves together. It also complements the sentiment quite well. 

To begin, I die cut the flowers out of Susan's Specialty Cardstock. Once I had a sizable number of die cut flowers, I I used Spun Sugar Distress ink to colour each of the petals using using a foam blending tool and then lightly shaped them using the 2mm ball stylus tip. Next, I die cut the stem in the Lily of the Valley Etched Dies from Limeade Splash Cardstock. I lightly embossed it using the 2mm embossing  stylus tip included in the Susan's Garden Ultimate Tool Kit.

Then, I adhered each of the petals through the nodes of the stem. The leaves were die cut out of Fern Cardstock using the Lily of the Valley Etched Dies. I lightly embossed the centre of the leaves using the 5mm embossing stylus tip and drew some veins on the die cuts using the leaf veiner tool in the Susan's Garden Ultimate Tool Kit

Once my floral spray was complete, I die cut the Elegant Twist Ovals Etched Dies from Gold Mirror Cardstock. The  leftover negative die cut piece was coloured with Broken China Distress ink using a blending brush and I added some black paint splatters for visual interest. I also stamped a sentiment from the Spring Quotes Clear Stamp Set using Black Licorice ink on a small oval frame die cut from the Twist Ovals Etched Dies. Both the die cut pieces were foam mounted to the panel for dimension.  

Next, I took a piece of White Cardstock and trimmed it to size. I used the Snip It Flowers Die Set to emboss the panel using a rubber embossing pad in my die cutting sandwich. Then, I added some black paint splatters to the panel for interest. I matted this to a panel of Gold Mirror Cardstock and then adhered it to a side-folding cream card base

Other Supplies: Distress Inks - Broken China, Peeled Paint, Spun Sugar, Distress Oxides- Peeled Paint, Squeezed Lemonade, Tattered Rose; White Fun Foam, Watercolour Paper; Stencils, White Texture Paste; Embellishments: Ribbons, Mirco Glitter Balls, Black Acrylic Paint

I hope you enjoyed looking at my spring floral cards and thanks so much for stopping by today. You can find more inspiration over on my Instagram page @hussena_cal.
Thank you for stopping by!

Wednesday, June 17, 2020

Spellbinders Guest Design Post | Elegant Twist Collection by Amazing Paper Grace

Hello, crafty friends!
I'm so excited to be guesting on the Spellbinders blog today, sharing two card projects I created using the magnificent Elegant Twist Collection by Becca Feeken. I had such a great time working with this collection - the designs are beautiful and timeless and can be combined and used for so many projects!

Elegant Twist Collection creates designs with the classic braid motif in mind. Layer with other coordinating shapes to inspire elegance and beauty that Amazing Paper Grace by Becca Feeken is known for.

My first Card features the Elegant Twist Circles Etched Dies, the Splendid Trilliant Etched Dies, and a sentiment Glimmer Plate from the Borders and Sentiments Glimmer Hot Foil Plates.

I have been in love with Slimline Cards recently and decided to create one for my post as well. I will admit, that the measurements did take me some time to figure out, but I am quite happy with the end result. To create my card, I die cut three inserts for my circles using the small circle pattern and the small circle inner rim dies from the Elegant Twist Circles Etched Dies using my Platinum 6 Die Cutting and Embossing Machine - 6" Platform. I taped the two dies together while die cutting to help create the basic layout of my card. 

Then, I die cut the small circle outer rim die from Gold Mirror Cardstock to create the inlay piece for my circles. I adhered the die cut Gold Mirror Cardstock frames behind my circles to interweave the die cut designs. Next, I die cut the rims for my circles by die cutting the small circle outer rim and the small circle pattern dies together (I used Washi Tape to tape the two frames together while die cutting) from Buttercream Cardstock. I repeated this process thrice in order to get three rims for my circle frames and then adhered them down to my panel.

 I also die cut three circles using the small circle inner rim die from patterned paper to add to the centres of the circles on my panel. I just felt the card was looking a bit too plain without it, and so, I went ahead and added them. I know, it sounds a tad bit confusing, however, once you figure it out, you'll be able to create these Slimline Card designs in a jiffy!

To embellish my card, I created few handmade flowers. I used the flower dies from this month's Amazing Paper Grace Club Kit Set to die cut my flowers from Color Splash Watercolor Sheets and coloured them using Banana Cream Re-Inker. I love using re-inkers to color my flowers as it's so easy and quick to do. You need to just take a sheet of Watercolor paper, add a few drops of the Re-inker of your choice, and then use a Watercolor Brush to paint the paper. It's a great technique to help colour a large number of flowers quickly as well. I also added some foliage for my flowers which were die cut using the dies from the June 2020 Card Kit. I coloured the leaves and foliage using the Sweet Pear Re-Inker. I did dilute the colour using water for a more light wash of colour. 

For my sentiment, I used one of the sentiment plates from the Borders and Sentiments Glimmer Hot Foil Plates Set. I used the Glimmer Hot Foil Roll - Champagne to foil my sentiment in my Glimmer Machine. I then used a die to die cut the banner to create my sentiment strip. I then adhered my panel to a custom-made card base using foam tape for dimension. 


My second Card features the Elegant Twist Ovals Etched Dies, Splendid Trilliant Etched Dies, along with a sentiment Glimmer Plate from the Borders and Sentiments Glimmer Hot Foil Plates.

I love the gorgeous die designs from the Elegant Twist Ovals Etched Dies and wanted to created a card to showcase it in its full beauty. I started with a piece of Whip Cream 8.5 x 11 Cardstock and trimmed it to size, as I wanted to foil the card panel using the Card Creator A2 Corner Cotillion Die from one of Becca's previous collections. I foiled the entire die piece using the Glimmer Hot Foil Roll - Blush using my Glimmer Machine. This provided for an interesting background piece.

Then, I die cut the large oval pattern die from Gold Mirror Cardstock and kept it aside. I also die cut an oval using my Nestabilities Classic Ovals Die Set from Buttercream Cardstock. I foiled my sentiment on this oval die cut using one of the Glimmer Plates from the Borders and Sentiments Glimmer Hot Foil Plates. I used the same Glimmer Roll - Blush for foiling the piece.  Then I adhered the frame and the oval piece to my previously foiled panel.

I decided to create my own handmade flowers to embellish the card. I used the flower dies from the Amazing Paper Grace Club Kit Set to die cut the flowers from Color Splash Watercolor Sheets. I coloured them using the Turbo Teal Re-Inker which was diluted with water for a lighter color. The leaves were die cut using the die from the Sweet Cottage Flowers Etched Dies. The additional foliage was die cut using the various dies from the June 2020 Card Kit. I used the Sweet Pear Re-Inker to colour the leaves and foliage.

Now it was time to put my card together - I adhered all the embellishments on my card panel. I felt that the card was missing something, so I die cut four corner pieces from the Splendid Trilliant Etched Dies using Gold Mirror Cardstock. I adhered them to another card panel and then finally matted this panel to my card base. I love how the oval die cut adds so much elegance to the design. It's definitely a must-have in your stash!

OTHER SUPPLIES​​:
Neenah Solar White 110 LB Cardstock, Cream Linen Textured 12 x 12 Cardstock, White Fun Foam; Patterned Paper: Papericious Me Before You 12 X 12 Patterned Paper Pack; Adhesive: Scrapbook Adhesives 3D Foam Squares, Tombow Mono Multi Liquid Glue, Double Sided Foam Tape, Mini Glue Gun; Tools and Accesories: McGill Inc. Paper Blossoms Tool Kit, Cream Thread Pollens, Prima Marketing Watercolor Brush Pens

Thank you so much for letting me help inspire you today! I hope you liked my creations! If you did, please let me know which card is your favourite and why! :) To
see more of my work with Spellbinders products, do visit my Instagram page and subscribe to my Blog. Stay safe and have a wonderful day.

Friday, January 10, 2020

Tonic Studios Guest Design Post | Susan's Garden Club

Hello, crafty friends!
Wishing you all a very Happy New Year!

I am so excited and honoured to share that I am a guest designer today for Tonic Studios! I have two projects to share using the range of NEW dies from Susan's Garden Club. I just adore making handmade flowers and Susan's dies are amazing to create realistic looking flowers with minimal effort. Without much ado, let's get right to my projects!


My first project is an elaborate floral Card featuring the Susan's Garden Club - Pom Pom Dahlia Die Set & the Susan's Garden Club - Holly & Berries Die Set.

To create my card, I first took a piece of Bright White Watercolor Paper and did some stenciling on the background to create a textured background for my flowers. Next, I started working on the main focal for my card, which are the flowers. I die cut the Susan's Garden Club - Pom Pom Dahlia Die Set from Watercolor Paper using my die cutting machine. I also cut a bunch of holly leaves and foliage using the Susan's Garden Club - Holly & Berries Die Set

Once they were all die cut, I used my Zig Brush Markers to colour the flowers. I did not colour them all perfectly - I just added colour to the centre and the sides of the petals and used a Watercolor Brush to spread the colour. I did this for all the flower die cuts, and once they were dry, I used Embossing Tools to shape my flowers. I repeated the same process for the leaves - I used Zig Markers to colour them along with a Watercolour Brush, and then slightly shaped them to give them a more realistic finish.  

For the foliage, I die cut it from the Susan's Garden Club - Holly & Berries Die Set using Watercolour Paper and then added yellow and peach dots to create berries using the Nuvo Crystal Drops - Dandelion Yellow and Nuvo - Jewel Drops - Rose Water. I arranged all the elements together to create my floral spray and then adhered them to my card panel. To finish off, I added a sentiment strip over the die cut circle window and mounted my panel to a a top folding White card base. 


My next project is a Gift Box created using the Susan's Garden Club - Columbine Die Set & the Susan's Garden Club - Holly & Berries Die Set.

I am a sucker for pretty packaging and totally love creating my own gift boxes, bags, tags, and more, so I decided to create a Gift Box and embellish it using flowers made from Susan's Garden Dies. I created the lid of the box using Patterned Paper while the base was made from White Cardstock. Then, I die cut several flowers and leaves from the Susan's Garden Club - Columbine Die Set using Watercolour Paper. I went with different colours this time, and kept the flowers in White and Peach.

 I used a mix of leaves from this die set and the Susan's Garden Club - Holly & Berries Die Set and coloured them using green dye inks. I arranged all of them on the box and added some additional foliage as well. The little peach berries that you see were created using the Nuvo - Jewel Drops - Rose Water. I added two inverted scalloped rectangle frames and sentiment strips to complete my project. I was quite pleased with the way this one turned out. I'd love to know what you think of it?

Thank you for visiting and checking out my post! I hope you liked my projects using these dies. If you did, I would love to hear from you!
Do follow me on Instagram @hussena_cal for upcoming projects using Susan's Gardens dies.