Showing posts with label Envelope. Show all posts

Monday, February 18, 2019

Amazing Paper Grace Die of the Month | February 2019


Hello, crafty friends!
I have something very new and exciting to share today. The lovely folks at Spellbinders sent me their Amazing Paper Grace February Die of the Month to work with and I have some project ideas to share using it. If you are not familiar with the Spellbinders Club Kits, I highly recommend checking them out. HERE's a link to all their Monthly Club Kits. Their kits are truly value for money and I have really enjoyed working with them. 

I have TWO projects to share today using the APG (Amazing Paper Grace) February Die of the Month, so without further ado, let's get started:

I have always been a big fan of Becca Feeken's dies and designs. They are so intricate and exquisite and can really dress up any project without doing much. I wanted to create a Card which would be perfect to use as a Wedding Card. This Enchantment Tall Flip and Gatefold Card Die Set can be used to create a variety of projects and are designed in signature Becca style.

My card measures 5" X 7". To create this card, I first started by die-cutting the main card panel. I cut two die panels and folded them in half leaving a 1/2" inch space on the side of the paper to glue this to the card base. This has to be done, because the largest frame die cuts only one one side and scores on the other as these dies are designed to create Gate Fold Cards. HERE is a video by Becca Feeken explaining how to use these dies.

After adhering the two side panels of the card on to my card base, I created a belly band to hold the card close. I have used a 12" X 2" piece of cardstock to create the band and scored it at 5" approximately to fold. 

Then, I die cut the center piece using a patterned paper and stamped my sentiment on it. I also added gold foil cardstock behind it to help accentuate it. I die cut a border from the Shadow Box Ribbon Threader Etched Dies using gold foil cardstock to add some detail to the belly band.

The white and blue flowers were made using the flower dies included in the Enchantment Tall Flip and Gatefold Card Die Set. I lightly coloured and embossed them to give them a more natural look. I also adhered some mulberry flowers, fillers, and rose buds to complete my cluster.

Here is how the card looks when opened. There is enough space to include a message for the recipient.


My second project is an Envelope cum Card. This piece can again be gifted to someone at their Wedding or any special occasion. I have tried to keep this one simple and elegant. Trust me, this looks really glamorous in real life.

The concept behind this project was that I wanted to create a card which was shaped like a Clutch Purse, since this particular die is shaped like a handle when used individually. It's perfect for making small gift bags and hence, an elegant purse too!

You can see the gorgeous gold foil in this picture. I created this handle like shape for the clutch by partially die cutting the die twice from cream cardstock to give it some thickness, and once from gold foil cardstock to accentuate it. I adhered all the three layers one on top of the other.

I went with a dainty floral arrangement on this one. I die cut the flowers from the flower dies included in the Enchantment Tall Flip and Gatefold Card Die Set. I lightly shaped and coloured them and grouped them together with some mulberry rose buds and die cut leaves to give it a complete look.

I have used the corner dies included in the set to create inserts for my project, both on the outside flap as well as inside the card.

I also used tiny magnets for the closure of this card. These magnets are super strong and give the project the proper look of a clutch purse while serving a more practical purpose.

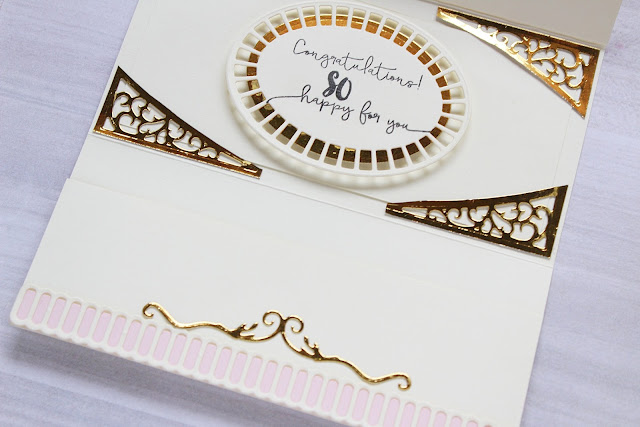
When the card is opened, the top half can be used for writing a little note to the recipient or you can stamp a sentiment in the centre like I did. The bottom half has a pocket in which you can either place a gift card or add some money depending on who you are looking to gift it to!

Here's a closer look at the corners and the sentiment. I have used gold foil cardstock for die cutting them. I feel it gives it a very regal look.

I also wanted to some pretty little details to the bottom half of the pocket. I die cut a flourish from gold foil cardstock using the die included in the Shadow Box Ribbon Threader Etched Dies. I also added a die cut ribbon using dies from the same set and adhered it to my card for a finishing touch.


That's it from me today. I hope you enjoyed seeing my projects. I really loved creating with the APG February Die of the Month. This is truly a very versatile set and I would recommend checking out the other inspiration projects using this die set on Becca's blog. There's so much one can do with it!

If you liked my projects and found them inspirational, please leave a comment letting me know. Thank you so much for stopping by!
Have a great day!

Saturday, November 3, 2018

Guest Post using CrafTreat Stencils | Part Two


Hello everyone!
I am back to share some projects I made using the amazing stencils from CrafTreat's September 2018 Release. I am in love with their layered florals and amazing background stencils. So much variety to work with here! I have a total of SIX projects to share today, so let's dive right into it!


I have used the Tropical Leaves stencil for my first card. This is such a fun stencil and is so versatile to work with!


To create this card, I began by die cutting a scalloped circle frame from Neenah Classic Crest Solar White cardstock. Once the frame was die cut, I used two inks from Altenew's Tropical Forest Mini Dye inks to color the background using the Tropical Leaves stencil.


Next, I stamped, coloured, and fussy cut some animals and placed them on my card base where I had cut out the circle frame. I also fussy cut some leaves and popped them on foam dots to add some dimension to my card. I added a stamped and die cut sentiment to finish off my card.


Card Two - CrafTreat Stencils - 2 Step Peony & Tropical Leaves


I love combining my craft supplies to give them a new look and that's what I did for this card as well. I used two stencils - 2 Step Peony & Tropical Leaves to create this card. 


The peonies were coloured using Altenew's Rose Petal inks. I coloured, fussy cut them, and placed them on my light blue ink blended background to create the focal for my card. I used the Tropical Leaves stencil for creating the leaves on my card. I coloured them using Altenew's Tropical Forest Mini Dye inks and then fussy cut them to place on my card panel. 


I also added a mix of some Altenew filler flowers (from the Beautiful Day stamp set) to give a fuller look to the arrangement. I added a piece of black and white patterned paper on the bottom of my card which is from Papericious' Monochrome paper pack. Finally, I stamped a sentiment on my card panel and that's about it! I love how this card came together!


Next up, I am sharing a set of two bookmarks I made using the CrafTreat Stencil - Lily and Iris.

I really loved how these turned out! They make for such pretty gifts to be given to any bookworm! To create these bookmarks, I used the Lily and Iris stencil with the Tombow Colorless Blending Pen and dye inks to stencil the designs on the bookmarks. I used a colorless blending pen here so that it would add a soft look to the design. If you don't have dye inks in your stash, you can work with Distress inks as well. Distress inks are very vibrant in nature, but when used with a colorless blending pen give you very beautiful results.


I used Altenew's Shades of Purple Mini Dye inks + Distress ink - Twisted Citron + Tombow Colorless Blending Pen to create the bookmark on the left, while I used Distress inks: Peacock Feathers & Twisted Citron + Tombow Colorless Blending Pen to create the bookmark on the right. I wanted to leave them as is, but then decided to add some black paint splatters and a stamped sentiment to complete the look. 


Lastly, I have two money envelopes to share I made using stencils. These stencils can be used to create a lot of interesting designs on the background of envies. Here's how I used them!

Money Envelope One - CrafTreat Stencils - Leaf Pattern Background & 2 Step Peony.

I have to admit, this envelope isn't one of my favourites, because I ended up making a major mistake in the background. I wanted the coral flowers to have a grey backdrop, but unfortunately the grey ink I used turned out to be a dark grey which almost looks like black. But I still wanted to share it with you all to give you an idea on how to creatively stretch your stencils. I used the 2 Step Peony stencil to create the flowers on my envelope. I coloured and fussy cut them and placed it on a oval lace die cut. The background for the envelope was made using the Leaf Pattern Background stencil.


This is how the flap of the envelope looks. I extended the design to the back as well to give it a more finished look. The small rose bunch is made using the Mini Rose Background stencil.


This envelope is more of my usual style and I am happy with the way it turned out! I used Sakura Modelling Paste mixed with Papericious Rajni Chawla's - Crystal Clear Glitter to create a white sparkly paste, and used this paste with the Daisy Background stencil to create the background. Once it dried, I used Distress inks - Squeezed Lemonade and Spun Sugar to create a watercolour splash on the background.


Here's how the background looks. The Papericious Crystal Clear Glitter adds a subtle shimmer to the background.


And here's how the flap of this envelope looks. I followed the same method to create the background even here. Doesn't it look pretty? 


I hope you liked my projects and found them inspirational. If you liked them, please do leave a comment below. I would love to hear from you! If you have any queries regarding any of the products or techniques used on my prooejcts, please feel free to ask me.

Thank you so much for stopping by!

Saturday, December 27, 2014

An Envelope and Gift Bag

Hello friends!!
I'm back again sharing with you the very last post for this year and it's NOT a card. Hehehe :D Jokes apart, recently though, I had been asked by my cousin to create a very large gift bag approximately measuring 20 inches X 15 inches in size. She wanted to gift to her MIL and she wanted an exclusive envelope to go with it and this is what I came up with.
The sad part though, is that the pictures I clicked are from my phone camera and are not very good quality ones. So please bear with me!

The gift envelope :

 The gift bag! 

 A close up of the decorated panel :

Since the gift bag was very large in size, the only thing I could think of creating was to create a panel for it which I did using cardstock and DCWV pattern paper. I have added punched laces using the Martha Stewart Doily Lace punch colored with Tim Holtz Distress Stains- Spun Sugar. The flowers and the leaves are created using Cheery Lynn Medium Tea Rose die. I'm totally in love with this die as this helps cut five different layers of flowers in one go plus it also cut and embosses the leaves, all in one go. This really saves time on die-cutting and plus the results are really beautiful. :-) I've used handmade paper to create my roses and leaves.

The gift envelope was embossed using Cuttlebug Swiss Dots embossing folder and added a Spellbinders die panel and again used the Cheery Lynn Tea Rose Medium die to make my flowers and foliage. The glittered alphabets are die-cut using glittered Washi tape and Memory Box Alphabet Soup die.

Supplies used :
Gift bag base- Local buy
Patterned paper- DCWV
Punches- Martha Stewart Doily lace.
Dies- Cheery Lynn Tea Rose Medium die, Spellbinders Radiant Rectangles die, Joy! Crafts Lily Angle Corner 2 die, Memory Box Alphabet Soup die.
Inks- Distress Stain - Spun Sugar.
Stamens , Fillers, Pink Glitter Washi tape, Pearls, Glitter Strips.

Envelope base- Handmade
Embossing folders- Cuttlebug Swiss Dots embossing folder, Sizzix embossing folder (RAK from Piali)
Dies- Cheery Lynn Tea Rose Medium die, Spellbinders Radiant Rectangles die, Memory Box Alphabet Soup die.
Punches - Martha Stewart Doily lace punch, Martha Stewart 3 in 1 Butterfly punch, Jef flower punch.
Pearls and glitter strips.

Challenges entered :
Cheery Lynn - Anything Goes

Hope you like my projects! I would love to hear what you think about them. :)
Have a nice day everyone!

Tuesday, December 31, 2013

Guest Designing for Rainbow Craftykari!

Hi friends,
As, today is the last day of the year and this being my last post for the year, I want to Thank all my bloggy friends and peeps for all the love, support and comments that you always leave for me :) I really, really appreciate it from the bottom of my heart. Wishing you all a very Happy New Year!
Today I am sharing with you, three of my projects which I have made for my Guest Design post for the Rainbow Craftykari store. I have shared these projects along with the detailed tutorial on Maninder's blog. So, if you want to check it out, HERE's the link for it.
Maninder sent me a mixed kit of some gorgeous mulberry flowers, re-inkers, Ultra Thick embossing enamel in gold, cardstocks, pattern papers and various other embellishments as well, and the focus for this month was on how to create backgrounds using Re-inkers and embossing using Gold UTEE! And, this is what I have come up with. First is card, a tag and an gift envelope, all three made with  Re-inkers and embossing. So, here's a look :-                                                      
                                                       

The backgrounds for all the three were created using some fun techniques which I have shared on the Rainbow Craftykari's blog , So do check it out.

Supplies used :- 

(For the card) :
Base Cardstock -Rainbow Craftykari store.
Stamps : Fiskars/Teresa Collins Girly Posh stamp set,Tim Holtz Artistry French Market, Inspired by Stamping Creative tags set.
Inks : Distress Re-inkers Spiced marmalade and Seedless Preserves, Distress Inks Spun Sugar, Shabby Shutters and Scattered Straw., Versafine Onyx Black ink pad, Versamark Embossing ink pad.
PTI Feather die-cuts, Provocraft small tags -RAK from Neha! :)
Martha Stewart 3 in 1 Butterfly punch cut outs - RAK from Sindhu! :)
Gold Ultra Thick Embossing Enamel,Mulberry flowers, Stick Pollens, Hemptique Hemp Mini cord- Orange, Rose buds,Leaves, Seam Binding Ribbon and Pearls.

(For the Tag) :
Base Tag -Handcut.
Dies & Embossing folder : Itsy Bitsy Folder leaves embossing folder, Cheery Lynn Anastasia border die, Ironwork Motifs Oval dies, Ironwork Motifs Scalloped Oval dies, Joy! Crafts Vintage Flourishes -6003/0015.
Punch : Martha Stewart Doily Lace punch.
Stamps : Hero Arts All Occasions Messages stamp, KaiserCraft 75 cents stamp set.
Inks : Distress inks Peacock feathers, and Scattered Straw, Distress re-inkers Spiced marmalade and Seedless Preserves, Versafine Onyx Black ink pad.
Itsy Bitsy glittered strips, Gold Ultra Thick Embossing Enamel, Mulberry flower, Small filler flowers, Studio Calico Wood Veneers- Stars, Hemptique Hemp Mini cord- Orange, Leaves, Seam Binding Ribbon and Pearls.

(For the Envelope) :
Base Envelope -Handcut.
Dies and Embossing folder : Sizzix embossing folder -RAK from Piali :)
Ironwork Classic Oval Dies, Ironwork Scalloped Oval dies, Cheery Lynn Anastasia border die, Cheery Lynn Olive Branches die.
Punch : Martha Stewart 3 in 1 Butterfly punch.
Stamps : Hero Arts Flourish background stamp.
Inks : Distress Re-inker - Spiced Marmalade,Distress inks Peacock Feathers, Shabby Shutters and Scattered Straw, Versamark Embossing ink pad.
Ranger Gold embossing powder, Itsy Bitsy glitter strip,Mulberry flower, Small daisy flowers, Stick pins, Rose-buds and Pearls.

Challenges entered :
Craft DeeBowZAnything Goes and include a handmade bow.
Kaboodle Doodles -Anything Goes
Sentimental Sundays -Tag Your'e it (Entering my tag in it). ( Made it to Top 3 )
Stamping Sensations - Free and easy (Entering my tag).
IBS Customer Gallery Contest -I have used the Creative tags stamp set on my card.

And please, do leave me your comments/suggestions regarding these projects. Would love to hear your views regarding it.
Have a nice day everyone!

Tuesday, June 26, 2012

Few BOXES and an Envelope :)

Hi Everyone,
Like I told you all in My Last post :) I have a few Boxes to Share with you which are Made using the MS Scoreboard !!..I really Had Fun Decorating them after I figured out the proper Measurements for The Lid and the Base :P.. So Here's the Pics :-


  The Below  one ..I have learnt  from You -tube HERE's The Link :-


  Another View :-

                                 
   And Now for the final One :-


        And Now for the Envie :-

                                   
  And the Back Side of the Envie :-


         I had Made this  Envelope on order for My Friend :)She had asked me to Place the Gold Coin in Such a Manner that it would Look a Part of the Design ..So I decided to do a Quilled Sunflower with the Centre as the Gold Coin ...And Embellished it with Two Layers of Pearls to Highlight the Coin in the Centre...In Making this Envie I found that Pie Lane Products {Glitter Balls and Small Butterflies } Really Complimented My Quilled Design and Worked Perfectly...     I was quite happy with the Outcome and so was my Friend :)

Have a good day Everyone:)
And do Drop in Your Comments /Sugggestions !!
P.S : Supplies Used way too Many so if you have any Queries ..Shoot Me an Email or Leave Me a Comment and I will get back to You !!        

Challenges :-
1. Crafty Cardmakers- Make your Own Flowers !!      
2.MIM- Always Anything Goes    
3.Pile it on- Make your Own Embellishments {The Flowers are Handmade  in all  the  4 Projects }
4.Frosted Designs- Make your Own Embellishments {  The Flowers are Handmade  in all  the  4 Projects}


Wednesday, December 7, 2011

SOME ENVELOPES AND B'DAY SHARES:)

HI Friends,
I know I  have been MIA for some time as I was busy with some order,But today I wanted to share some of my Quilled envelopes which I have been making for some time... These envelopes are used to gift money in Marraiges or some Special Functions,So here's a look at them :-

       
  So these are a few of  the most recently made envelopes ..I was starting to miss Quilling and was seeing a lot of different styles of Quilling which I  had not tried before so I  ended up experimenting with the Multi Strips Scrolls which I had seen earlier on Suganthi's blog here.  and also did those Open Loop Flowers in a Bouquet and my fave Punched flowers too.The Third Envie has got some Pie Lane Glitter Balls and Butterflies...Hope you All can See it.
I also wanted to share a few Birthday cards and gift that I got last month...Sorry I am late in Sharing them .....Here's a look at what I  got :-
                                                          ....
    This Beautiful Card and Wooden case was sent by Snehal from all the way from J&K......... The card is just Gorgeous and so is the Case which now hold my Quilling Needle's:)Thank you so much Snehal..;:)
                                         
      This lovely Stamped card was sent by Pooja on behalf of the ICR  Team... Thank you so much you guys :)


I am entering the above Envelopes in the following Challenges:
1.http://justsomelinesblog.blogspot.com/2011/12/new-challenge-handmade-gifts.html(Made Handmade Gift Envelopes)
2http://www.weememories.net/2011/12/challenge-78-sponsored-by-artful.html(Free for All)
3.http://annabellestamps.blogspot.com/2011/12/say-it-withchristmas-1-handmade-gifts.html.Handmade Gift )
4.http://willowsketchiechallenge.blogspot.com/2011/12/willow-sketchie-challenge-1st-december.html (Anything Goes ).
Thats it from Me  ...Hope you guys like my Work...And if you have any queries Drop me a Mail...Try my Best to help you out..Do Leave your Comments/Feedback....:)
Have a Good Day Everyone


Friday, September 9, 2011

AN TEACHER'S DAY CARD AND A BUTTERFLY AWARD.

HI  friends today i posting a card i made for my son's teacher for this teacher's day have a look.
                   
   and now a look at the inside of the card.
   oh and now a look at the envelope i made to give this card in,and here i have to mention that i got this idea of decorating the envelope from snehal of snehal's creation she always makes envelopes for her cards which i think is just great, not many people think so far ahead her's are done so well too. Oh and i also wanted to show the gift that went with this card sorry i know a lot of pic's but bear with me:) so here goes:
 
     and now a little bit about the card ,i have used  only stamping for this card the stamps are from inkadinkadoo the stems and leaves are paper pieced and the butterflies are punched i colored the flowers with faber castell color pencils. inks used are colorbox  burgundy and ala mode pigment inks.the butterfly on the envie is also from inkadinkadoo and stamped with rubberstampede. the carstock is fabriano white and hobby ideas red.
ok onto my butterfly award then which i received from khushboo of something sassy  .There are some rules regarding this award and that is to answer a few question and link the name of the person who has passed you this award and to give this award to fellow bloggers and inform them about it .Ok first let me answer the question here they are:
1.Name your favorite color?  it has to be pink and white.
2.Name your favorite song? i am a sucker for a good romantic  song whether it be a western or hindi one.Here i have to mention that i really love the AIR SUPPLY band they do my kind of music:)
3.Name your favorite dessert:oh i love bitter chocolates especially the" twilight delight" from GHIRARDELLI.
4.what worries you off at the moment:i have some concerns regarding my son ability to write having a tough time as of now,hoping it will improve soon.
5Your favorite pet? love birds or budgriers my husband loves them and we have a few in our house.
6.Black or white? actually both.
7.Your biggest fear?i always fear for the safety of my children ,really get scared if any thing happens to them.
8.Best feature?can i say my loyalty,it seems like an outdated quality but i really value it very much ,especially in my friends:)
9.Everyday attitude?take one day at a time ....phewww.
10.What is perfection?my children's smile's .
11.Guility pleasure?as of now it has to be buying craft supplies constantly,whether i need it or not:)
12.When you are upset?give a call to my mom immediately so i can chew her ear off with my troubles:
I would like to pass this award to all my fellow bloggers who has ever  left a comment on my blog thank u all so much.                                                          

Thursday, April 28, 2011

CARD OR ENVELOPE.

Hi friends this time i have something new to show .i have been experimenting with different ways i could make a envelope but which would also serve as a small card and this is what i have come up with
     and i also wanted to show how the inside looks like so here goes
   in cream color card i have made a small pouch in which one can place  money or a gift coupon,and in the pink card i have stuck an small envelope.And for those of who are wondering what the card base is i have recycled old wedding cards of course since they make for good background in the absence of a cuttle bug,which i don't posses.
                            hope u guys like it.