Friday, September 30, 2016

Congratulations | Card

Hello, friends!
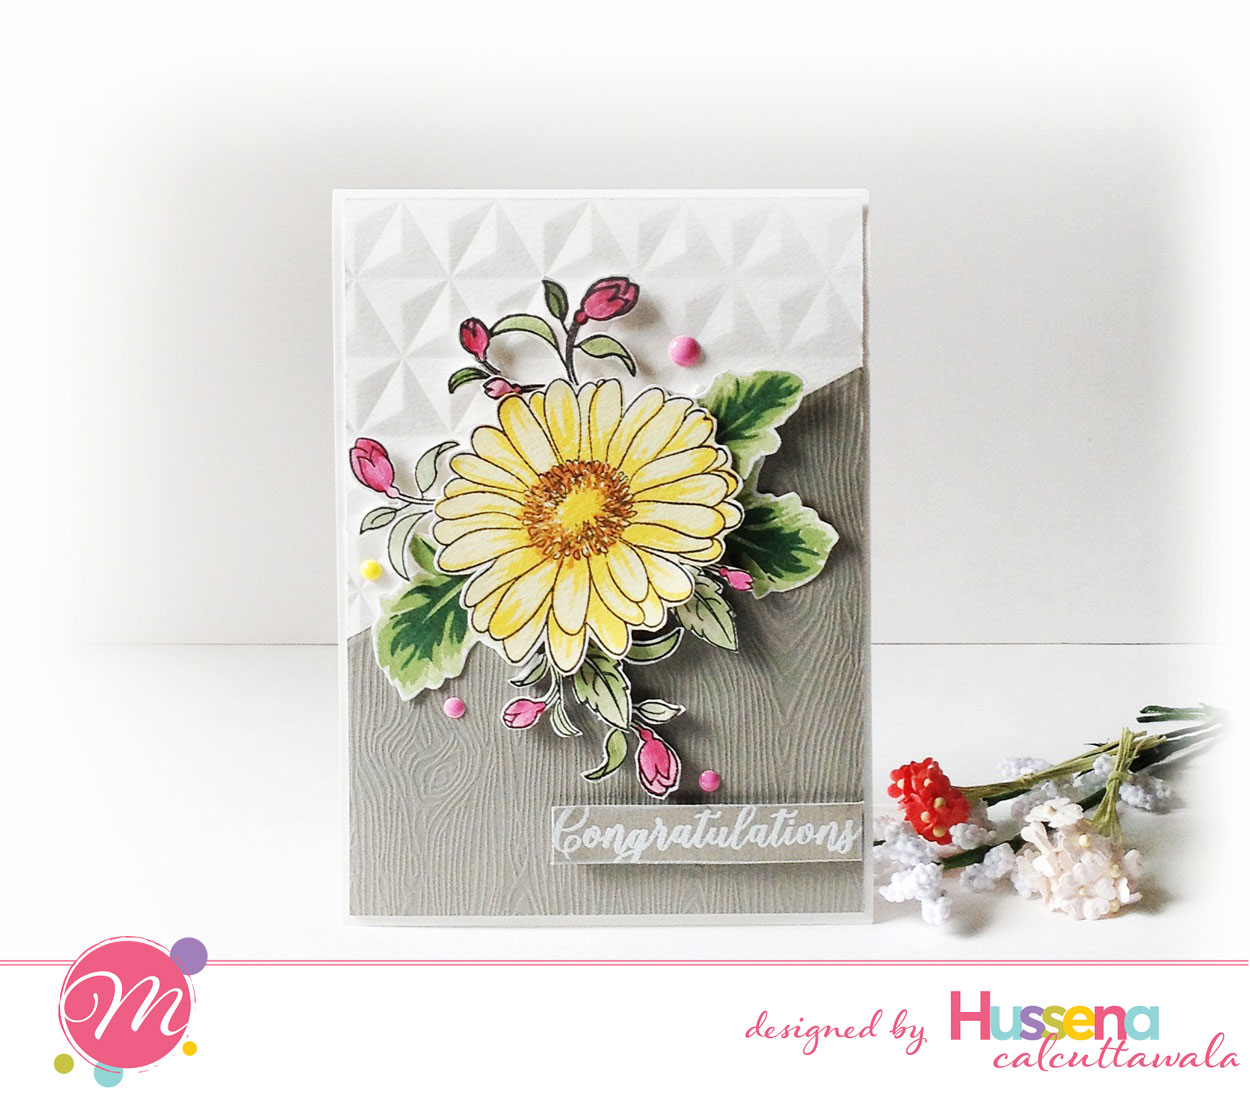
I'm blogging again after a short break. I have a lot of cards to share with you all in the upcoming days. In the mean time, here's a look at a card I created for my DT post at the Mudra blog.


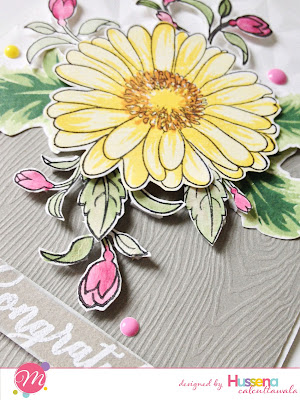
Close-up of the Gerberas :


Here's how I created it :
To begin, I took a gray woodgrain textured cardstock from American Crafts and cut it at an angle, then I dry-embossed a white piece of cardstock using a 3D embossing folder by We R Memory Keepers & glued both the panels on a white card front. I stamped the Gerbera Blooms using Versafine Onyx Black ink and two shades of yellow inks from Altenew & fussy-cut it and popped it on foam dots. Did the same for the leaves. The inks I used for stamping the leaves are from the Altenew - Green Fields set. I also stamped & watercolored some leaves & buds from the Hummingbirds set and fussy-cut it and added it as a foliage against the Gerbera. Added a sentiment from the Sentiment Essentials and some enamel dots to finish off my card.


So, did you like my card? Let me know in the comments below if you did :)

I'm entering this in the STAMPlorations Sketch Challenge, Mod Squad Challenge Blog- Falling Leaves, Simon Says Stamp - Anything Goes, Word Art Wednesday- Anything Goes and Get Creative Challenges- Embossing


Thank you so much for stopping by! Have a nice day everyone :)

Thursday, September 22, 2016

MFT Florals | Card Two

Hello, friends!
Back again with my second submission for the MFT Superstar Contest. This time around, I have used the same stamp set as the previous one which is the MFT Desert Blooms set, but I have tried to play with some unusual colours using the same set, here's a look :


For this card, I have used cream cardstock from MFT as my base. This cardstock has some interesting texture in it and it's the most gorgeous shade of cream. I first embossed the background using the MFT Mini Chicken Wire Cover Plate then did some wet embossing using texture paste and the Grid Stencil from MFT adding a slight hint of blue color to the paste. Added some black spatters and stamped the flowers and leaves using just two shades of ink : Altenew Ruby Red and Dark Chocolate ink. The gears are die-cut from another MFT Die-namics called Time Pieces.This was distressed using Dark Chocolate ink as well. I finally added some gold glitter die-cut leaves and flourishes. The sentiment is from a SSS Stamp set .

I hope you like it. Do leave me your comments/suggestions regarding it. Have a nice day everyone!


MFT Florals | Card One

Hello, friends!
Today I have two cards to share. I'll be sharing the first card here and the second one in the next post.
After a very longggg time, I have made cards to participate in challenges. I have been so tied up with all my DT work that I have recently not got any time to play with the new goodies in my stash.
I made this card for the MFT Superstar Contest. I'm literally giving a last moment entry. This contest has been so popular that people have been entering in this contest through all medias.  Here's a look at my card first :


Although, I have a lot of dies from MFT & even stencils, I seem to have only one stamp from this company which I recently got & that is the Desert Blooms. I've used this set to create both my cards. Also, I have die-cut some glitter flourishes using the Die-namics Fancy Flourish. 
This card was pretty easy to put together. I did some light blending on a piece of cardstock using Tumbled Glass Distress ink, added some black & gold coloured splatters, stamped the flowers & leaves & fussy-cut them and popped them on foam dots and adhered everything on my card base along with a stitched die-cut circle which was colored using distress inks as well. Finally added a die cut sentiment to finish off my card.

Supplies used :
Off - white cardstock, MFT Desert Blooms Stamp Set, MFT Fancy Flourish die, Distress inks, Altenew inks, Gina Marie Stitched Circle dies, Die-Versions 'Celebrate' Sentiment die.


I hope you like my card. Please do leave me your views regarding it. Would love to hear from you.

Monday, September 19, 2016

Sneak Peek | Cards

Hi, crafty friends!
I'm sharing some cards today at the MUDRA blog using their newest stamps from the September Release. Here's a sneak peek for you :


I am sharing a total of 4 cards. Do visit the blog for the complete reveal and don't forget to leave me a comment there. I would love to hear your views regarding it :)


Have a nice day everyone!

Tuesday, September 13, 2016

Gift Bag & Notecards | Photo Tutorial

Hi, crafty friends!
I'm posting after a short hiatus on my blog :D
Today, I have a very quick and easy tutorial to share for making a beautiful card pouch. I really had a lot of fun creating this. My son has a male class teacher & coming up with a gift for him for Teachers' Day was quite a challenge as I usually tend to create quite feminine project, so I was pretty happy to work with the newest collections from Papericious which has some really good masculine tones. 
Warning - It's a picture heavy post.

Here's a look at the card pouch :


Here's how it looks when opened up :

I have embellished the insides using pattern papers from the Mi Estilo collection. The bow-tie & sentiment have been fussy-cut from the Gentleman pack. (The papers used here are all from Papericious)

As you can see, it has two pockets and can hold 4 X 4 inch notecards with coordinating envelopes and also there is enough space to hold a candy bar of your choice.

The note-card & coordinating envelope :


The trio together!


The back side of the pouch :


- - - - - - - - - - - - - - - - - - - - - - - - - - - - - - - - - - - - - - - - - - - - - - - - -
Here's the tutorial on how to create this :

TUTORIAL

Step 1 - Take a 12 X 5" piece of cardstock and score at 5 1/2 and 6 1/2 inches.

Step 2 - To create the inside pockets, take TWO pieces of 2 3/4 inches X 5 3/4 inches piece of cardstock.

Step 3 - Score at 1/4 inch TWICE on three sides of this cardstock and fold it to form the pocket. Cut out the two squares on the sides to help create a crisp pocket-fold.

Step 4 - To create handles of the card pouch, you can either use any punch of your choice or a die, I have used Spellbinders Label 4 to create my handles.

After die-cutting the handle looks like this :

Step 5 - To further embellish the handles, create a frame using the same die set. I have distressed it using Hickory Smoke Distress ink. ( I have used the Papericious Craft Sheet & Ink Blending Tool )

Step 6 - To embellish the front & back of the pouch, I have used different pattern papers from Mi Estilo and the Gentleman pack.

The Note card and the co-ordinating envelope were also made using these papers.

For the pouch, I die-cut a scalloped border panel using papers from the Mi Estilo collection and layered it with another paper from the same collection. I then made a handmade flower again die-cut using papers from the Mi Estilo pack. Added few leaves, filler flowers and the sentiment, and my bag was ready :)

For the note-card, I have used die-cuts from the Infinity Collection. I have used three different pattern papers from the Mi Estilo collection.

For the envelope, I have again used a die-cut from the Infinity pack.


Hope you liked the tutorial and give it a try. I would love to hear your views on it :)

Linking this to Eclectic Ellapu- Gifts, Challenge up your life- Lace (Have used paper lace on both the gift bag & envelope), Crafty Catz- Anything but square (entering my bag only), Jo's Scrap Shack - 3 colors (Red, Gray and Green), 2 embellishments (2 kinds of filler flowers and enamel dots), 1 technique- Die-cutting, Just add ink - Just add P (Pattern papers).

Have a nice day everyone!